
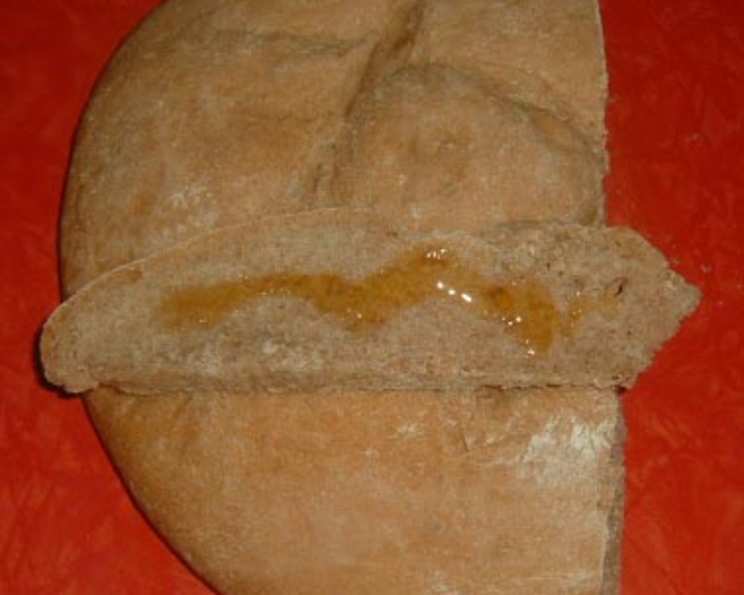
Dark Tuscan Bread (Pane Toscano Scuro): A Taste of Rustic Italy
The memory still lingers – the warmth radiating from a small bakery in Florence, the earthy aroma of freshly milled wheat mingling with the faint scent of yeast. I was barely ten, clutching a few Euros my grandfather had pressed into my hand, and I used it to buy a thick slice of Pane Toscano Scuro. The crust, dark and hearty, gave way to a surprisingly soft interior, its flavor deeply satisfying. It was simple, honest bread, and it ignited a lifelong passion for baking in me.
Recipe Overview
- Prep Time (Starter): 10 minutes
- Rise Time (Starter): 6-12 hours
- Prep Time (Dough): 20 minutes
- Rise Time (Dough – First Proof): 1-1.5 hours
- Rise Time (Dough – Second Proof): 45-60 minutes
- Cook Time: 35-45 minutes
- Total Time: 24 hours 40 minutes (approximate, includes starter fermentation)
- Yields: 2 large ruota (wheel) or one large loaf
- Dietary Type: Vegetarian
Ingredients
For the Starter (Biga):
- 1 teaspoon active dry yeast (6 g)
- ⅔ cup warm water
- 1 ⅓ cups unbleached all-purpose flour (175 g)
For the Dough:
- 1 ¼ teaspoons active dry yeast (9 g)
- ⅓ cup warm water
- 1 cup water, room temperature
- ¼ cup unbleached all-purpose flour (30 g)
- 3 ¾ cups stone-ground whole wheat flour (475 g)
- Cornmeal, for dusting
Equipment Needed
- Large mixing bowl
- Wooden spoon or electric mixer with paddle attachment
- Plastic wrap
- Floured work surface
- Lightly oiled bowl
- Baking sheet or baking peel
- Clean kitchen towel
- Sharp knife or razor blade
- Cooling rack
Instructions
-
Prepare the Starter (Biga): In a mixing bowl, stir the active dry yeast into the warm water. Let it stand for 10 minutes, or until the yeast becomes creamy and frothy, indicating that it’s active.
-
Combine and Mix: Add the unbleached all-purpose flour to the yeast mixture. Stir vigorously with a wooden spoon, using about 100 strokes. Alternatively, use the paddle attachment of an electric mixer and mix for 1 minute until a homogenous dough forms. The starter should be quite stiff.
-
First Fermentation (Starter): Cover the bowl tightly with plastic wrap. Let the starter rise in a warm place until it has tripled in volume. This may take anywhere from 6 hours to overnight, depending on the temperature of your kitchen. This long fermentation develops the complex flavors characteristic of this bread.
-
Activate Yeast (Dough): In a separate bowl, stir the active dry yeast for the dough into the warm water. Let it stand for 10 minutes until creamy, ensuring the yeast is active.
-
Combine Wet Ingredients (Dough): Add the room temperature water and the fully fermented starter to the yeast mixture. Stir vigorously or squeeze the mixture between your fingers to break up the starter and incorporate it fully into the water. This ensures even distribution throughout the dough.
-
Incorporate Flours (Dough): Gradually add the unbleached all-purpose flour and the stone-ground whole wheat flour to the wet ingredients, adding the flours in two additions and stirring until thoroughly mixed after each addition. This ensures the flour is properly hydrated and prevents lumps from forming.
-
Knead the Dough: Turn the dough out onto a lightly floured work surface. Knead the dough until it becomes firm and resilient, about 8 to 10 minutes. The dough will be slightly sticky but should hold its shape. Add a little flour if necessary, but avoid adding too much, as this can result in a dry bread.
-
First Proof (Dough): Place the dough in a lightly oiled bowl, turning to coat. Cover the bowl tightly with plastic wrap to prevent it from drying out. Let the dough rise in a warm place until it has doubled in volume, approximately 1 to 1 ½ hours.
-
Shape the Loaf(ves): Turn the risen dough out onto a lightly floured surface. Punch it down gently to release any trapped air. Shape the dough into one large round loaf or two oval loaves, depending on your preference.
-
Second Proof (Dough): Place the shaped loaf(ves) on a baking peel sprinkled generously with cornmeal or on an oiled baking sheet. The cornmeal will prevent the bread from sticking. Dust the top(s) of the loaf(ves) lightly with flour. Cover them with a lightly dampened kitchen towel to prevent a crust from forming. Let them rise until doubled again, approximately 45 to 60 minutes.
-
Preheat the Oven: While the dough is undergoing its second proof, preheat your oven to 450°F (232°C).
-
Score the Loaf(ves): Just before baking, score the top of the loaf(ves) with a sharp knife or razor blade in a “tic-tac-toe” pattern. This allows the bread to expand evenly during baking and prevents it from cracking uncontrollably.
-
Bake the Bread: Carefully slide the loaf(ves) from the cornmeal-sprinkled peel onto a baking sheet sprinkled with cornmeal. If using an oiled baking sheet instead of a peel, simply place the baking sheet in the oven. Bake for 15 minutes at 450°F (232°C).
-
Lower Temperature and Continue Baking: Turn the oven temperature down to 400°F (204°C). Bake for an additional 20 minutes for smaller loaves or 25 to 30 minutes for a large loaf.
-
Check for Doneness: The loaf(ves) are done when they sound hollow when tapped on the bottom. An internal temperature of 200-210°F (93-99°C) is also a good indicator of doneness.
-
Cool the Bread: Transfer the baked loaf(ves) to a wire cooling rack and let them cool completely before slicing. This is crucial to prevent the bread from becoming gummy.
Expert Tips & Tricks
- Starter Hydration: The starter is intentionally stiff. This helps develop flavor. Don’t be tempted to add more water.
- Oven Spring: For a better oven spring, try placing a pan of hot water on the bottom rack of the oven during baking. The steam will help the crust form properly and allow the bread to rise more fully.
- Scoring: Scoring deeply is important to direct the oven spring, but don’t cut all the way through the loaf. Aim for about 1/2 inch deep.
- Flour Quality: The quality of the flour greatly impacts the final result. Use high-quality, freshly milled whole wheat flour for the best flavor.
- Adjust for Altitude: If you live at a high altitude, you may need to adjust the rising times and baking times.
- Autolyse: Consider autolysing the flour and water (for the dough) for 30 minutes before adding the yeast and starter. This allows the flour to fully hydrate, resulting in a more extensible dough.
Serving & Storage Suggestions
- This dark Tuscan bread is best enjoyed fresh, within a day or two of baking.
- Serve it alongside hearty soups, stews, or pasta dishes. It’s also delicious with olive oil and balsamic vinegar.
- Store leftover bread in a breadbox or wrapped tightly in plastic wrap at room temperature.
- For longer storage, slice the bread and freeze it in an airtight container for up to 2 months. Thaw completely before serving.
- Stale bread is excellent for making croutons, breadcrumbs, or using in classic Tuscan dishes like panzanella or pappa al pomodoro.
Nutritional Information
| Nutrient | Amount per Serving (estimated) | % Daily Value |
|---|---|---|
| Calories | 1136 kcal | N/A |
| Total Fat | 48 g | 4% |
| Saturated Fat | 0.9 g | 4% |
| Cholesterol | 0 mg | 0% |
| Sodium | 20.2 mg | 0% |
| Total Carbohydrate | 240.5 g | 80% |
| Dietary Fiber | 31.1 g | 124% |
| Sugars | 1.2 g | 4% |
| Protein | 42.8 g | 85% |
Note: Nutritional information is an estimate and may vary based on specific ingredients and portion sizes.
Variations & Substitutions
- Spelt Flour: Substitute some of the whole wheat flour with spelt flour for a slightly sweeter and nuttier flavor.
- Rye Flour: Add a small amount of rye flour (about ¼ cup) for a more complex flavor profile.
- Seeds: Incorporate seeds like sunflower, pumpkin, or flax seeds into the dough for added texture and nutritional value.
- Herbs: Add dried herbs such as rosemary, thyme, or oregano to the dough for an aromatic twist.
- Salt: Traditional Tuscan bread is saltless. However, you can add salt (about 1-2 teaspoons) to the dough if you prefer a more savory flavor.
FAQs (Frequently Asked Questions)
Q: Why is this bread saltless?
A: Traditional Tuscan bread is made without salt due to a historical tax on salt in the region. The lack of salt allows the other flavors of the bread and accompanying dishes to shine through.
Q: Can I use a stand mixer for kneading?
A: Yes, you can use a stand mixer with a dough hook to knead the dough. Knead on low speed for about 8-10 minutes, or until the dough is smooth and elastic.
Q: How can I tell if my starter is ready?
A: A ready starter will have tripled in size, be bubbly throughout, and have a slightly tangy aroma.
Q: Can I make this bread with only all-purpose flour?
A: While you can, the flavor and texture will be different. The whole wheat flour provides a more rustic and hearty character to the bread.
Q: My bread is dense. What went wrong?
A: Several factors can cause dense bread, including insufficient rising time, using old yeast, or not kneading the dough properly. Ensure your yeast is fresh, allow the dough to rise fully, and knead it until it is smooth and elastic.
Final Thoughts
This Dark Tuscan Bread is more than just a recipe; it’s a connection to a place, a culture, and a tradition. The simple act of mixing flour, water, and yeast transforms into a deeply satisfying and flavorful loaf that embodies the rustic charm of Tuscany. I urge you to try your hand at this recipe, embrace the process, and enjoy the rewarding experience of baking your own authentic Pane Toscano Scuro. Share it with friends and family, and let the flavors of Italy transport you to sun-drenched hills and bustling markets. Buon appetito!