
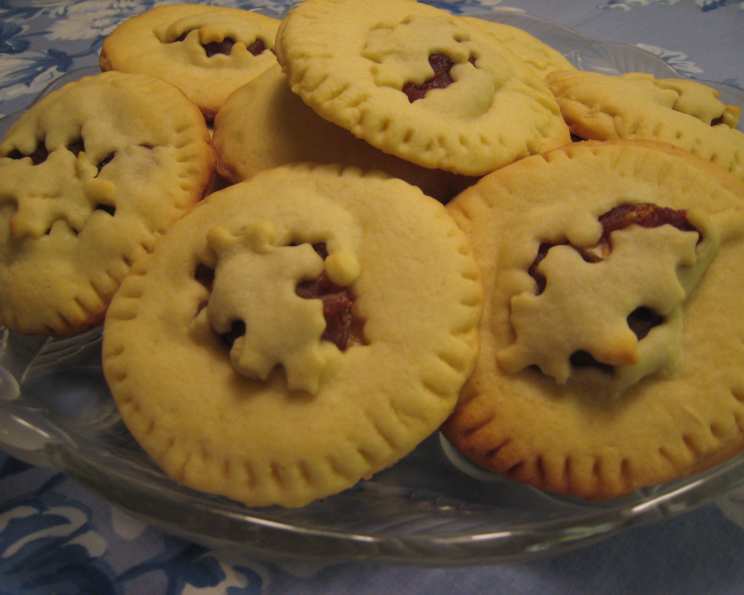
Date Tart Cookies: A Taste of Nostalgia
There’s a certain type of cookie that just screams “comfort,” and for me, it’s always been a filled cookie, especially one boasting a rich, sweet date filling. As a child, I remember my grandmother, a woman whose hands seemed permanently dusted with flour, carefully crimping the edges of these little tarts with a fork. The aroma of dates simmering on the stove would fill the kitchen, a promise of warm, sweet treats to come. Each bite was a little piece of her love, a connection to family history, and a reminder that the simplest things are often the most delicious.
Recipe Overview
- Prep Time: 45 minutes (plus 2 hours chilling)
- Cook Time: 12-15 minutes
- Total Time: 2 hours 57 minutes – 3 hours
- Yields: 30 cookies
- Serves: 30
- Dietary Type: Vegetarian
Ingredients
Cookie Dough:
- ½ cup butter or margarine, softened
- 1 cup brown sugar, firmly packed
- 2 eggs
- 1 teaspoon vanilla
- 2 cups all-purpose flour
- ½ cup wheat germ, unsweetened and toasted
- ½ teaspoon salt
- ½ teaspoon nutmeg
- ¼ teaspoon baking soda
Date Filling:
- 1 ½ cups pitted dates, lightly packed
- ½ cup water
- 2 tablespoons honey
- ½ teaspoon vanilla
Equipment Needed
- Large bowl
- Electric mixer
- Small pan
- Spoon
- Plastic wrap
- Well-floured board
- Rolling pin
- 3-inch cookie cutter
- Greased baking sheets
- Fork
- Wire racks
Instructions
-
Prepare the Cookie Dough: In a large bowl using an electric mixer, beat the softened butter or margarine and brown sugar together until the mixture is creamy and well combined.
-
Add Wet Ingredients: Beat in the eggs one at a time, followed by the vanilla extract. Make sure each egg is fully incorporated before adding the next.
-
Combine Dry Ingredients: In a separate bowl, stir together the all-purpose flour, wheat germ, salt, nutmeg, and baking soda. Whisking ensures even distribution.
-
Combine Wet and Dry: Gradually add the dry ingredients to the butter mixture, blending thoroughly with the electric mixer until just combined. Be careful not to overmix, as this can lead to tough cookies.
-
Chill the Dough: Cover the cookie dough tightly with plastic wrap and refrigerate for at least 2 hours, or up to 3 days. This chilling period is crucial for the dough to become firm enough to handle and prevents the cookies from spreading too much during baking.
-
Prepare the Date Filling: In a small pan, combine the pitted dates, water, and honey.
-
Cook the Filling: Cook the mixture over medium heat, stirring and mashing the dates with a spoon, until the mixture is thick and smooth. The dates should break down completely and the water should evaporate, leaving a luscious, jam-like consistency.
-
Flavor the Filling: Stir in the vanilla extract.
-
Cool the Filling: Let the date filling cool completely. Then, cover it and refrigerate it until you are ready to assemble the cookies. Chilling helps the filling firm up, making it easier to handle.
-
Preheat the Oven: Preheat your oven to 350°F (175°C). Make sure your oven rack is in the center position for even baking.
-
Roll Out the Dough: Take out about 1/3 of the chilled dough, leaving the remaining dough in the refrigerator to keep it firm. On a well-floured board, roll out the dough to 1/16-inch thickness. This is quite thin, so work carefully. Use extra flour as needed to prevent sticking.
-
Cut Out the Cookies: Cut out the dough with a 3-inch cookie cutter. You can use different shapes if you prefer, but a 3-inch circle is classic.
-
Assemble the Cookies: Place half of the cookies slightly apart on greased baking sheets. Spoon a heaping teaspoonful of the chilled date filling onto the center of each cookie.
-
Top and Seal: Cover each filled cookie with another cookie and gently press the edges together with a floured fork to seal them. This not only seals the filling inside but also creates a decorative crimped edge.
-
Decorate (Optional): Decoratively slash the top of each cookie with a sharp knife if desired. This allows steam to escape during baking and adds visual appeal.
-
Bake: Bake in the preheated 350°F (175°C) oven for 12 to 15 minutes, or until the cookies are lightly browned around the edges.
-
Cool: Transfer the baked cookies to wire racks and let them cool completely.
-
Store: Store the cooled cookies in an airtight container.
Expert Tips & Tricks
- Toasting the wheat germ enhances its nutty flavor. Spread it on a baking sheet and toast it in the oven at 350°F for about 5-7 minutes, or until lightly golden and fragrant. Watch it carefully to prevent burning.
- If the dough becomes too soft while rolling, simply return it to the refrigerator for a few minutes to firm up.
- For a richer flavor, use brown butter in the dough. Simply melt the butter in a saucepan over medium heat and cook until it turns a golden brown and smells nutty. Let it cool slightly before using.
- Make sure your baking sheets are properly greased to prevent the cookies from sticking. You can also use parchment paper for easy cleanup.
- For a shinier finish, brush the tops of the cookies with a mixture of egg yolk and milk before baking.
Serving & Storage Suggestions
These date tart cookies are delicious served at room temperature. They pair perfectly with a cup of tea, coffee, or even a glass of cold milk. For a special treat, serve them with a scoop of vanilla ice cream.
To store, place the cooled cookies in an airtight container. They will last for about 3-5 days at room temperature or up to a week in the refrigerator. For longer storage, you can freeze them for up to 2 months. Thaw completely before serving.
Nutritional Information
| Nutrient | Amount per Serving | % Daily Value |
|---|---|---|
| Calories | 127.1 kcal | N/A |
| Calories from Fat | 33 g | 26% |
| Total Fat | 3.7 g | 5% |
| Saturated Fat | 2.1 g | 10% |
| Cholesterol | 22.2 mg | 7% |
| Sodium | 79.3 mg | 3% |
| Total Carbohydrate | 22.4 g | 7% |
| Dietary Fiber | 1.2 g | 4% |
| Sugars | 13.9 g | 55% |
| Protein | 2 g | 3% |
Note: Nutritional information is an estimate and may vary based on specific ingredients and portion sizes.
Variations & Substitutions
- Gluten-Free: Substitute the all-purpose flour with a gluten-free blend. You may need to add a binder like xanthan gum to help the cookies hold their shape.
- Vegan: Replace the butter with a vegan butter substitute and the eggs with flax eggs (1 tablespoon ground flaxseed mixed with 3 tablespoons water per egg). Ensure the honey in the filling is replaced with agave or maple syrup.
- Spice it Up: Add a pinch of cinnamon or cardamom to the date filling for a warmer, more complex flavor.
- Nutty Addition: Incorporate chopped walnuts or pecans into the date filling for added texture and flavor.
- Citrus Zest: A little lemon or orange zest in the dough can brighten the flavor.
FAQs (Frequently Asked Questions)
Q: Why do I need to chill the dough?
A: Chilling the dough allows the gluten to relax, preventing the cookies from becoming tough. It also firms up the butter, which helps the cookies maintain their shape during baking and prevents excessive spreading.
Q: Can I use different types of dates for the filling?
A: Yes, you can use Medjool, Deglet Noor, or any other variety of dates you prefer. Medjool dates will result in a softer, more caramel-like filling.
Q: My date filling is too thick. What can I do?
A: Add a tablespoon or two of water to the filling and cook it over low heat, stirring constantly, until it reaches the desired consistency.
Q: How can I prevent the cookies from sticking to the baking sheet?
A: Make sure to grease the baking sheet thoroughly or line it with parchment paper.
Q: Can I freeze these cookies?
A: Yes, these cookies freeze well. Store them in an airtight container for up to 2 months. Thaw completely before serving.
Final Thoughts
These Date Tart Cookies are more than just a simple treat; they are a little piece of history, a warm hug from the past, and a delicious way to connect with loved ones. I encourage you to try this recipe and experience the joy of creating something truly special. Don’t be afraid to experiment with variations and substitutions to make it your own. And most importantly, share your creations with those you care about. I’d love to hear about your baking adventures and any personal touches you add to this classic recipe! Happy baking!