
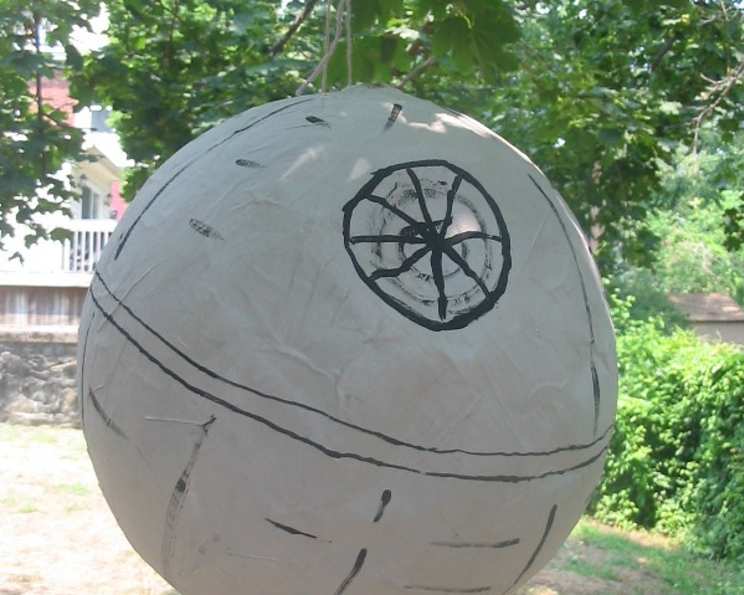
Death Star Piñata with Lightsaber Stick: A Culinary Galaxy Far, Far Away
I remember the sheer joy on my nephew’s face when he finally shattered the Star Wars piñata I’d painstakingly crafted for his tenth birthday. He was, and still is, completely obsessed with everything Star Wars, and this piñata, shaped like the infamous Death Star, was the ultimate centerpiece. The eruption of candy as it burst open, a miniature explosion of galactic goodies, remains a treasured memory—a testament to the power of fandom and a little bit of DIY magic. Now, I’m sharing my recipe, so that you can have the same magical experience with your family.
Recipe Overview
- Prep Time: 99 hours (includes drying time)
- Cook Time: None
- Total Time: 100 hours
- Yields: 1 piñata & stick
- Dietary Type: Not applicable
Ingredients
FOR THE PIÑATA:
- 1 large balloon (punch ball)
- Newspaper, torn into strips
- Papier Mache Paste (see recipe below)
- Silver Powdered Tempera Paint (non-toxic)
- Black Powdered Tempera Paint (non-toxic)
- Heavy String (as much as you need)
- Scotch Tape
- Candy and small toys to fill the piñata
FOR THE LIGHTSABER:
- 1 Broom Stick
- 2 sheets Sky Blue Craft Foam (8 1/2-inch x 11-inch)
- 1 sheet Grey Thin Craft Foam (8 1/2-inch x 11-inch)
- Hot Glue
Papier Mache Paste Recipe:
- 1 cup all-purpose flour
- 2 cups cold water
- 2 cups boiling water
- 1 tablespoon salt
Equipment Needed
- Large bowl
- Whisk
- Paintbrushes
- Scissors
- Hot glue gun
- Protective surface for painting
Instructions
- Prepare the Papier Mache Paste: In a large bowl, whisk together the flour and cold water until smooth. Stir in the boiling water, mixing constantly to prevent lumps. Add the salt and mix well. Let the paste cool completely before using.
- Inflate the Balloon: Inflate the balloon until it is as large and round as possible. Tuck the end of the balloon into itself, securing it with tape if necessary, to prevent it from deflating too quickly.
- Apply the First Layer of Papier Mache: Dip a strip of newspaper into the cooled papier mache paste, ensuring it is fully coated. Remove any excess paste by running the strip between your fingers. Lay the coated newspaper strip onto the balloon, smoothing it as much as possible with your hand. Repeat with more newspaper strips, overlapping each strip slightly, until the entire balloon is covered.
- Dry the First Layer: Let the covered balloon dry overnight, or for about 12 hours, until the papier mache is completely hard. This is crucial for a sturdy piñata.
- Apply Additional Layers: Repeat step 3 at least twice, creating a total of 3-4 layers of papier mache. More layers will result in a stronger piñata. Allow each layer to dry completely before adding the next. The surface should be very hard to the touch when finished.
- Create the Trap Door: Once the final layer of papier mache is completely dry, carefully cut a “trap door” on one side of the piñata. A 3″ x 3″ square is a good size. This will be used to fill the piñata with candy and treats.
- Remove the Balloon: Carefully detach the balloon from the inside of the piñata through the “trap door”. Deflate the balloon and remove it completely.
- Painting the Death Star: Paint the entire piñata with silver tempera paint. Allow the paint to dry completely. Repeat until the ball looks uniform and no newspaper shows through. You may want to apply a “primer” coat of neutral-colored paint before the silver for better coverage.
- Add Death Star Details: Once the silver paint is dry, paint “Death Star” details in black. Paint a black line around the “equator” of the piñata. On one side, near the top, paint a medium-sized (about 4″ diameter) black circle, and then add decreasingly smaller black circles inside to create the “superlaser” disk. Add some vertical and horizontal black lines around the surface to suggest further details.
- Attach the Hanging String: Once all the paint is dry, attach a heavy string to the top of the piñata for hanging. Poke two small holes in the top of the piñata and thread the string through, knotting it securely inside.
- Fill the Piñata: Add candy, small toys, and other treats to the piñata, filling it about one-third full. Secure the “trap door” with scotch tape.
- Reinforce the Hanging String: Lift the piñata by the string. If the string starts to tear the papier mache, reinforce the area around the holes with hot glue.
- Creating the Lightsaber Handle: (Adult supervision required for this step due to the hot glue). Apply a line of hot glue to the 8 1/2″ edge of the grey sheet of foam. Press the glued edge vertically to the bottom of the broom stick (this will be the lightsaber handle). Wrap the foam tightly around the stick. Apply another line of hot glue to the already-glued-down edge and press the foam to it, creating an overlap. Allow the glue to cool slightly, then trim any excess foam until the edges are flush. Apply another line of hot glue over the seam if needed for a secure hold.
- Creating the Lightsaber Blade: Repeat step 13 four times with the sky blue foam, each layer flush with the previous one, until the broom stick is covered up to the hilt (handle).
- Lightsaber Detailing: Once the glue is completely cooled, use the black paint to add details to the handle, such as horizontal lines and a circle for a “button.”
- Hanging and Breaking the Piñata: Drape the piñata’s string over a tree branch, or have one person hold the end securely. Each player takes a turn using the lightsaber to hit the “Death Star” until it breaks apart. For older children, consider blindfolding them for added challenge. This piñata should be strong enough that 6-8 younger children can each have a turn, and it should begin to break apart during the second round without adult assistance.
Expert Tips & Tricks
- To speed up the drying process, use a fan or hairdryer (on a low setting) to circulate air around the piñata.
- For a smoother finish, sand the papier mache lightly after it has completely dried, before painting.
- Consider using different colored paints to add more detailed designs to the Death Star, such as battle damage or weathering effects.
- To make the lightsaber more durable, wrap the broom stick with duct tape before applying the foam.
Serving & Storage Suggestions
The Death Star piñata is best served immediately after creation—that is, broken open and enjoyed! Store the lightsaber separately in a dry place. Due to the nature of the piñata and its contents, there is no leftover storage. Once broken, the candy and treats should be consumed or stored in airtight containers as appropriate.
Nutritional Information
The nutritional information for this project is highly variable depending on the specific candies and treats used to fill the piñata. The papier-mâché itself is not intended for consumption.
| Nutrient | Amount per Serving | % Daily Value |
|---|---|---|
| Calories (Candy) | Varies widely | Varies |
| Total Fat (Candy) | Varies widely | Varies |
| Saturated Fat (Candy) | Varies widely | Varies |
| Sugar (Candy) | Varies widely | Varies |
| Sodium (Candy) | Varies widely | Varies |
Variations & Substitutions
- For a lighter lightsaber, use a cardboard tube instead of a broomstick.
- Instead of craft foam, felt can be used for the lightsaber handle, offering a softer texture.
- Customize the Death Star’s design with different colors or patterns to match specific scenes from the Star Wars universe.
FAQs (Frequently Asked Questions)
Q: How long does it really take to make this piñata?
A: While the active work time is only a few hours, the drying time for the papier mache layers takes several days. Plan accordingly!
Q: Can I use different types of paint?
A: Yes, you can use acrylic or poster paints instead of tempera paints, but make sure they are non-toxic.
Q: How can I make the piñata stronger?
A: Add more layers of papier mache or use a thicker type of paper, like brown paper bags, for increased durability.
Q: What if the papier mache paste gets lumpy?
A: Use an immersion blender or a whisk to smooth out any lumps. You can also strain the paste through a fine-mesh sieve.
Q: Is it safe for very young children to play with the lightsaber?
A: Adult supervision is always recommended, especially with younger children, to ensure they are using the lightsaber safely and responsibly.
Final Thoughts
Creating this Death Star piñata and lightsaber is more than just following a recipe; it’s about crafting an experience, a moment of pure joy and excitement that will be remembered for years to come. So, gather your supplies, put on some Star Wars music, and embark on this intergalactic crafting adventure. Don’t be afraid to get creative with the design, and most importantly, have fun! And may the Force be with you when it finally comes time to unleash the candy-filled chaos.