
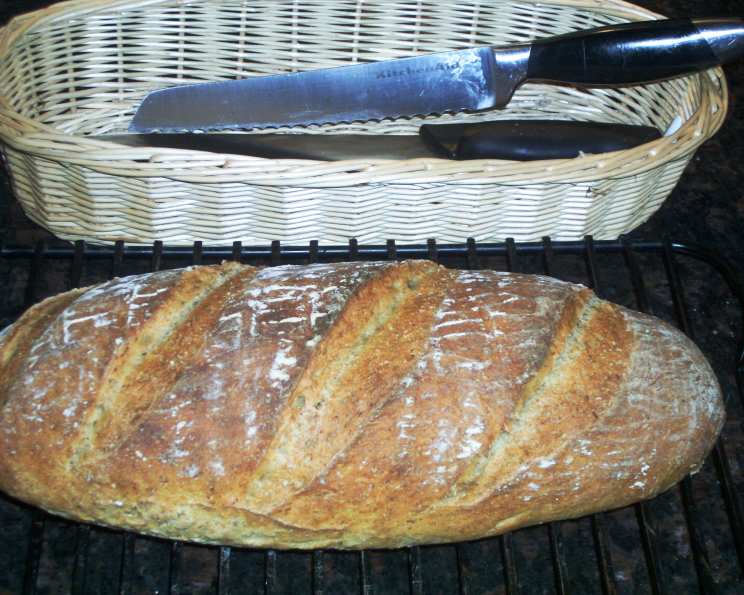
Deli-Style Rye – No Kneading Kneaded!
The aroma of rye bread baking is forever etched in my memory, transporting me back to my grandmother’s tiny Brooklyn kitchen. Every Sunday, the scent of caraway seeds and warm dough would fill the air, a comforting promise of the delicious sandwiches to come. She never seemed to struggle with the process, effortlessly producing loaves that were dense, flavorful, and perfect for piling high with pastrami or corned beef. This recipe, with its remarkably simple no-knead technique, allows me to recapture that nostalgic taste and aroma without spending hours at the counter.
Recipe Overview
- Prep Time: 20 minutes
- Cook Time: 30 minutes
- Total Time: 50 minutes (plus 2 hours rising time, and optional refrigeration time)
- Yields: 4 1-pound loaves
- Serves: 16
- Dietary Type: Vegetarian
Ingredients
- 3 cups lukewarm water
- 1 1/2 tablespoons granulated yeast (1 1/2 packets)
- 1 1/2 tablespoons salt
- 1 1/2 tablespoons caraway seeds, plus more for sprinkling on top
- 1 cup rye flour
- 5 1/2 cups unbleached all-purpose flour
- Cornmeal, for pizza peel
- 1/2 teaspoon cornstarch
Equipment Needed
- 5-quart bowl or lidded (not airtight) food container
- Spoon, 14-cup capacity food processor (with dough attachment), or heavy-duty stand mixer (with dough hook)
- Pizza peel
- Pizza or baking stone
- Empty broiler tray
- Pastry brush
- Serrated bread knife
Instructions
- Mixing the Dough: In a large 5-quart bowl or a lidded (but not airtight) food container, combine the lukewarm water, granulated yeast, salt, and caraway seeds.
- Combining Dry Ingredients: Add the rye flour and all-purpose flour to the water mixture. Mix the ingredients without kneading, using a spoon. Alternatively, you can use a 14-cup capacity food processor (with the dough attachment) or a heavy-duty stand mixer (equipped with the dough hook). If mixing by hand, you may need to wet your hands slightly to incorporate the last bit of flour.
- First Rise: Cover the bowl or container (not airtight) and let it rest at room temperature until the dough has risen and collapsed (or flattened on top). This will take approximately 2 hours.
- Refrigeration (Optional): The dough can be used immediately after the initial rise. However, it becomes easier to handle when cold. For optimal results, refrigerate the dough in a lidded (again, not airtight) container and use it over the next 14 days.
- Shaping the Loaf: On baking day, lightly dust the surface of the refrigerated dough with flour. Cut off a 1-pound (grapefruit-sized) piece.
- Forming the Ball: Dust the piece with more flour. Quickly shape it into a ball by stretching the surface of the dough around to the bottom on all four sides, rotating the ball a quarter-turn as you go. This should take no longer than 30 seconds. The key is to handle the dough as little as possible during this step.
- Resting and Rising: Elongate the ball into an oval-shaped loaf. Allow it to rest and rise on a cornmeal-covered pizza peel for 40 minutes.
- Preheating the Oven: Twenty minutes before baking time, preheat the oven to 450°F (232°C), with a baking stone placed on the middle rack. Place an empty broiler tray on any other shelf that won’t interfere with the rising bread.
- Preparing the Cornstarch Wash: While the dough is resting, prepare the cornstarch wash. Using a fork, blend 1/2 teaspoon cornstarch with a small amount of water to form a paste. Add 1/2 cup water and whisk with the fork. Microwave or boil the mixture until it appears glassy, about 30 to 60 seconds on high. This wash can be stored in the refrigerator for up to 2 weeks.
- Glazing and Scoring: Using a pastry brush, paint the top crust of the loaf with the cornstarch wash. Then, sprinkle the loaf generously with additional caraway seeds. Using a serrated bread knife, slash the loaf with deep parallel cuts across its surface.
- Baking: Slide the loaf directly onto the hot stone. Pour 1 cup of hot tap water (do not boil) into the broiler tray and quickly close the oven door. Bake for about 30 minutes, or until the loaf is deeply browned and firm. Remember that smaller or larger loaves will require adjustments in baking time.
- Cooling: Allow the bread to cool completely before slicing or eating.
Expert Tips & Tricks
- Dough Consistency: Don’t be alarmed if the dough seems very wet and sticky. This is perfectly normal for this no-knead recipe and is essential for achieving the characteristic open crumb of rye bread.
- Stone Placement: Ensure your baking stone is fully preheated before adding the loaf. This helps create a crisp crust.
- Steam is Key: The steam created by pouring water into the broiler tray is crucial for achieving a beautiful crust with a nice shine and proper oven spring. If you don’t have a broiler tray, you can use a cast-iron skillet.
- Doneness Check: The loaf is done when it’s deeply browned and sounds hollow when tapped on the bottom. An internal temperature of 200-210°F (93-99°C) is ideal.
- Refrigeration Time: While the recipe states the dough can be used immediately after the initial rise, a longer refrigeration time (up to 3 days) actually enhances the flavor and makes the dough easier to work with. The fermentation process continues slowly in the fridge, developing a more complex and tangy flavor profile.
Serving & Storage Suggestions
Serve this deli-style rye warm or at room temperature, sliced and piled high with your favorite deli meats, cheeses, or spreads. It’s fantastic for sandwiches, toast, or simply enjoyed on its own with a pat of butter.
To store, wrap the cooled loaf tightly in plastic wrap or place it in a bread bag at room temperature for up to 3 days. For longer storage, freeze the loaf, tightly wrapped, for up to 2 months. To thaw, leave it at room temperature for several hours or overnight. To refresh a thawed loaf, briefly warm it in a 350°F (175°C) oven for 5-10 minutes.
Nutritional Information
| Nutrient | Amount per Serving | % Daily Value |
|---|---|---|
| Calories | 192 kcal | N/A |
| Calories from Fat | 7 g | N/A |
| Total Fat | 0.9 g | 1% |
| Saturated Fat | 0.1 g | 0% |
| Cholesterol | 0 mg | 0% |
| Sodium | 658.2 mg | 27% |
| Total Carbohydrate | 39.4 g | 13% |
| Dietary Fiber | 3.1 g | 12% |
| Sugars | 0.2 g | 0% |
| Protein | 6.6 g | 13% |
Note: Nutritional information is an estimate and may vary based on specific ingredients and portion sizes.
Variations & Substitutions
- Dark Rye: For a darker, more intense rye flavor, substitute up to half of the rye flour with dark rye flour or pumpernickel flour.
- Different Seeds: Experiment with other seeds, such as fennel seeds, anise seeds, or sunflower seeds, in addition to or instead of the caraway seeds.
- Sweetness: For a slightly sweeter loaf, add 1-2 tablespoons of molasses or honey to the dough.
- Gluten-Free: While this recipe relies on gluten for its structure, gluten-free rye bread recipes are available. Look for recipes that use a blend of gluten-free flours and a binder like xanthan gum.
- Marble Rye: Divide the dough in half. To one half, add 2 tablespoons of cocoa powder and 1 tablespoon of instant coffee granules dissolved in 1 tablespoon of hot water. Swirl the two doughs together before shaping.
FAQs (Frequently Asked Questions)
Q: Can I use active dry yeast instead of instant yeast?
A: Yes, you can. However, you will need to proof the active dry yeast in the lukewarm water for about 5-10 minutes before adding the other ingredients.
Q: My dough didn’t rise much. What could be the reason?
A: Several factors can affect the rise of the dough. The yeast might be old or inactive. Also, the water may have been too hot or too cold, or the room temperature might have been too low. Ensure the yeast is fresh, the water is lukewarm, and the dough is placed in a warm place to rise.
Q: Can I bake this bread without a baking stone?
A: While a baking stone is recommended for a crispy crust, you can still bake this bread on a baking sheet. Preheat the baking sheet in the oven before placing the loaf on it.
Q: The crust is getting too dark before the inside is cooked. What should I do?
A: Tent the loaf with aluminum foil to prevent the crust from burning while the inside finishes baking.
Q: Can I freeze the dough instead of refrigerating it?
A: Yes, you can freeze the dough after the initial rise. Divide it into 1-pound portions, wrap tightly in plastic wrap, and freeze for up to 2 months. Thaw the dough in the refrigerator overnight before shaping and baking.
Final Thoughts
Don’t be intimidated by the idea of baking your own rye bread! This no-knead recipe is incredibly forgiving and delivers fantastic results with minimal effort. I urge you to give it a try and experience the satisfaction of creating a truly delicious and authentic loaf. Share your creations with friends and family, and don’t hesitate to experiment with variations to make it your own. I often pair this rye with a hearty bowl of homemade tomato soup or a simple green salad – the perfect complement to its robust flavor. Happy baking!