
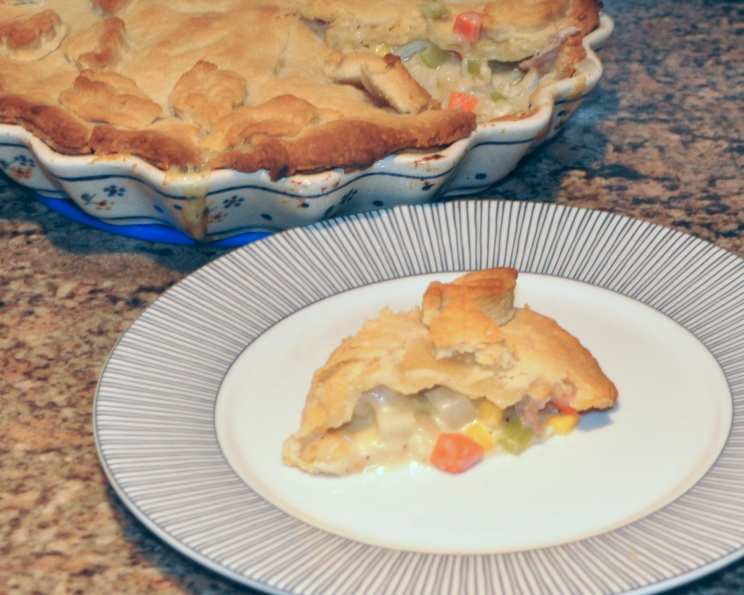
Delightful Chick Pot Pie
The aroma of pot pie baking always takes me back to Sunday afternoons at my grandmother’s house. Her pot pies were legendary – flaky crusts brimming with tender vegetables and savory gravy. But my favorite part was always the little bits of perfectly seasoned chicken nestled within. This recipe captures that same cozy feeling, that sense of home, with every single bite. The golden crust, the comforting filling, it’s pure magic.
Recipe Overview
- Prep Time: 20 minutes
- Cook Time: 40 minutes
- Total Time: 1 hour
- Servings: 8
- Yield: 1 pie
- Dietary Type: Comfort Food
Ingredients
- 1 cup russet potato, diced
- 1 large sweet onion, diced
- 1 cup celery, diced
- 1 cup carrot, diced
- 1 ear of corn, cooked
- 1/3 cup melted margarine
- 1 teaspoon garlic powder
- 1/2 cup all-purpose flour
- 2 cups chicken broth
- 1 cup half-and-half
- 1/2 teaspoon black pepper
- 1 teaspoon salt
- 2 pie crusts
- 4 cups chicken, cooked and chopped
- 1 tablespoon margarine, melted
Equipment Needed
- 9-inch pie pan
- Large skillet or pot
- Cutting board
- Sharp knife
- Measuring cups and spoons
- Whisk
Instructions
-
Preheat your oven to 400°F (200°C). Ensuring your oven is properly preheated will help the crust bake evenly and prevent it from becoming soggy.
-
Cut the corn off the cob and set aside. A simple trick is to stand the corn cob upright in a bundt pan; this will catch all the kernels as you slice them off.
-
In a large skillet or pot, sauté the onions, celery, carrots, and potatoes in melted margarine for about 10 minutes over medium heat. Stir frequently to prevent burning and to ensure the vegetables cook evenly. The goal is to soften them slightly, not to fully cook them through at this stage.
-
Add the all-purpose flour to the vegetable mixture. Stir well, ensuring the flour is fully incorporated. Cook for about 1 minute, stirring constantly, to cook out the raw flour taste. This step is crucial for creating a smooth, lump-free gravy.
-
In a separate bowl or measuring cup, combine the chicken broth and half-and-half. Whisk together to ensure a smooth consistency.
-
Slowly stir the broth and half-and-half mixture into the vegetable and flour mixture in the skillet. Incorporate it gradually to avoid lumps forming.
-
Bring the heat to medium, stirring constantly until the mixture is very thick and bubbly. This may take a few minutes. The constant stirring is key to preventing scorching on the bottom of the pan and to achieving a creamy texture.
-
Add the corn kernels, salt, black pepper, garlic powder, and cooked, chopped chicken to the pot. Stir well to combine all ingredients evenly. Make sure the chicken is distributed throughout the mixture.
-
In a 9-inch pie pan, lay down one pie crust. Gently press it into the bottom and up the sides of the pan. Crimp the edges to create a decorative border.
-
Pour the chicken and vegetable mixture into the pie crust-lined pan, filling it evenly.
-
Cover the filling with the second pie crust. Crimp the edges to seal the top and bottom crusts together. You can use a fork to press the edges or create a more elaborate design.
-
Spread the melted margarine evenly over the top crust. This will help the crust brown beautifully and create a crispy, golden finish.
-
Cut several slits in the top crust to allow steam to escape during baking. This prevents the crust from puffing up too much and potentially cracking.
-
Bake in the preheated oven for 35-45 minutes, or until the crust is a nice golden brown color. Check the pie periodically to ensure the crust isn’t browning too quickly. If necessary, you can tent the pie with foil during the last 15 minutes of baking to prevent over-browning.
Expert Tips & Tricks
- For a richer flavor, consider using bone-in chicken thighs for cooking and chopping. The bones add depth to the broth.
- To prevent a soggy bottom crust, partially bake the bottom crust for 10 minutes before adding the filling.
- Spice it up! Add a pinch of red pepper flakes or a dash of hot sauce to the filling for a little kick.
- Make-ahead tip: Prepare the filling a day in advance and store it in the refrigerator. This allows the flavors to meld and deepens the overall taste.
- If your crust starts to brown too quickly, cover the edges with aluminum foil or use pie shields.
Serving & Storage Suggestions
Allow the pot pie to cool slightly for about 10-15 minutes before serving. This will allow the filling to set a bit and prevent it from being too runny. Serve warm, and garnish with fresh parsley, if desired.
Leftovers can be stored in the refrigerator for up to 3 days. To reheat, cover the pot pie with foil and bake in a preheated oven at 350°F (175°C) until heated through. You can also reheat individual slices in the microwave, but the crust will be less crispy. For longer storage, freeze individual slices wrapped tightly in plastic wrap and then in a freezer bag. Reheat from frozen in the oven.
Nutritional Information
| Nutrient | Amount per Serving | % Daily Value |
|---|---|---|
| Calories | 428 kcal | N/A |
| Total Fat | 28.1 g | 43% |
| Saturated Fat | 7.9 g | 39% |
| Cholesterol | 11.2 mg | 3% |
| Sodium | 854 mg | 35% |
| Total Carbohydrate | 37.8 g | 12% |
| Dietary Fiber | 3.6 g | 14% |
| Sugars | 3.1 g | N/A |
| Protein | 7.1 g | 14% |
Variations & Substitutions
- Gluten-Free Pot Pie: Use a gluten-free pie crust and a gluten-free all-purpose flour blend for the filling.
- Vegetarian Pot Pie: Substitute the chicken with a can of drained and rinsed chickpeas, more vegetables such as mushrooms and green beans, or cubed tofu.
- Dairy-Free Pot Pie: Use plant-based margarine and a dairy-free milk alternative, such as almond milk or soy milk, instead of half-and-half.
- Different Vegetables: Feel free to customize the vegetables according to your preference and what’s in season. Peas, green beans, and parsnips are all great additions.
- Crust Alternative: Instead of a top crust, consider biscuits! Prepare your favorite biscuit recipe and bake the pot pie until the filling is bubbly, then place the biscuits on top and continue baking until golden.
FAQs (Frequently Asked Questions)
Q: Can I use a store-bought rotisserie chicken to save time?
A: Absolutely! Using a rotisserie chicken is a great shortcut. Simply shred or chop the chicken and add it to the filling according to the recipe instructions.
Q: How do I prevent the crust from burning before the filling is heated through?
A: If the crust is browning too quickly, you can tent the pie with aluminum foil during the last 15-20 minutes of baking. This will protect the crust from over-browning while allowing the filling to heat through.
Q: Can I freeze this pot pie?
A: Yes, you can freeze the unbaked pot pie for up to 3 months. Wrap it tightly in plastic wrap and then in a layer of foil. When ready to bake, thaw it overnight in the refrigerator and bake according to the recipe instructions.
Q: What can I do if the filling is too thick?
A: If the filling is too thick, add a little more chicken broth or half-and-half, one tablespoon at a time, until you reach the desired consistency.
Q: Can I make this pot pie in individual ramekins?
A: Yes, you can divide the filling among individual ramekins and top each with a smaller pie crust or puff pastry. Adjust the baking time accordingly; individual pot pies will bake more quickly.
Final Thoughts
There’s something undeniably comforting about a warm, homemade pot pie. This recipe is more than just a set of instructions; it’s an invitation to create a delicious memory. Gather your ingredients, preheat your oven, and get ready to fill your kitchen with the irresistible aroma of this Delightful Chick Pot Pie. Don’t be afraid to experiment with different vegetables or seasonings to make it your own. And most importantly, enjoy the process and savor every single bite! I hope this becomes a cherished recipe in your family for years to come.