
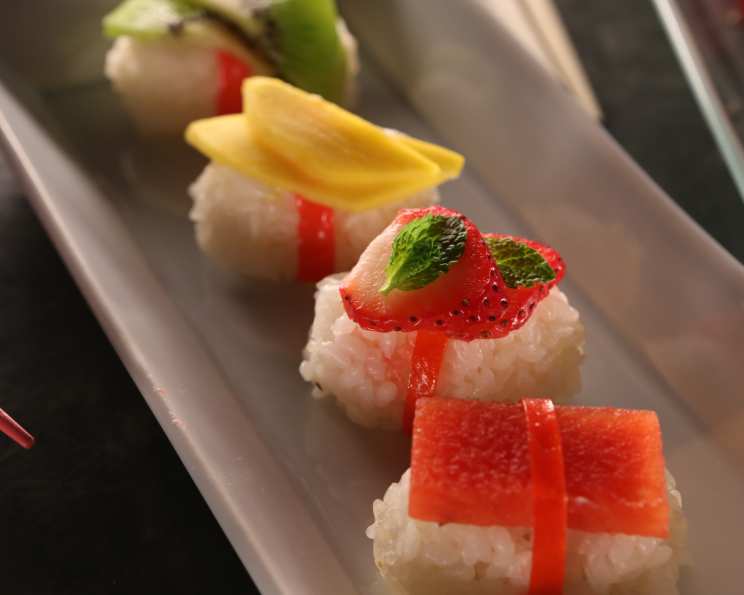
Dessert Sushi: A Sweet Culinary Adventure
I remember the first time I saw dessert sushi. It was at a quirky food festival, and I was instantly captivated. Amidst the savory aromas of grilled meats and spiced curries, this vibrant, playful creation stood out. Miniature rice “nigiri” adorned with jewel-toned fruit, and colorful “maki” rolls filled with creamy sweetness – it was a whimsical masterpiece that proved desserts could be just as adventurous as any savory dish. The burst of flavor and the sheer novelty of the experience cemented my love for this unique culinary concept. I’ve been experimenting with it ever since.
Recipe Overview
- Prep Time: 30 minutes
- Cook Time: 25 minutes
- Total Time: 55 minutes
- Servings: 8-10
- Yield: Varies depending on roll sizes and number of nigiri
- Dietary Type: Vegetarian (can be made vegan)
Ingredients
-
Sushi Rice:
- 1 1/2 cups medium-grain Japanese rice
-
Coconut Glaze:
- 1 (14 ounce) can coconut milk
- 1/2 cup sugar
- 1 lemon, zest of
-
“Seaweed” & Wraps:
- Fruit leather, such as Fruit by the Foot, for rolling maki rolls and nigiri
-
Optional Fillings or Toppings:
- Blueberries
- Candied sour cherries
- Mango
- Pineapple
- Strawberries
- 1/2 cup sesame seeds
- Mint leaves
Equipment Needed
- Medium pot with a tight-fitting lid
- Baking sheet
- Small saucepot
- Sharp knife
Instructions
-
Cooking the Rice: In a medium pot, combine the rice with 2 cups water. Cover with a tight-fitting lid. Bring to a boil over medium-high heat. Once boiling, stir briefly and cover again. Reduce the heat to a simmer and cook for 15 minutes.
-
Resting the Rice: Turn off the heat and fluff the rice gently with a fork. Replace the lid and let the rice sit for 5 minutes. This allows the residual steam to finish cooking the rice and achieve the desired stickiness.
-
Cooling the Rice: Once the rice is fully cooked, immediately spread it out evenly on a baking sheet. This step is crucial for cooling the rice quickly. The goal is to bring the rice down to room temperature as fast as possible to prevent it from becoming overly sticky.
-
Preparing the Coconut Glaze: In a small saucepot, combine the coconut milk, sugar, and lemon zest. Bring the mixture to a simmer over medium heat.
-
Reducing the Glaze: Let the mixture reduce by about two-thirds, until it thickens and becomes syrupy. This process should take approximately 20 to 25 minutes. Stir occasionally to prevent scorching on the bottom of the pot. The glaze is ready when it coats the back of a spoon.
-
Making Nigiri “Sushi”: Moisten your hands lightly with water to prevent the rice from sticking. Mold the cooled rice into 2-inch long logs, resembling the shape of nigiri sushi.
-
Glazing and Wrapping Nigiri: Drizzle a little of the prepared coconut glaze over the rice logs. Cut the fruit leather into 1/2- by 2-inch strips (or use the pre-cut Fruit by the Foot strips). Use these strips to wrap the rice logs cross-wise, mimicking the belt of seaweed (nori) wrapped around traditional nigiri.
-
Topping the Nigiri: Top the “nigiri” with your choice of fruit. Blueberries and candied sour cherries resemble salmon roe and create a fun visual effect. Alternatively, first top the rice with fruit, then secure the fruit to the rice by wrapping with strips of fruit leather.
-
Finishing the Nigiri: Sprinkle the topped nigiri with sesame seeds, and garnish with fresh mint leaves. Serve immediately.
-
Making Maki “Sushi” Rolls: Lay a piece of fruit leather out flat. Spread an even layer of the cooled rice over the fruit leather, about 1/2-inch thick. Leave a small border at the top edge to help seal the roll.
-
Glazing the Roll Base: Drizzle some of the coconut glaze over the rice layer. Sprinkle with a few sesame seeds.
-
Adding the Fillings: On the side closest to you, lay down a row of julienned fruit. You can use mangoes, pineapples, strawberries, cherries, or a combination.
-
Rolling the Maki: Top the fruit filling with some torn mint leaves. Carefully roll the entire thing into a cylinder, keeping it as tight as possible as you roll.
-
Slicing and Serving: Using a sharp knife, slice the roll into rounds. Serve immediately.
Expert Tips & Tricks
- Rice Perfection: Using high-quality Japanese sushi rice is key for that authentic texture. Rinsing the rice thoroughly before cooking helps remove excess starch and prevents it from becoming too gummy.
- Glaze Consistency: Keep a close eye on the coconut glaze as it reduces. Overcooking will result in a hard candy, while undercooking will leave it too runny. The perfect consistency is a thick syrup that coats the back of a spoon.
- Fruit Prep: Ensure your fruit is fresh and ripe. For the maki rolls, julienne the fruit thinly so it’s easy to roll and bite through.
- Rolling Technique: If you find the fruit leather difficult to roll, lightly moisten it with water. This will make it more pliable and easier to work with. Using a sushi mat wrapped in plastic wrap can also help to achieve a tighter roll.
- Knife Skills: A sharp knife is essential for clean cuts when slicing the maki rolls. Dampen the blade between cuts to prevent the rice from sticking.
Serving & Storage Suggestions
Serve your dessert sushi immediately after assembly for the best texture and flavor. The rice can dry out if left for too long. Arrange the nigiri and maki rolls artfully on a platter.
Leftover sushi can be stored in an airtight container in the refrigerator for up to 24 hours. However, the texture of the rice and fruit leather may change slightly. It is best consumed fresh. The coconut glaze can be stored separately in the refrigerator for up to a week.
Nutritional Information
| Nutrient | Amount per Serving | % Daily Value |
|---|---|---|
| Calories | 331.4 kcal | N/A |
| Calories from Fat | 137 kcal | N/A |
| Total Fat | 15.3 g | 23% |
| Saturated Fat | 10.1 g | 50% |
| Cholesterol | 0 mg | 0% |
| Sodium | 8.1 mg | 0% |
| Total Carbohydrate | 45.7 g | 15% |
| Dietary Fiber | 1.8 g | 7% |
| Sugars | 12.7 g | N/A |
| Protein | 5.1 g | 10% |
Variations & Substitutions
- Vegan Option: Ensure your fruit leather is vegan-friendly. Some brands contain gelatin. Substitute the coconut glaze with a rice syrup-based glaze or a vegan caramel sauce.
- Gluten-Free: This recipe is naturally gluten-free, but always check the labels of your ingredients to be sure.
- Seasonal Fruit: Adapt the recipe to showcase seasonal fruits. Berries in the summer, stone fruits in late summer, and citrus fruits in the winter all make excellent fillings and toppings.
- Chocolate Drizzle: For a richer dessert, drizzle the sushi with melted dark chocolate instead of, or in addition to, the coconut glaze.
- Cream Cheese Filling: For an even richer texture, try incorporating a small amount of cream cheese or vegan cream cheese into your maki rolls.
FAQs (Frequently Asked Questions)
Q: Can I use regular rice instead of sushi rice?
A: While possible, sushi rice is ideal due to its higher starch content, which gives it the sticky texture needed for forming the sushi. Regular long-grain rice will not hold together as well.
Q: Can I make the coconut glaze ahead of time?
A: Absolutely! The coconut glaze can be made up to a week in advance and stored in an airtight container in the refrigerator.
Q: What’s the best way to prevent the rice from sticking to my hands?
A: Lightly moisten your hands with water before handling the rice. You can also use a rice paddle dampened with water to help shape the sushi.
Q: My fruit leather is tearing when I try to roll it. What should I do?
A: The fruit leather may be too dry. Try gently moistening it with a little water to make it more pliable.
Q: Can I use different types of fruit leather?
A: Yes! Experiment with different flavors and colors of fruit leather to create visually appealing dessert sushi.
Final Thoughts
Dessert sushi is more than just a recipe; it’s an invitation to play with your food, experiment with flavors, and create something truly unique. Don’t be afraid to get creative with your fillings and toppings, and most importantly, have fun with the process! Share your creations with friends and family, and let them experience the delightful surprise of this sweet culinary adventure. I hope this recipe inspires you to create your own dessert sushi masterpieces! Enjoy!