
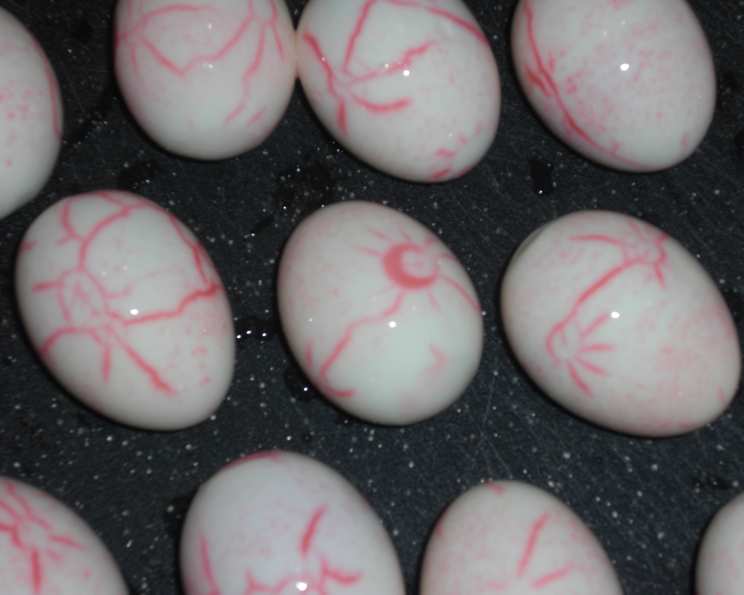
Deviled Eyeballs: A Spooky Halloween Treat
Halloween has always been a special time in our family, filled with imaginative costumes and delightfully spooky treats. I remember one year, trying to impress my cousins with something truly unique. I stumbled upon the idea of deviled eyeballs – a playful twist on a classic deviled egg. The slightly horrified yet intrigued faces of my young cousins were priceless, and the dish quickly became a Halloween staple. The memory of their wide-eyed wonder still brings a smile to my face, making this recipe even more special to me.
Recipe Overview
- Prep Time: 30 minutes
- Cook Time: 20 minutes
- Total Time: 2 hours 50 minutes
- Servings: 18
- Yield: 36 eyeballs
- Dietary Type: Varies (see variations)
Ingredients
Eyeballs
- 18 eggs
- 1/3 cup mayonnaise
- 2 tablespoons Dijon mustard
- 1 tablespoon lemon juice
- 1/4 teaspoon onion powder
- 1/4 teaspoon garlic powder
- 1/2 teaspoon Worcestershire sauce
- 1/4 teaspoon salt
- 1/4 teaspoon cayenne pepper
Decoration
- 10 green olives, sliced
- 2 ounces fusilli col buco pasta
- Red, blue, and green food coloring
Equipment Needed
- Large pot
- Metal spoon
- Ice bath
- Small saucepan
- Colander
- Sharp knife
- Mixing bowl
- Melon baller or small ice cream scoop
- Serving platter
Instructions
- Prepare the Eggs: Gently place the eggs into a large pot. Cover the eggs with about 1 inch of cold water.
- Cook the Eggs: Bring the water to a full boil, then boil for 1 minute. Cover the pot, remove from heat, and let the eggs stand for 17 minutes.
- Cool and Crack: Immediately rinse the eggs under cold running water to stop the cooking process.
- Create the Bloodshot Effect: Gently tap each egg with a metal spoon in several places to crack the shell. The key here is to create small, hairline cracks across the surface of the shell without fully breaking it. These cracks will allow the food coloring to seep in and create a bloodshot effect.
- Color the Eggs: Place the cracked eggs in a pan with ice water, just enough to cover them. Add enough red food coloring to the water to achieve a deep red hue. Allow the eggs to sit in the colored water for 1 to 2 hours. This will allow the color to seep into the cracks, creating the desired effect.
- Cook the Pasta: While the eggs are soaking, bring a small saucepan of water to a boil. Add the fusilli col buco pasta and a few drops of red food coloring to the boiling water. Cook the pasta according to package directions, until al dente.
- Drain and Rinse Pasta: Once the pasta is cooked, drain it thoroughly and rinse with cold water to prevent it from sticking together. Set aside on a platter.
- Peel and Halve the Eggs: Carefully crack and peel the eggs. Rinse them under cold water to remove any shell fragments. Cut the eggs in half crosswise on a slight diagonal.
- Remove the Yolks: Gently remove the yolks from each egg half and place them in a mixing bowl.
- Prepare the Filling: Add the mayonnaise, Dijon mustard, lemon juice, onion powder, garlic powder, Worcestershire sauce, salt, and cayenne pepper to the bowl with the yolks.
- Blend the Filling: Using a fork or a mixer, blend the yolks and other ingredients until smooth. You’ll want the mixture to be a bit stiff, so it holds its shape when scooped.
- Color the Filling: Divide the yolk mixture into separate bowls and add different food coloring as desired for different eye colors, like green or blue.
- Fill the Eyeballs: Using a melon baller or a small ice cream scoop, place a scoop of the colored yolk mixture into each egg half.
- Add the Pupils: Top each filled egg half with a slice of green olive to create the pupil of the eye.
- Assemble and Serve: Arrange the cooked red pasta on the serving platter to create a “bed of brains”. Place the completed deviled eyeballs on top of the pasta. Serve immediately or chill until ready to serve.
Expert Tips & Tricks
- Achieving the Perfect Cracks: The key to a good bloodshot effect is to create fine cracks in the eggshell without breaking it completely. Use a metal spoon and gently tap the egg all over.
- Controlling the Color: The amount of food coloring you use will determine the intensity of the bloodshot effect. Start with a few drops and add more until you reach the desired color.
- Preventing Gray Yolks: To avoid the green-gray ring that can form around hard-boiled yolks, immediately plunge the eggs into an ice bath after cooking.
- Making Ahead: You can hard-boil and dye the eggs a day in advance. Store them peeled and halved in an airtight container in the refrigerator. Prepare the yolk filling separately and store it in an airtight container as well. Fill the egg whites just before serving to prevent the filling from becoming soggy.
- Flavor Boost: For a bolder flavor, consider adding a dash of hot sauce or a pinch of smoked paprika to the yolk filling.
Serving & Storage Suggestions
These deviled eyeballs are best served chilled. Arrange them artfully on a platter, perhaps nestled amongst the red pasta for an extra spooky touch. Leftover deviled eyeballs should be stored in an airtight container in the refrigerator. They will keep for up to 2-3 days. Due to the mayonnaise content, it’s best not to leave them at room temperature for more than 2 hours. Freezing is not recommended as it will alter the texture of the eggs and filling.
Nutritional Information
Please note that these values are estimates and can vary based on specific ingredients and portion sizes.
| Nutrient | Amount per Serving | % Daily Value |
|---|---|---|
| Calories | 104 kcal | 5% |
| Total Fat | 6.6 g | 10% |
| Saturated Fat | 1.8 g | 9% |
| Cholesterol | 187 mg | 62% |
| Sodium | 178 mg | 7% |
| Total Carbohydrate | 4.1 g | 1% |
| Dietary Fiber | 0.2 g | 0% |
| Sugars | 0.6 g | 2% |
| Protein | 6.8 g | 13% |
Variations & Substitutions
- Vegan Deviled Eyeballs: Substitute the eggs with firm tofu. Slice the tofu into eye shapes. For the filling, use vegan mayonnaise, nutritional yeast for a cheesy flavor, and black salt (kala namak) for an eggy taste.
- Spicy Eyeballs: Add a finely chopped jalapeno pepper or a few dashes of hot sauce to the yolk filling for an extra kick.
- Mediterranean Eyeballs: Incorporate chopped sun-dried tomatoes, Kalamata olives, and feta cheese into the yolk mixture for a Mediterranean twist.
- Different Eye Colors: Experiment with different food coloring combinations to create unique eye colors. Try using a combination of yellow and green for hazel eyes, or blue and purple for striking violet eyes. Beet juice can also be used as a natural red dye.
- Gluten-Free: Make sure your mayonnaise and Worcestershire sauce are gluten-free. Substitute the fusilli pasta with zucchini noodles for a low-carb, gluten-free “bed of brains.”
FAQs (Frequently Asked Questions)
Q: Can I make these ahead of time?
A: Yes! You can hard-boil and dye the eggs a day in advance. Store them peeled and halved in the refrigerator. Prepare the yolk filling separately and store it in an airtight container. Assemble just before serving.
Q: Can I use a different type of pasta?
A: While fusilli col buco is ideal for creating a “bed of brains,” other short spiral pasta shapes will work as well. The pasta helps keep the eyeballs from sliding around on the plate.
Q: What if I don’t have Worcestershire sauce?
A: If you don’t have Worcestershire sauce, you can substitute it with a mixture of soy sauce and tamarind paste, or a splash of balsamic vinegar.
Q: How do I prevent the yolk filling from being watery?
A: Be sure to drain the cooked eggs thoroughly after peeling. Also, avoid adding too much lemon juice or mayonnaise to the yolk mixture.
Q: How long will these last in the refrigerator?
A: Deviled eyeballs will last for up to 2-3 days in an airtight container in the refrigerator. It’s best to consume them sooner rather than later due to the mayonnaise content.
Final Thoughts
So, this Halloween, why not dare to delight with a platter of these wonderfully eerie Deviled Eyeballs? Not only are they a playful homage to the season, but they are also a guaranteed conversation starter. Don’t be afraid to experiment with the filling and decorations to make them truly your own. Embrace the spookiness, share your creations, and let the screams of delight begin! Perhaps pair these with some bat-shaped cookies or a blood-red punch for a complete Halloween feast. Happy haunting!