
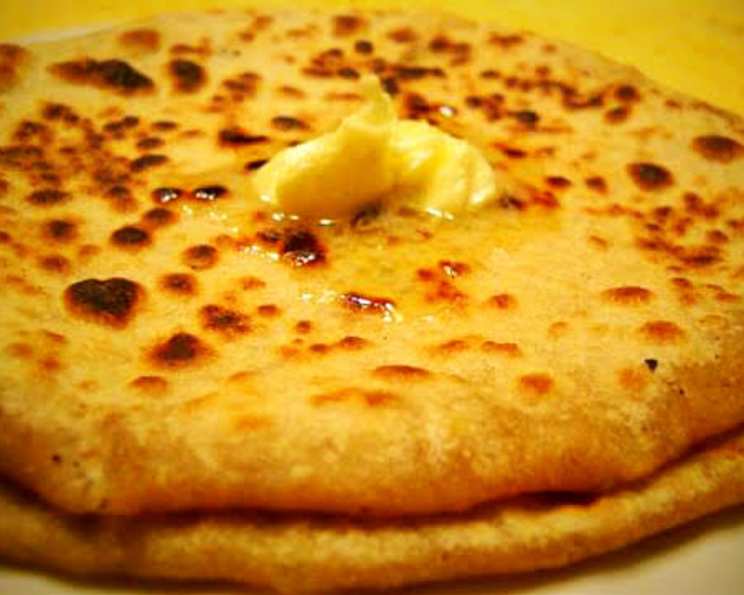
Dhaba-Style Aloo Paratha: A Taste of the Open Road
The clatter of metal plates, the aroma of spices hanging heavy in the air, the boisterous laughter of truck drivers sharing stories – these are the memories that flood back to me with every bite of a perfectly made aloo paratha. Growing up, family road trips across the Indian countryside always meant a stop at a roadside dhaba, and without fail, I’d order a plate of these golden, potato-stuffed flatbreads. Each bite was a comforting burst of flavor, a taste of home away from home, smeared with melting butter and a dollop of cooling yogurt. Now, years later, I strive to recreate that authentic taste in my own kitchen.
Recipe Overview
- Prep Time: 20 minutes
- Cook Time: 30 minutes
- Total Time: 50 minutes
- Servings: 4
- Dietary Type: Vegetarian
Ingredients
For the Dough:
- 1 cup whole wheat flour
- 1 cup refined flour (or 1 cup maida flour)
- 1 teaspoon salt
- 1 teaspoon oil
- 1 teaspoon carom seeds (or 1 teaspoon ajwain)
- Water, as required (approximately 1 cup)
For the Potato Stuffing:
- 3 medium potatoes (boiled and peeled)
- 1 green chili pepper, finely chopped
- 1 tablespoon coriander leaves, finely chopped
- ¼ teaspoon garam masala powder
- ¼ teaspoon red chili powder (adjust to taste)
- 1 inch grated ginger
- 1 teaspoon chat masala
- Salt, to taste
- 6 tablespoons oil
Equipment Needed
- Food processor (optional, but recommended)
- Rolling pin
- Tawa (flat griddle)
- Mixing bowls
Instructions
- Prepare the Dough: In a food processor fitted with a dough blade, combine the whole wheat flour, refined flour, salt, oil, and carom seeds. Gradually add water until a soft and elastic dough forms. The amount of water may vary slightly depending on the humidity and the flour used. If kneading by hand, combine the dry ingredients in a bowl, then add the wet ingredients and knead for about 8-10 minutes until the dough is smooth.
- Rest the Dough: Cover the dough with a damp cloth or plastic wrap and set it aside to rest while you prepare the potato stuffing. This resting period allows the gluten to relax, resulting in a softer paratha. Aim for at least 15-20 minutes of rest.
- Prepare the Potato Stuffing: In the food processor, combine the boiled and peeled potatoes, chopped green chili pepper, coriander leaves, garam masala powder, red chili powder, grated ginger, chat masala, and salt. Pulse until the mixture is well combined and the potatoes are minced but not completely mashed. Alternatively, you can mash the potatoes with a fork and then mix in the remaining ingredients by hand.
- Divide the Dough and Stuffing: Divide the dough into 7-8 equal portions, and shape them into smooth balls. Divide the potato stuffing into equal portions as well, keeping in mind the number of dough balls you have.
- Roll the Dough: On a lightly floured surface, roll one of the dough balls into a small circle, about 3-4 inches in diameter. Be careful not to tear the dough. Keep the remaining dough balls covered to prevent them from drying out.
- Stuff the Paratha: Hold the rolled dough circle in your palm and place 2-3 tablespoons of the potato filling in the center. The amount of filling will depend on the size of your dough circles, but aim for a generous amount without overstuffing, which could cause the paratha to tear.
- Seal the Paratha: Carefully bring the edges of the dough circle together to enclose the potato filling. Pinch the top of the dough to seal it tightly, ensuring that there are no openings. This is crucial to prevent the filling from leaking out during cooking.
- Flatten and Roll Again: Gently flatten the stuffed dough ball with your hands. Dust the rolling surface generously with flour to prevent sticking. Using a rolling pin, gently roll out the dough into a 6-8 inch circle. Be careful not to apply too much pressure, as this could cause the filling to burst through the dough. Rotate the paratha as you roll to ensure even thickness.
- Cook the Paratha: Heat a tawa (flat griddle) over medium-high heat. Once the tawa is hot, carefully place the rolled paratha on it.
- Cook on One Side: Cook the paratha for about 1-2 minutes, or until small bubbles start to appear on the surface and the bottom side is lightly browned.
- Flip and Oil: Flip the paratha and brush the cooked side with about 1 tablespoon of oil.
- Cook the Other Side: Cook the other side for another 1-2 minutes, or until it is also lightly browned. Brush this side with another tablespoon of oil.
- Cook Until Golden Brown: Continue to cook the paratha, flipping it occasionally and pressing gently with a spatula, until both sides are golden brown and crispy. This usually takes about 2-3 minutes per side. Make sure to cook the paratha thoroughly to ensure the potato filling is heated through.
- Serve Hot: Remove the cooked paratha from the tawa and serve it hot, topped with a generous dollop of butter, along with your favorite pickle or yogurt.
Freezing Instructions:
- Partially Cook: If you plan to freeze the parathas for later use, cook them on the tawa until they are just slightly underdone – about halfway through the cooking process. They should be lightly browned but not fully cooked and crispy.
- Cool Completely: Allow the partially cooked parathas to cool completely.
- Layer with Parchment Paper: Place the cooled parathas in a Ziploc bag or airtight container, separating each paratha with a piece of parchment paper. This will prevent them from sticking together when frozen.
- Freeze: Freeze the parathas for up to 2-3 months.
- Reheat: When ready to eat, take the frozen paratha directly from the freezer and cook it on a hot tawa until it is perfectly golden brown and crisp. There’s no need to thaw it first.
Expert Tips & Tricks
- Dough Consistency: The key to a soft and pliable paratha is in the dough. Make sure the dough is not too stiff or too sticky. It should be soft and elastic.
- Even Filling: Distribute the potato filling evenly throughout the paratha to ensure that every bite is flavorful.
- Gentle Rolling: Roll the paratha gently to prevent the filling from bursting through the dough.
- Proper Cooking Temperature: Cook the paratha over medium-high heat to achieve a golden brown color and crispy texture without burning it.
- Ghee or Butter for Richness: For an extra layer of richness, use ghee (clarified butter) instead of oil for cooking the paratha.
- Spice Level Adjustment: Adjust the amount of green chilies and red chili powder to suit your spice preference.
- Don’t Overstuff: Avoid the temptation to overstuff the paratha, as this can lead to tearing during rolling and cooking.
Serving & Storage Suggestions
Serve the aloo paratha hot, immediately after cooking, for the best taste and texture. It’s traditionally enjoyed with a dollop of butter, a side of yogurt, Indian pickles (like mango or lime pickle), or even a cup of hot chai.
Leftover aloo parathas can be stored in an airtight container in the refrigerator for up to 2-3 days. To reheat, simply warm them on a tawa or in a microwave. However, keep in mind that reheating may slightly alter the texture, making them less crispy than freshly cooked parathas. For longer storage, follow the freezing instructions above.
Nutritional Information
| Nutrient | Amount per Serving | % Daily Value |
|---|---|---|
| Calories | 534 kcal | N/A |
| Total Fat | 22.8g | 35% |
| Saturated Fat | 3g | 15% |
| Cholesterol | 0mg | 0% |
| Sodium | 595.7mg | 24% |
| Total Carbohydrate | 74.5g | 24% |
| Dietary Fiber | 7.8g | 31% |
| Sugars | 2g | 8% |
| Protein | 10.7g | 21% |
Note: Nutritional information is an estimate and may vary based on specific ingredients and preparation methods.
Variations & Substitutions
- Gluten-Free Aloo Paratha: Use gluten-free flour blends instead of wheat flour for the dough. You may need to experiment with different blends to achieve the right texture.
- Spicier Filling: Add more green chilies or red chili powder to the potato filling for a spicier kick.
- Different Vegetables: Experiment with adding other vegetables to the potato filling, such as finely chopped onions, peas, or grated carrots.
- Cheese Aloo Paratha: Add grated cheese (such as cheddar or mozzarella) to the potato filling for a cheesy twist.
- Herbed Aloo Paratha: Add different herbs to the potato filling, such as mint or cilantro, for a different flavor profile.
FAQs (Frequently Asked Questions)
Q: Can I prepare the dough and stuffing ahead of time?
A: Yes, you can prepare both the dough and the stuffing ahead of time and store them separately in the refrigerator. This can save you time on busy mornings.
Q: Why is my paratha tearing when I roll it out?
A: This could be due to several reasons: the dough may be too dry, the filling may be too chunky, or you may be applying too much pressure while rolling. Make sure the dough is soft and elastic, the filling is well-mashed, and roll the paratha gently.
Q: How do I prevent the filling from leaking out while cooking?
A: Ensure that you seal the paratha tightly after stuffing it with the potato filling. Also, avoid overfilling the paratha, as this can cause it to burst during cooking.
Q: Can I use a different type of oil for cooking the paratha?
A: Yes, you can use any cooking oil with a high smoke point, such as vegetable oil, canola oil, or sunflower oil. However, ghee or butter will give the paratha a richer flavor.
Q: How do I make sure the potato filling is cooked through?
A: Make sure the potatoes are fully boiled and mashed before adding them to the filling. Also, cook the paratha thoroughly on both sides until it is golden brown and crispy, ensuring that the filling is heated through.
Final Thoughts
There’s something truly special about a homemade aloo paratha. It’s more than just a breakfast dish; it’s a comforting reminder of simpler times, of family gatherings, and of the warmth of home. I encourage you to try this recipe and experience the authentic taste of dhaba-style aloo paratha for yourself. Don’t be afraid to experiment with the filling and adjust the spice level to your liking. Serve it with your favorite sides and enjoy the delicious flavors of India! And please, feel free to share your feedback and experiences – I’d love to hear how your aloo parathas turned out.