
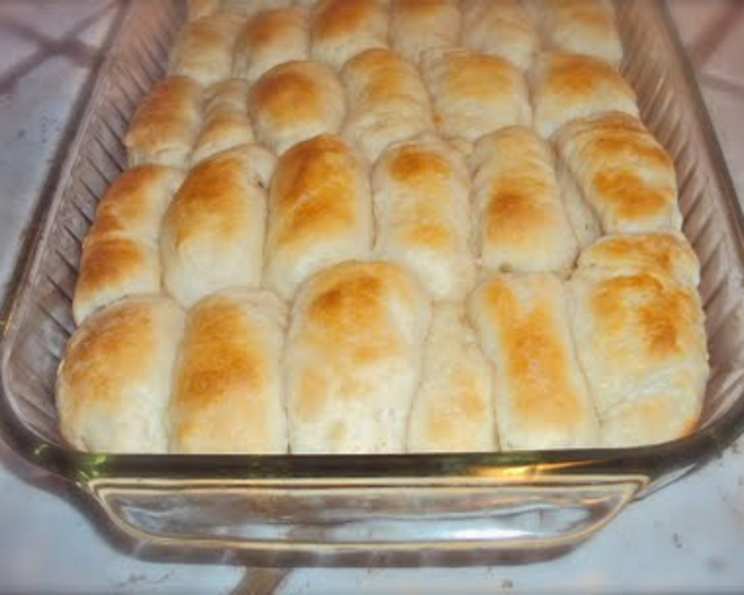
Divas Can Cook Grandma’s Homemade Yeast Rolls
The memory of my grandmother’s kitchen during the holidays is forever etched in my mind. The air, thick with the aroma of cinnamon, roasted turkey, and something subtly sweet and yeasty, was pure comfort. But the star of the show wasn’t the perfectly browned bird or the glistening cranberry sauce; it was always her homemade yeast rolls. Warm, soft, and slathered in butter, they were a little slice of heaven that made every holiday feel complete. I remember sneaking into the kitchen, hoping to snag one fresh from the oven, and the pure joy of that first bite. These are the rolls that made me fall in love with baking.
Recipe Overview
- Prep Time: 42 minutes
- Cook Time: 14 minutes
- Total Time: 3 hours 56 minutes (includes refrigeration and rise time)
- Yields: 30 rolls
- Serves: 30
- Dietary Type: Vegetarian (can be made vegan with substitutions – see variations below)
Ingredients
- 3 1/4 cups all-purpose flour, divided
- 1/4 ounce active dry yeast (rapid rise)
- 1 1/4 cups milk
- 1/4 – 1/2 cup sugar (adjust to your desired sweetness)
- 1/4 cup butter flavor shortening (Crisco)
- 1 egg
- 1 teaspoon salt
- Butter, for dipping the rolls
Equipment Needed
- Large mixing bowl
- Saucepan
- Whisk
- Electric mixer (optional, but recommended)
- Rubber spatula
- Plastic bowl
- 9×13 inch baking pan
- Kitchen towel
- Measuring cups and spoons
- Cooking thermometer (optional, but helpful)
Instructions
- In a large mixing bowl, add 1 1/4 cups of flour.
- Add in the active dry yeast and whisk until thoroughly combined. Set aside.
- In a saucepan over medium heat, add the milk, sugar, and butter flavor shortening.
- Stir constantly until the shortening has completely melted. Be careful not to boil the mixture.
- Use a cooking thermometer (if you have one) to check the temperature of the milk mixture. The ideal temperature for activating the yeast is usually between 115-130 degrees F, but always check the back of your yeast package for specific instructions.
- When the liquid reaches the recommended temperature, carefully pour it into the flour and yeast mixture.
- Add in the egg.
- Using an electric mixer (or by hand), beat the mixture on low speed for 1 minute to combine. Then, increase the speed to high and beat for 3 minutes. The mixture should be smooth.
- Add in the salt and the remaining 2 cups of flour.
- Use your hands or a rubber spatula to incorporate the rest of the flour until a soft dough forms. The dough will be slightly sticky, but it should pull away from the sides of the bowl.
- Grease a clean plastic bowl with vegetable oil. Place the ball of dough into the bowl, turning to coat all sides with the oil. This will prevent the dough from sticking as it rises.
- Cover the bowl tightly with plastic wrap or a lid and refrigerate for at least 2 hours. This chilling period is important for developing the flavor and making the dough easier to handle.
- After refrigerating, remove the bowl from the refrigerator. Punch down the dough with your fist to release the air. Don’t be shy!
- Spread a thin layer of melted butter on the bottom of a 9×13 inch baking pan. This will help the rolls brown beautifully and prevent them from sticking.
- Take chunks of the dough and form them into your desired shape. You can make them round, oval, or even knot shapes.
- Dip each formed roll in a bowl of melted butter, ensuring all sides are coated.
- Place the butter-dipped rolls in the prepared pan, keeping them close together. This will help them rise taller and create soft sides.
- Cover the pan with a thin kitchen towel and let it sit in a warm place for at least 1 to 1 1/2 hours. This is the second rise, and it’s crucial for creating light and airy rolls. The rolls will approximately double in size.
- Preheat your oven to 350 degrees F (175 degrees C).
- Bake the rolls for 10-14 minutes, or until they are golden brown. Keep a close eye on them, as ovens can vary. The tops should be nicely browned, and the rolls should sound hollow when tapped.
- Remove the rolls from the oven and immediately brush them with honey butter or herb butter (optional) for an extra touch of flavor.
Expert Tips & Tricks
- Don’t overmix the dough. Overmixing can develop the gluten too much, resulting in tough rolls. Mix just until the ingredients are combined.
- Proof your yeast. Although this recipe uses rapid-rise yeast, it’s always a good idea to proof it to ensure it’s active. Simply dissolve the yeast in warm water with a pinch of sugar. If it foams up after a few minutes, it’s good to go.
- Warm place for rising. The ideal temperature for rising dough is around 80-85 degrees F. You can create a warm environment by placing the dough near a warm oven, on top of the refrigerator, or in a slightly warmed oven (turned off!).
- If using Rapid Rise “Highly active” yeast: skip the refrigeration step and let the dough rise in a covered bowl for 10 -15 minutes in a warm place. Proceed with the rest of the recipe. Highly active yeast replaces the first rise.
- For extra soft rolls: Cover the baking pan with foil during the first half of the baking time, then remove the foil for the last few minutes to allow the tops to brown.
Serving & Storage Suggestions
Serve these rolls warm, ideally straight from the oven. They are delicious on their own, but even better with a pat of butter, honey butter, or your favorite jam. Leftover rolls can be stored at room temperature in an airtight container for up to 2 days. For longer storage, refrigerate them for up to 5 days or freeze them for up to 2 months. To reheat, wrap the rolls in foil and warm them in a 350°F oven for about 10-15 minutes, or until heated through. You can also microwave them individually for a few seconds.
Nutritional Information
| Nutrient | Amount per Serving | % Daily Value |
|---|---|---|
| Calories | 80.5 kcal | N/A |
| Calories from Fat | 21 g | 27% |
| Total Fat | 2.4 g | 3% |
| Saturated Fat | 0.7 g | 3% |
| Cholesterol | 7.6 mg | 2% |
| Sodium | 85.3 mg | 3% |
| Total Carbohydrate | 12.6 g | 4% |
| Dietary Fiber | 0.4 g | 1% |
| Sugars | 1.7 g | 6% |
| Protein | 2 g | 4% |
Note: Nutritional information is an estimate and may vary depending on specific ingredients and portion sizes.
Variations & Substitutions
- Vegan Rolls: Substitute the milk with unsweetened almond milk or soy milk. Use vegan butter flavor shortening. Replace the egg with applesauce (1/4 cup) or a flax egg (1 tablespoon flaxseed meal mixed with 3 tablespoons water, let sit for 5 minutes).
- Gluten-Free Rolls: Use a gluten-free all-purpose flour blend. You may need to add a binder like xanthan gum to help with the texture.
- Herb Butter Rolls: Mix softened butter with chopped fresh herbs like rosemary, thyme, or parsley. Brush this mixture over the rolls after baking.
- Sweet Potato Rolls: Add 1/2 cup of mashed cooked sweet potato to the dough for a subtle sweetness and beautiful orange color.
- Garlic Parmesan Rolls: After baking, brush the rolls with melted garlic butter and sprinkle with grated Parmesan cheese.
FAQs (Frequently Asked Questions)
Q: Can I make the dough ahead of time and freeze it?
A: Yes, you can freeze the dough after the first rise. Wrap it tightly in plastic wrap and then in foil. Thaw it in the refrigerator overnight before shaping and baking.
Q: My rolls didn’t rise very much. What could have gone wrong?
A: Several factors can affect the rise: the yeast could be old, the liquid might have been too hot or too cold, or the environment might not have been warm enough. Make sure your yeast is fresh, the liquid is at the correct temperature, and the dough is in a warm place.
Q: Can I use regular butter instead of butter-flavor shortening?
A: Yes, you can. However, the butter flavor shortening adds a distinct flavor that many people enjoy in these rolls.
Q: How do I know when the rolls are done baking?
A: The rolls are done when they are golden brown on top and sound hollow when tapped. A toothpick inserted into the center should come out clean.
Q: Can I use a stand mixer instead of mixing by hand?
A: Absolutely! A stand mixer with a dough hook will make the process even easier. Mix on low speed until the dough comes together, then increase the speed to medium and knead for 5-7 minutes.
Final Thoughts
These rolls are more than just a recipe; they’re a connection to the past, a reminder of family traditions, and a symbol of warmth and comfort. I encourage you to give them a try and experience the joy of baking homemade yeast rolls. Don’t be intimidated by the process; it’s simpler than you might think. And once you taste that first warm, buttery bite, you’ll be hooked! Serve them alongside your favorite holiday meal, a comforting soup, or simply enjoy them with a cup of coffee. Share your creations and feedback, and let the aroma of freshly baked rolls fill your home with love and happiness.