
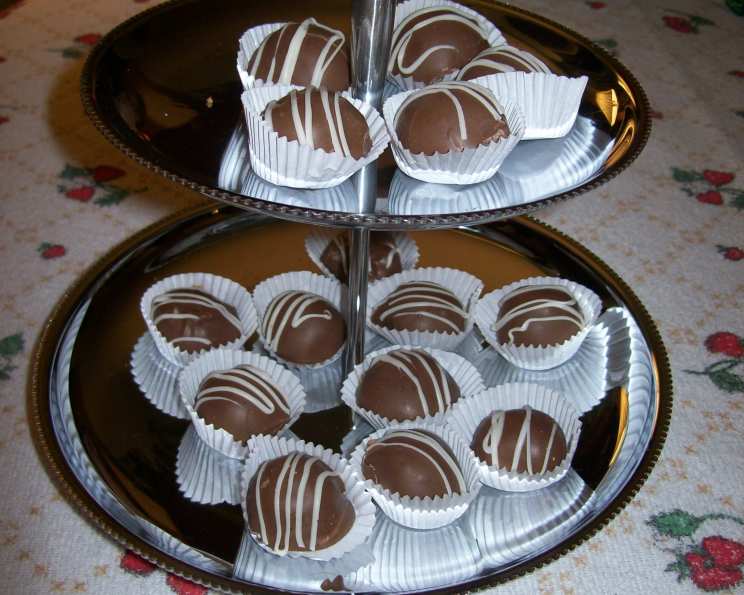
Divine Chocolate Coated Coconut Truffles
I remember being a child, mesmerized by the rows of neatly arranged chocolates in my grandmother’s candy dish. Among the peanut clusters and caramels, there were always these glorious mounds of coconut, enrobed in dark chocolate, that held a special allure. They tasted like pure tropical bliss, a sweet escape from the everyday. Little did I know then that these decadent treats were surprisingly easy to make, a delightful secret I’m now thrilled to share with you.
Recipe Overview
- Prep Time: 20 minutes
- Chill Time: 1 hour
- Freeze Time: Overnight
- Total Time: Approximately 24 hours
- Yields: 4 dozen
- Serves: 20
Ingredients
- 1/4 cup softened butter
- 1 (12 ounce) bag shredded sweetened coconut
- 1 (14 ounce) can sweetened condensed milk (not evaporated)
- 1/4 teaspoon almond extract or 1/4 teaspoon vanilla extract
- 3 cups powdered sugar (amount may vary)
- Chocolate almond bark, for dipping
Equipment Needed
- Food processor
- Melon baller or small cookie scoop
- Wax paper
Instructions
- Pour the entire bag of shredded sweetened coconut into your food processor.
- Pulse the coconut until it turns into fine crumbs, resembling a coarse flour. This will help the truffles bind together properly.
- Add the softened butter to the food processor.
- Pulse again until the butter and coconut are thoroughly combined. The mixture should start to clump together.
- Pour in the can of sweetened condensed milk, ensuring you scrape the sides of the can to get every last drop.
- Add either almond extract or vanilla extract to the mixture. The almond extract will give a slight marzipan flavor that complements the coconut beautifully, while the vanilla extract provides a more classic, comforting sweetness.
- Pulse until a sticky dough begins to form. This may take a minute or two, so be patient and pulse in short bursts to avoid over-processing.
- Slowly add the powdered sugar to the food processor, a cup at a time.
- Continue to pulse after each addition until a dough forms a ball that pulls away from the sides of the food processor. You may not need all 3 cups of powdered sugar, so add it gradually until you achieve the right consistency. The dough should be firm but not dry.
- Remove the dough from the food processor and wrap it tightly in plastic wrap.
- Chill the dough in the freezer until it is easy to roll, approximately 1 hour. This will make the truffle-forming process much easier and prevent the dough from sticking to your hands.
- Once the dough is chilled, use a melon baller or a small cookie scoop to form it into even-sized balls. This ensures consistent size and a professional look.
- Place the formed truffle balls on a baking sheet lined with wax paper.
- Return the truffle balls to the freezer and freeze overnight. This step is crucial for firming up the truffles so that they don’t melt when you dip them in the chocolate.
- The next day, melt the chocolate almond bark according to the package directions. You can melt it in a double boiler or in the microwave in 30-second intervals, stirring in between, until smooth.
- Remove the frozen truffle balls from the freezer.
- Dip each truffle ball into the melted chocolate almond bark, ensuring it is fully coated. You can use a fork or dipping tools to make this process easier.
- Place the chocolate-coated truffles on wax paper to cool and allow the chocolate to set completely.
- Once the chocolate is set, the truffles are ready to be enjoyed!
Expert Tips & Tricks
- Don’t over-process the coconut: Over-processing can release too much oil from the coconut, resulting in a greasy texture. Pulse in short bursts until the coconut is finely crumbed.
- Adjust the powdered sugar: The amount of powdered sugar needed may vary depending on the humidity and the consistency of your sweetened condensed milk. Add it gradually until the dough forms a ball that is firm but not dry.
- Freeze thoroughly: Freezing the truffles overnight is essential for preventing them from melting when you dip them in the chocolate.
- Melt chocolate carefully: Be careful not to overheat the chocolate when melting it. Overheated chocolate can become grainy and difficult to work with.
- Add a touch of salt: A pinch of salt in the coconut mixture can enhance the sweetness and balance the flavors.
- Toast the coconut: For a deeper, nuttier flavor, toast the shredded coconut lightly in a dry skillet before adding it to the food processor. Watch it carefully to prevent burning.
- Use high-quality chocolate: The quality of the chocolate almond bark will greatly impact the flavor of the finished truffles. Choose a good-quality brand for the best results.
Serving & Storage Suggestions
Serve these divine chocolate-coated coconut truffles chilled or at room temperature. They make a beautiful addition to a dessert platter, a thoughtful homemade gift, or a satisfying sweet treat any time of day. Store the truffles in an airtight container in the refrigerator for up to 2 weeks or in the freezer for up to 6 months. To thaw, simply transfer them to the refrigerator a few hours before serving.
Nutritional Information
| Nutrient | Amount per Serving | % Daily Value |
|---|---|---|
| Calories | 234.8 kcal | N/A |
| Calories from Fat | 85 g | 36% |
| Total Fat | 9.5 g | 14% |
| Saturated Fat | 7.4 g | 37% |
| Cholesterol | 12.8 mg | 4% |
| Sodium | 85.3 mg | 3% |
| Total Carbohydrate | 36.8 g | 12% |
| Dietary Fiber | 0.7 g | 2% |
| Sugars | 35.8 g | 143% |
| Protein | 2.1 g | 4% |
Note: Nutritional information is an estimate and may vary based on specific ingredients and serving sizes.
Variations & Substitutions
- Dairy-Free: Substitute the butter with coconut oil and use a dairy-free chocolate for dipping.
- Extract Variations: Experiment with different extracts, such as rum, orange, or peppermint extract, to create unique flavor combinations.
- Nutty Coating: Instead of plain chocolate, try coating the truffles in chocolate mixed with chopped nuts like almonds, pecans, or walnuts.
- Chocolate Variety: Use dark chocolate, milk chocolate, or white chocolate for dipping to customize the truffles to your liking. You can even swirl different chocolates together for a marbled effect.
- Citrus Zest: Add a teaspoon of lemon, lime, or orange zest to the coconut mixture for a bright, citrusy flavor.
FAQs (Frequently Asked Questions)
Q: Can I use unsweetened coconut instead of sweetened?
A: While you can use unsweetened coconut, you will need to adjust the amount of powdered sugar to compensate for the lack of sweetness. Start with a smaller amount of powdered sugar and add more gradually until you reach the desired sweetness.
Q: What if my dough is too sticky to roll?
A: If the dough is too sticky, add a little more powdered sugar, a tablespoon at a time, until it reaches a workable consistency. You can also chill the dough for a longer period to firm it up further.
Q: Can I make these truffles without a food processor?
A: Yes, you can make these truffles without a food processor, but it will require more manual effort. Finely chop the coconut by hand and mix all the ingredients together in a bowl until well combined.
Q: My chocolate is seizing up when I melt it. What am I doing wrong?
A: Chocolate can seize up if it comes into contact with even a tiny bit of water. Make sure your bowl and utensils are completely dry when melting the chocolate. You can also add a small amount of vegetable shortening to the chocolate to help prevent seizing.
Q: How do I prevent the truffles from sticking to the wax paper?
A: Make sure the wax paper is clean and dry before placing the dipped truffles on it. You can also lightly grease the wax paper with butter or cooking spray to prevent sticking.
Final Thoughts
These Divine Chocolate Coated Coconut Truffles are a testament to the fact that simple ingredients and straightforward techniques can create truly exquisite results. Don’t be intimidated by the chilling and freezing times – the hands-on preparation is minimal, and the wait is well worth it. These truffles are guaranteed to impress your friends, family, and even yourself. So go ahead, indulge in a little bit of homemade heaven, and don’t forget to share your creations (if you can bear to part with them!). Pair them with a strong cup of coffee or a glass of dessert wine for the ultimate treat. Enjoy!