
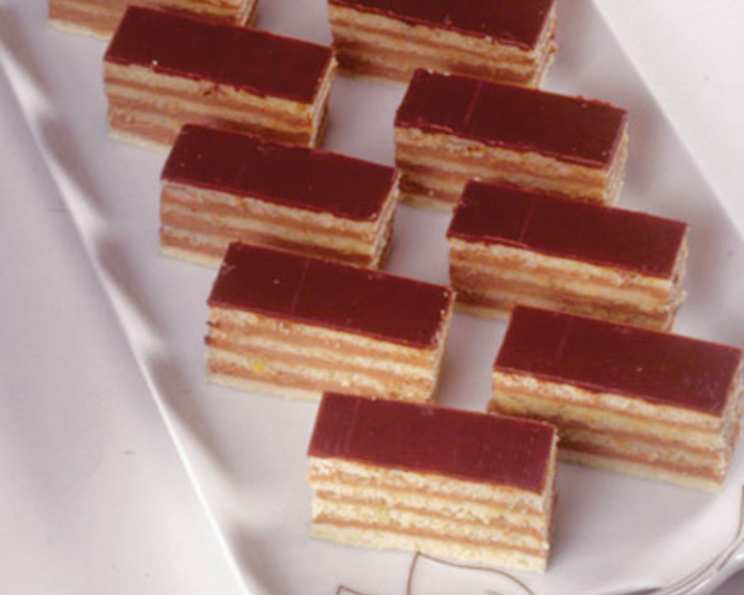
Dobosh Torte: A Symphony of Chocolate and Layers
The memory of Dobosh Torte is forever etched in my childhood. I remember my grandmother, a master baker, painstakingly crafting this magnificent cake for special occasions. The aroma of rich chocolate and the sight of those perfectly aligned layers always filled me with anticipation. It wasn’t just a cake; it was a symbol of love, tradition, and the joy of sharing something truly special with family. Each bite was a small piece of heaven.
Recipe Overview
- Prep Time: 60 minutes
- Cook Time: 35-49 minutes (5-7 minutes per layer)
- Total Time: Several Hours (including cooling and refrigeration)
- Servings: 12
- Yield: 1 Torte
- Dietary Type: Not specified (contains eggs, dairy)
Ingredients
For Cake Layers:
- 7 eggs, separated into yolks and whites
- 3 additional egg yolks
- 3 1/2 cups (1 pound) confectioners’ sugar
- 3/4 cup sifted all-purpose flour
- 1 tablespoon lemon juice
- 1/8 teaspoon salt
For Frosting and Filling:
- 1/2 lb good quality semisweet chocolate or 1/2 lb bittersweet chocolate
- 1 cup (2 sticks) unsalted butter, softened
- 1 teaspoon vanilla extract
- 3 egg yolks
- 2 tablespoons confectioners’ sugar
Equipment Needed
- Electric mixer
- Rubber spatula
- Seven pieces of aluminum foil or baking pan liner paper, approximately 11 inches long
- Cookie sheets
- Cooling racks
- 9-inch circular object (springform pan bottom, cake tin, pot cover)
- Double boiler
- Small bowl
- Cake plate
- Long, narrow metal spatula
- Wax paper strips
- Small sharp knife
- Scissors
Instructions
-
Prepare the Baking Surfaces: Tear off seven pieces of aluminum foil or baking pan liner paper, each about 11 inches long. Lightly spread softened butter over a 10-inch square area in the center of each piece of foil or paper. Sprinkle the buttered area with flour. Shake and tilt the foil or paper to ensure the buttered area is thoroughly floured, then shake off any excess. On the floured area, trace a 9-inch circle using a 9-inch circular object as a pattern. Repeat with the remaining pieces of foil or paper. Set aside.
-
Preheat the Oven: Place a rack in the center of the oven and preheat to 450 degrees Fahrenheit (232 degrees Celsius).
-
Beat the Egg Yolks: In the large bowl of an electric mixer at high speed, beat the 10 egg yolks (7 separated + 3 additional) for a few minutes until they are pale and lemon-colored.
-
Add Sugar Gradually: Reduce the mixer speed and gradually add the 3 1/2 cups of confectioners’ sugar. Increase the speed to high again and beat for 5 minutes, or until very thick.
-
Incorporate Flour: Reduce the speed and gradually add the 3/4 cup of sifted all-purpose flour, then increase the speed to high again and beat for 5 minutes more (the mixture will be almost stiff), scraping the bowl occasionally with a rubber spatula.
-
Add Lemon Juice: Mix in the 1 tablespoon lemon juice and remove the bowl from the mixer. (The mixture will be very thick – use your fingers to get it all off the beaters).
-
Whip Egg Whites: In a separate clean bowl, beat the seven egg whites with the 1/8 teaspoon salt until they hold a point – stiff, but not dry.
-
Combine Mixtures: Since the yolk mixture is very thick, stir a few spoonfuls of the beaten egg whites into it to lighten it a bit. Then, gently fold in a few large spoonfuls three or four times until the mixture lightens. Gently fold in the remaining egg whites.
-
Spread the Batter: With a large serving spoon, place two or three large spoonfuls of the batter on one of the prepared pieces of foil or paper. Using the back of the spoon, spread the batter thin, slowly rotating the paper with your left hand as you spread the batter with your right hand. Make it thin, but do not leave any holes in it. A 1/4-inch thickness should give you seven layers. Do not make the edges too thin. Follow the lines closely, but the edges can be trimmed later.
-
Bake the Layers: Slide a cookie sheet under the foil or paper and bake for 5 to 7 minutes, or until the top is golden brown with dark brown spots. If the layers are thicker than mine, they will take longer to bake. If they are not baked long enough, they will stick to the foil or paper.
-
Repeat Baking: Repeat with the remaining layers. If you bake more than one layer at a time, rotate the positions of the pans during baking to ensure even browning.
-
Cool the Layers: When a layer is baked and out of the oven, lift the corners of the foil or paper and invert onto a rack. Peel off the paper and immediately invert the layer onto another rack to cool, right side up. (Letting the layer cool upside down will make it stick to the rack.)
-
Manage Cooling Space: When you run out of racks, layers may cool on smooth toweling that has been dusted with confectioners’ sugar. When you run out of room, cooled layers may be stacked if you sprinkle the tops lightly with confectioners’ sugar and place wax paper between them.
-
Trim the Layers: Cooled layers may be trimmed to even the edges. Working on a board, place an 8-1/2 inch or 9-inch pot cover or cake pan on the layer. Cut around with a small sharp knife and then cut with scissors.
-
Melt the Chocolate: For the frosting and filling, melt the 1/2 lb of semisweet or bittersweet chocolate in the top of a double boiler over hot water on moderate heat. Remove from heat, stir until smooth, and set aside to cool completely. Do not skip this step or the frosting will be grainy.
-
Cream the Butter: In a small bowl of an electric mixer, cream the 1 cup (2 sticks) of softened unsalted butter.
-
Add Flavorings and Yolks: Add the 1 teaspoon vanilla extract and 3 egg yolks and beat well.
-
Combine with Chocolate: Add the 2 tablespoons confectioners’ sugar and cooled chocolate. Beat until thoroughly mixed, scraping the bowl with a rubber spatula.
-
Assemble the Torte: Place four strips of wax paper around the outer edges of a cake plate. Place one cake layer on the plate and, with a long, narrow metal spatula, spread with a thin layer of the chocolate filling. If you have made more than seven layers, the filling must be spread very thin in order to have enough for all. Place another layer on top, adjusting it carefully so that the edges are lined up evenly.
-
Continue Layering: Continue icing the layers, stacking them as evenly as possible. Spread the remaining chocolate smoothly around the sides first and then over the top.
-
Chill the Torte: Remove wax paper strips by pulling each one out by a narrow end, and refrigerate the cake for at least several hours to set the icing. Store in the refrigerator and serve cold.
Expert Tips & Tricks
- Even Layers are Key: Aim for consistent thickness when spreading the batter to ensure even baking and a balanced torte. Using a scale to measure the batter for each layer can help with this.
- Chocolate Tempering: If you want a truly professional-looking chocolate coating, consider tempering the chocolate before using it for the frosting. This will give it a glossy sheen and prevent it from blooming (developing white streaks).
- Don’t Overbake: Overbaking the cake layers will result in dry, brittle layers. Watch them carefully and remove them from the oven as soon as they are golden brown with dark spots.
- Room Temperature Butter: Make sure your butter is properly softened before creaming it. This will ensure a smooth and creamy frosting.
- Layering Variations: You can brush each layer with simple syrup or a liqueur like rum or Kirsch before adding the chocolate filling. This will add moisture and flavor.
Serving & Storage Suggestions
Serve the Dobosh Torte chilled. A sharp, heavy knife is recommended for clean slices due to the firmness of the cake. It can be served as is, or with a dollop of whipped cream or a scoop of vanilla ice cream. It’s a perfect dessert for special occasions and pairs well with coffee or a dessert wine.
The torte should be stored in the refrigerator, where it will keep for up to 3-4 days. It can also be frozen for longer storage (up to 2 months). Thaw it in the refrigerator overnight before serving.
Nutritional Information
| Nutrient | Amount per Serving | % Daily Value |
|---|---|---|
| Calories | 467.7 kcal | N/A |
| Total Fat | 30.1 g | 46% |
| Saturated Fat | 17.5 g | 87% |
| Cholesterol | 232.2 mg | 77% |
| Sodium | 209.8 mg | 8% |
| Total Carbohydrate | 48.5 g | 16% |
| Dietary Fiber | 3.4 g | 13% |
| Sugars | 36 g | N/A |
| Protein | 8.3 g | 16% |
Variations & Substitutions
- Nutty Dobosh: Add finely ground toasted nuts (almonds, hazelnuts, or walnuts) to the cake batter or sprinkle them between the layers.
- Coffee Infusion: Add a tablespoon of instant coffee powder to the chocolate frosting for a mocha flavor.
- Citrus Zest: Grate orange or lemon zest into the cake batter or the chocolate frosting for a brighter flavor.
- Jam Layers: As the original recipe suggests, include a thin layer of cherry, raspberry, or strawberry jam between one or two of the chocolate layers. This provides a delightful contrast in flavor and texture.
- Caramel Top: For a stunning presentation, reserve some of the trimmed cake pieces and dip them in caramel to create a decorative crown for the top of the torte.
FAQs (Frequently Asked Questions)
Q: Why are my cake layers sticking to the foil/paper?
A: Make sure you are generous with both the butter and flour when preparing the foil/paper. Also, ensure the layers are baked long enough – they should be golden brown with dark brown spots.
Q: Can I make the cake layers ahead of time?
A: Yes, the cake layers can be made a day or two in advance and stored at room temperature, wrapped tightly in plastic wrap.
Q: My chocolate frosting is too thick. What can I do?
A: Add a tablespoon of milk or cream at a time until the frosting reaches your desired consistency.
Q: How can I prevent the chocolate from seizing when melting?
A: Ensure the bowl you are using for melting the chocolate is completely dry. Even a small amount of water can cause the chocolate to seize. Melt the chocolate over low heat, stirring frequently.
Q: Can I freeze the Dobosh Torte?
A: Yes, Dobosh Torte freezes well. Wrap it tightly in plastic wrap and then in foil before freezing. Thaw it in the refrigerator overnight before serving.
Final Thoughts
Dobosh Torte is more than just a cake; it’s an experience. It requires patience and attention to detail, but the result is a truly magnificent dessert that will impress your friends and family. Don’t be intimidated by the many layers – each step is simple and straightforward. I encourage you to try this recipe and create your own memories with this classic Hungarian masterpiece. Share your creations and experiences; I would love to hear about your own Dobosh Torte adventures! And for the perfect pairing, serve it with a strong cup of coffee or a sweet dessert wine for an unforgettable culinary experience.