
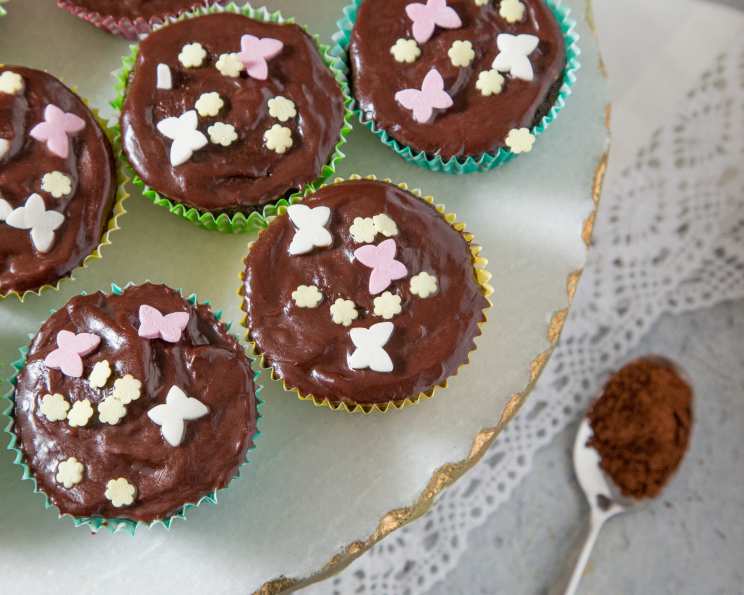
Double Chocolate Mini Cupcakes: A Bite-Sized Symphony of Sweetness
I remember the first time I made these double chocolate mini cupcakes. It was for my daughter’s fifth birthday, a party overflowing with princess dresses, superhero capes, and enough sugar to send a small army into a frenzy. But amidst the rainbow-colored chaos, these little chocolate gems stood out. Their deep, rich flavor, intense chocolate aroma, and fudgy glaze were a hit with kids and adults alike, and from that day on, they became a staple in our household, a tiny but mighty symbol of celebrations big and small.
Recipe Overview
- Prep Time: 20 minutes
- Cook Time: 15 minutes
- Total Time: 35 minutes
- Yields: 48-55 mini cupcakes
- Dietary Type: Vegetarian
Ingredients
Cupcakes
- 1 1⁄3 cups sifted all-purpose flour
- 1⁄3 cup dutch process cocoa
- 3⁄4 teaspoon baking soda
- 1⁄4 teaspoon salt
- 1⁄2 cup unsalted butter, softened, cut into pieces
- 1 cup sugar
- 1 tablespoon instant coffee, dissolved in 1 tablespoon hot water
- 3⁄4 teaspoon vanilla
- 2 large eggs
- 3⁄4 cup whole milk
- 1 cup miniature chocolate chips
Glaze
- 6 ounces semisweet chocolate, chopped or 6 ounces miniature chocolate chips
- 6 tablespoons unsalted butter, cut up
- 6 tablespoons heavy cream or 6 tablespoons whipping cream
Equipment Needed
- Miniature muffin tins
- Mini cupcake liners
- Sifter
- Mixing bowls
- Electric mixer
- Cookie scoop (optional)
- Double boiler (or two pots)
- Miniature rubber spatula
Instructions
-
Let’s begin by preparing your mini muffin tins. This recipe yields approximately 50 to 60 miniature cupcakes, so make sure you have enough space. Line your miniature muffin tins with miniature cupcake liners. I personally prefer purchasing these liners at a craft store that specializes in cake supplies, as they often have a better selection and quality.
-
Preheat your oven to 350°F (175°C). This is crucial for even baking and ensuring that your cupcakes rise properly.
-
In a medium bowl, sift together the flour, cocoa, baking soda, and salt. Sifting is essential because it removes any lumps and ensures a light and airy texture in your cupcakes. Blend the dry ingredients well with a whisk after sifting to ensure even distribution of the leavening agents.
-
In a large mixing bowl, cream the softened butter thoroughly with an electric mixer until it is very soft and fluffy. This step is important for creating a tender crumb.
-
Gradually add the sugar to the creamed butter and continue to beat for a minute or two until the mixture is light and well combined.
-
Beat in the coffee mixture (instant coffee dissolved in hot water) and vanilla extract. The coffee enhances the chocolate flavor beautifully.
-
Add the eggs one at a time, beating well after each addition. This ensures that each egg is fully incorporated into the batter, creating a smooth and emulsified mixture.
-
Now, for the dry and wet ingredients. At low speed, add the dry ingredients in three equal additions and the milk in two equal additions. Alternate between the dry and wet ingredients, beginning and ending with the dry ingredients. In other words, add one-third of the dry mixture, then half of the milk, then another one-third of the dry ingredients, followed by the rest of the milk, and then the last of the dry ingredients. This prevents the gluten in the flour from developing too much, which can result in tough cupcakes.
-
Scrape down the bowl as needed to ensure that all ingredients are evenly incorporated. The mixture should have the consistency of a thick pudding.
-
Stir in the miniature chocolate chips.
-
Pour the batter into the prepared muffin cups. I like to fill them pretty close to the top; when they bake, they come over and make a mushroom shape, which is how I prefer them. However, if you prefer smaller cupcakes, fill the cups accordingly. A cookie scoop (which looks like a small ice cream scoop but is designed for cookie dough) works well to fill the muffin cups without too much mess.
-
Bake at 350°F (175°C) for about 15 minutes, or until a toothpick inserted into the center comes out clean. Start checking for doneness around the 13-minute mark. Ovens can vary, so it’s always best to err on the side of caution.
-
Remove the cupcakes from the pan and let cool completely on a wire rack before glazing.
-
While the cupcakes are cooling, prepare the glaze. Put the chocolate, butter, and cream in the top of a double boiler (or in a heatproof bowl set over a saucepan of simmering water, ensuring the bottom of the bowl doesn’t touch the water).
-
Use low heat and stir until the mixture is smooth and glossy. The glaze might not look very chocolate-like until right at the end, so be patient. Stir completely to make it as smooth as possible.
-
Remove from the heat and let the glaze cool for about five minutes. This allows it to thicken slightly, making it easier to work with.
-
Spoon the glaze onto each cupcake and swirl it decoratively. A miniature rubber spatula works well for this. The glaze will be very shiny at first, but it will become more fudge-like as it cools.
-
Allow the glaze to set completely before serving.
Expert Tips & Tricks
- Room temperature is key: Make sure your butter, eggs, and milk are all at room temperature. This helps the ingredients emulsify properly, resulting in a smoother batter and more evenly baked cupcakes.
- Don’t overmix: Overmixing develops the gluten in the flour, leading to tough cupcakes. Mix until just combined.
- Coffee Substitute: If you are worried about the coffee flavor for children, you can omit it from the recipe, or replace it with a teaspoon of espresso powder added to the dry ingredients.
- Glaze consistency: If the glaze is too thick, add a tablespoon of cream at a time until you reach the desired consistency. If it’s too thin, let it cool for a bit longer, stirring occasionally.
- Prevent sticking: Ensure your cupcake liners are securely placed in the muffin tin to prevent the batter from sticking.
Serving & Storage Suggestions
Serve these double chocolate mini cupcakes at room temperature for the best flavor and texture. They make a delightful addition to parties, potlucks, or simply as a sweet treat for yourself.
To store leftover cupcakes, place them in an airtight container at room temperature. They will stay fresh for up to 3 days. For longer storage, you can freeze them for up to 2 months. Thaw them at room temperature before serving. If the glaze has lost its shine during storage, you can gently warm the cupcakes in the microwave for a few seconds to restore it.
Nutritional Information
| Nutrient | Amount per Serving | % Daily Value |
|---|---|---|
| Calories | 107.4 kcal | N/A |
| Calories from Fat | 67 g | 63% |
| Total Fat | 7.5 g | 11% |
| Saturated Fat | 4.6 g | 22% |
| Cholesterol | 19.6 mg | 6% |
| Sodium | 39.1 mg | 1% |
| Total Carbohydrate | 10.8 g | 3% |
| Dietary Fiber | 1.1 g | 4% |
| Sugars | 6.4 g | 25% |
| Protein | 1.6 g | 3% |
Note: Nutritional information is an estimate and may vary based on specific ingredients and portion sizes.
Variations & Substitutions
- Gluten-Free: Use a gluten-free all-purpose flour blend in place of the regular flour. Be sure to add 1/2 teaspoon of xanthan gum to improve the texture.
- Dairy-Free: Substitute the butter with a dairy-free butter alternative, the milk with almond or soy milk, and the heavy cream with coconut cream. Use dairy-free chocolate for the glaze.
- Peanut Butter Swirl: Add a dollop of peanut butter to the top of each cupcake before baking, and swirl it in with a toothpick for a peanut butter chocolate twist.
- Mint Chocolate: Add a few drops of peppermint extract to the batter and use mint chocolate chips instead of regular chocolate chips.
FAQs (Frequently Asked Questions)
Q: Can I make these cupcakes ahead of time?
A: Yes, you can bake the cupcakes ahead of time and store them in an airtight container at room temperature for up to two days. Glaze them just before serving for the best results.
Q: Can I use regular-sized muffin tins instead of miniature ones?
A: Yes, but you’ll need to adjust the baking time. Regular-sized cupcakes will likely take 18-22 minutes to bake.
Q: What if I don’t have Dutch-process cocoa?
A: You can use regular unsweetened cocoa powder, but the flavor and color might not be as intense.
Q: My glaze is too thick. What should I do?
A: Add a tablespoon of heavy cream at a time until you reach the desired consistency.
Q: Why did my cupcakes sink in the middle?
A: This can happen if the oven temperature is too low, or if the cupcakes were not baked long enough. Make sure your oven is properly preheated, and check for doneness with a toothpick.
Final Thoughts
These double chocolate mini cupcakes are more than just a sweet treat; they’re a little moment of joy, a bite-sized celebration, and a reminder that sometimes the best things come in small packages. Don’t be afraid to experiment with variations and make them your own. So gather your ingredients, preheat your oven, and get ready to create some delicious memories. I encourage you to share your creations and feedback, and perhaps pair them with a glass of cold milk or a scoop of vanilla ice cream for the ultimate indulgence. Happy baking!