
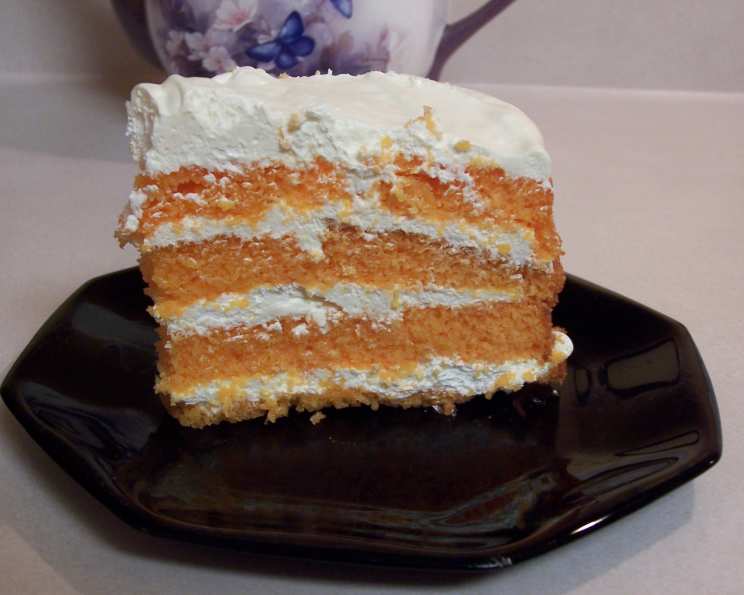
Dreamsicle Delight: A Taste of Sunshine in Every Slice
The scent of oranges always takes me back to childhood summers. I remember meticulously peeling oranges, segment by segment, the tangy juice bursting in my mouth. One of my favorite summer treats was a Dreamsicle bar; the creamy vanilla ice cream encased in a vibrant, frozen orange shell was absolute perfection. This Dreamsicle Cake captures that nostalgic flavor in a delightful, shareable dessert. It’s a bright and cheerful cake perfect for bringing a little sunshine to any occasion, any time of year.
Recipe Overview
- Prep Time: 20 minutes
- Cook Time: 25 minutes
- Total Time: 45 minutes
- Servings: 16
- Yield: One 4-layer cake
- Dietary Type: Not specified
Ingredients
For the Cake:
- 1 (18 ounce) box orange cake mix
- 1 (3 ounce) box orange gelatin
- 1/3 cup oil
- 1 1/4 cups water
- 3 eggs
- 1 teaspoon orange extract
For the Frosting:
- 12 ounces sour cream
- 1 1/4 cups sugar
- 1/2 cup orange juice
- 12 ounces Cool Whip (or more, if desired)
- 1 (2 ounce) package shredded coconut (optional)
Equipment Needed
- Two 9-inch round cake pans
- Mixing bowls
- Electric mixer
- Measuring cups and spoons
- Serrated knife
- Spatula
Instructions
- Preheat your oven to 350°F (175°C). Grease and flour two 9-inch round cake pans. This step is crucial for preventing the cake from sticking and ensuring easy removal.
- In a large mixing bowl, combine the orange cake mix, orange gelatin, oil, water, eggs, and orange extract.
- Using an electric mixer, blend all ingredients until well combined. The batter should be smooth and relatively lump-free.
- Pour the batter evenly into the prepared cake pans.
- Bake for 20-25 minutes, or until a toothpick inserted into the center comes out clean. Keep a close eye on the cakes; ovens can vary. Start checking for doneness around 20 minutes. If the tops are browning too quickly, tent them loosely with foil.
- Remove the cakes from the oven and let them cool in the pans for about 10 minutes before inverting them onto a wire rack to cool completely.
- Once the cakes are completely cool, use a long, serrated knife to carefully slice each layer horizontally in half, creating four layers total. This step adds to the cake’s height and creates more surface area for the delicious frosting.
- For the Frosting: In a large bowl, combine the sour cream and shredded coconut (if using). Note that the original recipe creator doesn’t use coconut, so feel free to omit it if you prefer a smoother frosting.
- In a separate bowl, mix the sugar and orange juice until the sugar is mostly dissolved. This creates a sweet and tangy syrup that will enhance the overall flavor of the frosting.
- Combine the sugar-orange juice mixture with the sour cream mixture.
- Gently fold in the Cool Whip until everything is evenly incorporated. Be careful not to overmix, as this can deflate the Cool Whip and result in a less fluffy frosting. It is imperative to use thawed Cool Whip to prevent a runny frosting.
- To assemble the cake, place one layer on a serving plate or cake stand. Spread a generous amount of frosting over the layer.
- Repeat with the remaining layers, stacking them on top of each other and frosting each layer.
- Once all the layers are stacked, spread the remaining frosting over the top and sides of the cake.
- Refrigerate the cake for at least 30 minutes before serving to allow the frosting to set and the flavors to meld together. Refrigerating longer (even overnight) is perfectly fine and can enhance the flavor even more.
Expert Tips & Tricks
- For an extra burst of orange flavor, consider adding a tablespoon of orange zest to the cake batter. Be sure to use the zest of an unwaxed orange, or scrub the orange well before zesting.
- If you’re not a fan of Cool Whip, you can substitute it with stabilized whipped cream. To stabilize whipped cream, add a teaspoon of cornstarch or gelatin powder to the cream before whipping.
- To prevent the cake layers from sliding, you can place a small dab of frosting on the serving plate before placing the first layer.
- For a neater frosting job, chill the cake layers for about 15 minutes before frosting. This will help to firm them up and make them easier to handle.
- If your frosting seems too thin, you can add a tablespoon of powdered sugar at a time until it reaches the desired consistency.
- To easily slice the cake into even layers, use a cake leveler or a long, serrated knife and gently rotate the cake while keeping the knife steady.
Serving & Storage Suggestions
This Dreamsicle Cake is best served chilled. The cool frosting and moist cake layers create a refreshing and satisfying dessert.
- To serve, slice the cake into individual portions and garnish with fresh orange slices or a sprinkle of shredded coconut.
- Leftover cake should be stored in an airtight container in the refrigerator for up to 3 days.
- The cake can also be frozen for longer storage. Wrap individual slices tightly in plastic wrap and then place them in a freezer-safe container. Frozen cake can be stored for up to 2 months. Thaw in the refrigerator overnight before serving.
Nutritional Information
Note: The following information is an estimate and can vary based on specific ingredients and serving sizes.
| Nutrient | Amount per Serving | % Daily Value |
|---|---|---|
| Calories | 583.8 kcal | N/A |
| Calories from Fat | 247 g | 42% |
| Total Fat | 27.5 g | 42% |
| Saturated Fat | 11.4 g | 56% |
| Cholesterol | 75.5 mg | 25% |
| Sodium | 432.4 mg | 18% |
| Total Carbohydrate | 80.3 g | 26% |
| Dietary Fiber | 0.6 g | 2% |
| Sugars | 62 g | N/A |
| Protein | 5.9 g | 11% |
Variations & Substitutions
- Gluten-Free: Use a gluten-free orange cake mix.
- Dairy-Free: Substitute the sour cream with a dairy-free sour cream alternative and use dairy-free whipped topping.
- Coconut Cream Frosting: Replace the Cool Whip with whipped coconut cream for a tropical twist.
- Other Citrus Flavors: Experiment with lemon or lime cake mix and corresponding gelatin for a different citrusy flavor.
- Orange Glaze: Instead of frosting, create a simple orange glaze with powdered sugar and orange juice.
FAQs (Frequently Asked Questions)
Q: Can I use a different size cake pan?
A: While 9-inch pans are recommended for the specified baking time, you can use other sizes. Adjust the baking time accordingly; smaller pans may require longer baking times, while larger pans may bake faster. Always check for doneness with a toothpick.
Q: Can I make this cake ahead of time?
A: Absolutely! This cake is perfect for making ahead of time. Assemble the cake and refrigerate it for several hours or overnight to allow the flavors to meld together.
Q: Can I freeze the cake?
A: Yes, you can freeze the cake for up to 2 months. Wrap individual slices tightly in plastic wrap and then place them in a freezer-safe container. Thaw in the refrigerator overnight before serving.
Q: What can I use instead of Cool Whip?
A: You can substitute Cool Whip with stabilized whipped cream. To stabilize whipped cream, add a teaspoon of cornstarch or gelatin powder to the cream before whipping. Alternatively, use whipped coconut cream for a dairy-free option.
Q: My frosting is too runny. What can I do?
A: If your frosting is too runny, you can add a tablespoon of powdered sugar at a time until it reaches the desired consistency. Make sure your Cool Whip is sufficiently thawed, but not melted.
Final Thoughts
I hope you enjoy this Dreamsicle Cake as much as I do. It’s a simple yet satisfying dessert that’s perfect for any occasion. Whether you’re celebrating a birthday, a holiday, or simply a sunny day, this cake is sure to bring a smile to everyone’s face. Don’t be afraid to experiment with different variations and substitutions to create your own unique version. I’d love to hear your feedback and see your creations, so please share your thoughts and photos! Pair this cake with a glass of chilled orange juice or a scoop of vanilla ice cream for the ultimate Dreamsicle experience. Happy baking!