
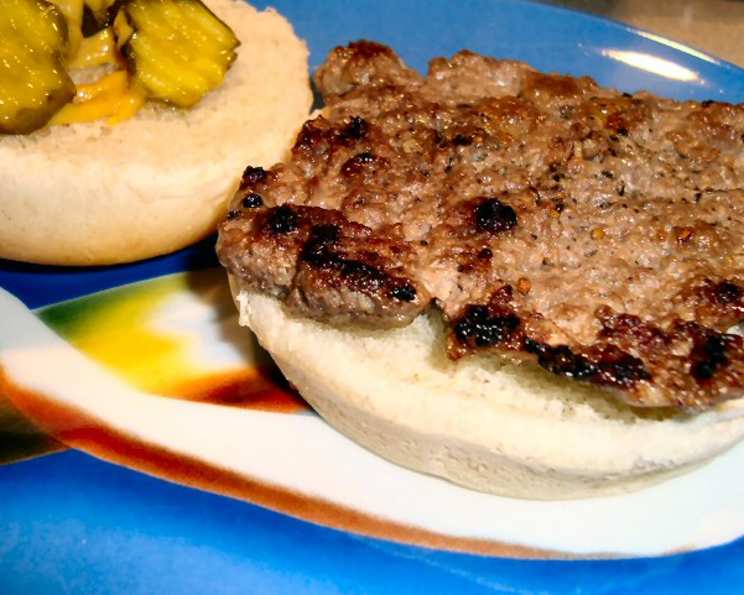
The Nostalgic Allure of Drive-In Hamburgers: A Culinary Journey Back in Time
The smell of sizzling burgers, a hint of grease in the air, and the warm summer night buzzing with conversation – these are the memories that flood back to me whenever I think of drive-in hamburgers. As a kid, a trip to the local drive-in was a weekend ritual. The anticipation of that thin, crispy-edged patty, nestled in a soft bun with a squirt of mustard, was almost unbearable. It wasn’t just a meal; it was an experience, a taste of Americana that I’ve been chasing in my kitchen ever since.
Recipe Overview
- Prep Time: 15 minutes
- Cook Time: 10-15 minutes
- Total Time: 25-30 minutes
- Servings: 10
- Yields: 10 burgers
- Dietary Type: Varies (Can be Gluten-Free with Gluten-Free Buns)
Ingredients
- 1 lb ground beef (preferably round steak)
- 1/3 lb pork sausage
- 2 cups soft bread cubes (OK to use the crust)
- 2 tablespoons Worcestershire sauce
- Salt to taste
- Pepper to taste
- 10 hamburger buns (not the big ones, just normal sized buns)
- Mustard, for serving
Equipment Needed
- Large Mixing Bowl
- Wax Paper
- Rolling Pin (Optional)
- Skillet(s)
- Spatula
Instructions
- In a large mixing bowl, combine the ground beef, pork sausage, bread cubes, and Worcestershire sauce. Season generously with salt and pepper.
- Thoroughly mix all ingredients together. The mixture should be cohesive but not overly wet. If the mixture seems too dry, you can add up to 1 tablespoon of water to make it more pliable. However, be cautious not to add too much water, as this will affect the patty’s ability to crisp up.
- Lay out a long piece of wax paper on a clean work surface. Divide the meat mixture into ten equal portions.
- Place one portion of the meat mixture onto the wax paper. Cover it with another piece of wax paper.
- Using your hands or a rolling pin, gently flatten and stretch the meat into a very thin patty. Aim for a thickness of about 1/8 inch. The patties should be larger than the hamburger buns, as they will shrink slightly during cooking.
- Repeat steps 4 and 5 with the remaining meat portions until you have ten thin patties.
- Heat a skillet (or two for faster cooking) over medium-high heat. No need to add oil as the fat from the ground beef and sausage will be enough.
- Carefully place the thin patties into the hot skillet, ensuring not to overcrowd. Work in batches if necessary.
- Fry the burgers for 2-3 minutes per side, or until they are cooked through and the edges are crispy and browned. The thin patties cook quickly, so keep a close eye on them to prevent burning. The internal temperature should reach 160°F (71°C).
- While the burgers are cooking, prepare the buns. Toast the hamburger buns lightly until they are crisp and golden brown.
- Once the burgers are cooked, immediately place them on the toasted buns.
- Serve the burgers hot with mustard. Other condiments, like ketchup or pickles, can also be added as desired.
Expert Tips & Tricks
- The key to a true drive-in burger is the thinness of the patty. Don’t be afraid to really stretch the meat out. This creates those desirable crispy edges and allows the burger to cook quickly.
- Use a meat thermometer to ensure doneness, especially if you’re new to making these thin patties. Overcooked burgers will be dry and tough.
- For an even more authentic drive-in experience, consider using a griddle instead of a skillet. The flat surface provides even heat distribution.
- Don’t skip the pork sausage! It adds a distinct flavor that elevates these burgers beyond your average hamburger.
- Want to add some sweetness? Mix a teaspoon of brown sugar into the meat mixture for a slightly caramelized flavor.
- If you want to elevate the flavors further, a dash of smoked paprika adds a nice smokey depth to the patties.
Serving & Storage Suggestions
Serve your drive-in burgers immediately while they are hot and crispy. A classic pairing is with crispy french fries and a cold milkshake or soda.
Leftover cooked patties can be stored in an airtight container in the refrigerator for up to 3-4 days. Reheat them in a skillet or microwave until heated through. While they won’t be as crispy as freshly cooked, they’ll still be delicious.
It’s not recommended to freeze the cooked patties as this can affect the texture. The raw patties can be frozen before cooking. Wrap them individually in plastic wrap and then place them in a freezer bag. They can be stored in the freezer for up to 2-3 months. Thaw them in the refrigerator before cooking.
Nutritional Information
| Nutrient | Amount per Serving | % Daily Value |
|---|---|---|
| Calories | 284.4 kcal | N/A |
| Calories from Fat | N/A | 41% |
| Total Fat | 12.9 g | 19% |
| Saturated Fat | 4.5 g | 22% |
| Cholesterol | 41.7 mg | 13% |
| Sodium | 413.1 mg | 17% |
| Total Carbohydrate | 25.5 g | 8% |
| Dietary Fiber | 1.1 g | 4% |
| Sugars | 3.3 g | N/A |
| Protein | 15.3 g | 30% |
Note: Nutritional information is an estimate and may vary based on specific ingredients and portion sizes.
Variations & Substitutions
- Gluten-Free: Use gluten-free hamburger buns and ensure your Worcestershire sauce is gluten-free.
- Leaner Burger: Use ground turkey or chicken instead of ground beef, but be aware that the flavor profile will change. You may need to add a bit of olive oil to the skillet to prevent sticking.
- Spicy Kick: Add a pinch of red pepper flakes or a dash of hot sauce to the meat mixture for a spicy twist.
- Vegetarian Option: While not a true drive-in burger, you can use plant-based ground meat alternative.
- Cheese Addition: Add a slice of American or cheddar cheese to the burger while it’s still hot in the skillet to melt the cheese.
FAQs (Frequently Asked Questions)
Q: Why are these burgers so thin?
A: Thin patties are essential for achieving that crispy-edged texture characteristic of classic drive-in burgers. The larger surface area allows for more browning and crisping.
Q: Can I use different types of bread?
A: While classic hamburger buns are recommended, you can experiment with other types of bread, such as brioche or potato rolls. However, the texture and overall experience may differ.
Q: How do I prevent the patties from sticking to the skillet?
A: Use a well-seasoned skillet or a non-stick skillet. Also, ensure the skillet is hot before adding the patties.
Q: Can I add onions to the meat mixture?
A: Yes, you can add finely chopped onions to the meat mixture for added flavor. About 1/4 cup of finely chopped onion should be sufficient.
Q: What’s the best way to serve these burgers?
A: The best way to serve these burgers is hot off the skillet with a simple condiment like mustard. Adding too many toppings can overwhelm the flavor of the crispy patty.
Final Thoughts
Recreating these drive-in hamburgers at home is more than just cooking; it’s a nostalgic journey. It’s about capturing the simple pleasures of good food, good company, and the magic of those carefree summer nights. So, gather your ingredients, fire up the skillet, and prepare to be transported back in time with every delicious bite. Don’t hesitate to experiment with variations and share your feedback. Happy cooking!