
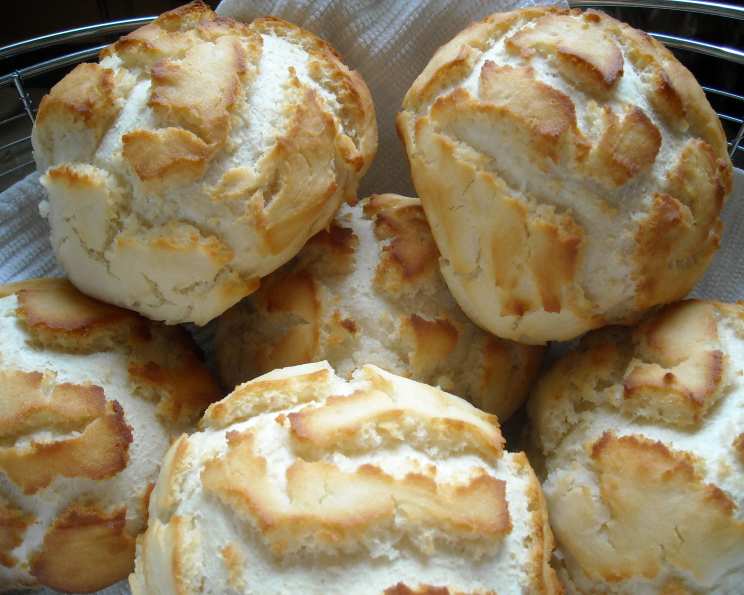
Dutch Crunch Rolls: A San Francisco Staple, Baked at Home
There’s something magical about the smell of baking bread that fills a home, a comforting aroma that evokes memories of cozy kitchens and shared meals. But Dutch Crunch rolls… they elevate that experience. I remember the first time I tasted one – the crackly, mottled crust giving way to a soft, pillowy interior. It was in a tiny San Francisco bakery, a hidden gem overflowing with locals. The distinctive, slightly sweet, and undeniably addictive topping sparked a culinary quest that eventually led me to perfecting this recipe. These aren’t just rolls; they’re an experience, a little piece of San Francisco you can create in your own kitchen.
Recipe Overview
- Prep Time: 1 hour 35 minutes (includes rising time)
- Cook Time: 25-30 minutes
- Total Time: 2 hours 5-10 minutes
- Servings: 8
- Yield: 8 Rolls
- Dietary Type: Vegetarian (easily made vegan)
Ingredients
For the Dough:
- 2 1⁄4 teaspoons active dry yeast (1 packet)
- 1 1⁄4 cups warm low-fat milk (105-110°F) (or non-dairy milk for vegan)
- 1 1⁄2 tablespoons sugar
- 2 tablespoons vegetable oil
- 1 1⁄2 teaspoons salt
- 3 – 4 cups all-purpose flour (or bread flour)
For the Dutch Crunch Topping:
- 2 (4 1/2 teaspoon) packets active dry yeast
- 1 cup warm water (105-115°F)
- 2 tablespoons sugar
- 2 tablespoons vegetable oil
- 1⁄2 teaspoon salt
- 1 1⁄2 cups rice flour
- 1 tablespoon coarse sea salt (optional)
Equipment Needed
- Electric mixer or large mixing bowl
- Dough hook attachment (if using electric mixer)
- Measuring cups and spoons
- Lightly greased bowl
- Plastic wrap
- Sharp knife or dough scraper
- Parchment paper
- Baking sheet
- Whisk
- Wire rack
Instructions
-
Activate the Yeast: In the bowl of an electric mixer or a large mixing bowl, combine 2 1⁄4 teaspoons active dry yeast, 1 1⁄4 cups warm low-fat milk, and 1 1⁄2 tablespoons sugar. Stir to dissolve the yeast and let it sit for about 5 minutes. You should see the mixture start to bubble or foam a bit, and it should smell yeasty – this confirms the yeast is active and ready to work its magic.
-
Combine Wet and Dry Ingredients: Add 2 tablespoons vegetable oil, 1 1⁄2 teaspoons salt, and 2 cups of flour to the yeast mixture.
-
Mix the Dough: Mix at low speed until the dough comes together. If using an electric mixer, switch to the dough hook attachment. Gradually add the remaining flour, a quarter cup at a time, until the dough pulls away from the sides of the bowl. (Note: The amount of flour needed may vary depending on the humidity of your kitchen. Start with 3 cups and add more as needed.)
-
Knead the Dough: Knead the dough for about 4 minutes, until it is smooth and elastic. This step is crucial for developing the gluten, which gives the rolls their structure and chewiness.
-
First Rise: Turn the dough out onto a lightly floured surface and knead it a few more times. Shape it into a ball and place it in a lightly greased bowl. Cover the bowl with plastic wrap and let the dough rise for 1 hour, or until it has doubled (or more) in size.
-
Divide and Shape the Dough: Once the dough has risen, turn it out onto a lightly floured surface. Divide it into 8 equal portions (if you’d like to make rolls) using a sharp knife or a dough scraper. Shape each portion into a ball.
-
Second Rise: Place the shaped rolls on a parchment-lined baking sheet, being careful not to handle the dough too much at this point. Cover them with a clean towel and let them rise for 15 minutes while you prepare the topping.
-
Prepare the Dutch Crunch Topping: In a large bowl, combine 2 (4 1/2 teaspoon) packets of active dry yeast, 1 cup warm water, 2 tablespoons sugar, 2 tablespoons vegetable oil, 1⁄2 teaspoon salt, and 1 1⁄2 cups rice flour. Beat vigorously with a whisk to combine all the ingredients thoroughly.
-
Adjust Topping Consistency: The consistency of the topping should be like stiff royal icing – spreadable, but not too runny. If you pull some up with your whisk, it should form soft peaks. Add more water or rice flour as necessary to achieve the desired consistency. Let the topping stand for 15 minutes. This allows the rice flour to fully hydrate and the yeast to activate, creating the distinctive crackled texture.
-
Coat the Rolls with Topping: Generously coat the top of each roll with a thick layer of the prepared topping. Don’t be shy – a thin layer will not crack properly. Sprinkle on the optional coarse sea salt if desired.
-
Final Rest: Let the topped rolls stand, uncovered, for 15 minutes. This allows the topping to set slightly before baking.
-
Bake the Rolls: Bake in a preheated 375ºF (190ºC) oven for 25-30 minutes, or until the rolls are well browned and the Dutch Crunch topping has cracked and turned a nice golden-brown color.
-
Cool and Enjoy: Let the baked rolls cool completely on a wire rack before eating. This prevents them from becoming soggy and allows the flavors to fully develop.
Expert Tips & Tricks
- Yeast Activation: Always check the expiration date on your yeast. If you’re unsure if your yeast is active, proof it by adding it to warm water with a pinch of sugar. If it doesn’t bubble within 5-10 minutes, it’s best to use fresh yeast.
- Dough Consistency: The dough should be slightly tacky but not sticky. If it’s too sticky, add flour one tablespoon at a time until it reaches the right consistency.
- Topping Thickness: The thickness of the Dutch Crunch topping is key to achieving the signature crackled effect. Err on the side of applying too much rather than too little.
- Oven Temperature: Oven temperatures can vary. If your rolls are browning too quickly, lower the oven temperature by 25 degrees.
- Steam: For an extra-soft interior, you can add steam to your oven during baking. Place a pan of hot water on the bottom rack of your oven.
Serving & Storage Suggestions
Dutch Crunch rolls are best enjoyed fresh, ideally within a few hours of baking. Serve them warm, either plain or with your favorite fillings. They make excellent sandwich rolls, sliders, or even a tasty side to soups and salads.
To store leftover rolls, wrap them tightly in plastic wrap or place them in an airtight container. They will keep at room temperature for 1-2 days or in the refrigerator for up to 3 days. To reheat, wrap the rolls in foil and warm them in a 350°F (175°C) oven for 5-10 minutes. You can also freeze the rolls for up to 2 months. Thaw them overnight in the refrigerator and reheat as described above.
Nutritional Information
| Nutrient | Amount per Serving | % Daily Value |
|---|---|---|
| Calories | 394.8 kcal | N/A |
| Calories from Fat | 76 g | 19% |
| Total Fat | 8.5 g | 13% |
| Saturated Fat | 1.4 g | 6% |
| Cholesterol | 1.9 mg | 0% |
| Sodium | 602.9 mg | 25% |
| Total Carbohydrate | 69.2 g | 23% |
| Dietary Fiber | 3.5 g | 13% |
| Sugars | 7.7 g | N/A |
| Protein | 10.2 g | 20% |
Note: Nutritional information is an estimate and may vary based on specific ingredients and portion sizes.
Variations & Substitutions
- Vegan Dutch Crunch Rolls: Substitute the low-fat milk with your favorite non-dairy milk, such as almond, soy, or oat milk. Ensure the chosen milk is warmed to the correct temperature before adding the yeast.
- Gluten-Free Dutch Crunch Rolls: While this recipe does not offer a gluten-free option, you could experiment with gluten-free all-purpose flour blends for the dough. Note that the texture and rise may be different, and you might need to adjust the liquid content.
- Sweet Dutch Crunch Rolls: Add a touch of vanilla extract to both the dough and the topping for a sweeter flavor profile. You can also increase the amount of sugar in the dough by a tablespoon.
- Savory Dutch Crunch Rolls: Omit the sugar in the dough and add a teaspoon of garlic powder or onion powder for a savory twist. Consider adding grated cheese to the topping for an extra layer of flavor.
FAQs (Frequently Asked Questions)
Q: Why is my Dutch Crunch topping not cracking?
A: The most common reason for this is that the topping is too thin. Be generous with the topping, ensuring a thick layer is applied to each roll. Also, make sure your yeast is active and that the topping has rested for the specified time.
Q: Can I make the dough ahead of time?
A: Yes, you can prepare the dough the day before and store it in the refrigerator. After the first rise, punch down the dough, wrap it tightly in plastic wrap, and refrigerate it overnight. Allow the dough to come to room temperature for about 30 minutes before proceeding with the shaping and baking steps.
Q: What is rice flour and why is it important for the topping?
A: Rice flour is a fine flour made from ground rice. It is essential for the Dutch Crunch topping because it creates the characteristic crackled texture. The rice flour hydrates and expands during baking, causing the topping to crack and become crispy.
Q: Can I use bread flour instead of all-purpose flour for the dough?
A: Yes, you can use bread flour. It will result in a slightly chewier and more structured roll. Keep in mind that bread flour absorbs more liquid, so you may need to add a bit more water to the dough to achieve the desired consistency.
Q: How do I know when the rolls are done baking?
A: The rolls are done when they are golden brown and the Dutch Crunch topping has cracked and turned a nice golden-brown color. You can also check the internal temperature of the rolls with a thermometer; it should be around 200-210°F (93-99°C).
Final Thoughts
So, there you have it – a step-by-step guide to creating your own delectable Dutch Crunch rolls. Don’t be intimidated by the process; bread baking is as much an art as it is a science. Embrace the journey, enjoy the aroma that fills your kitchen, and most importantly, savor the taste of these iconic San Francisco treats. I encourage you to give this recipe a try, and feel free to share your feedback and any creative twists you come up with. Perhaps you’ll pair them with a hearty clam chowder or a freshly brewed cup of coffee. Happy baking!