
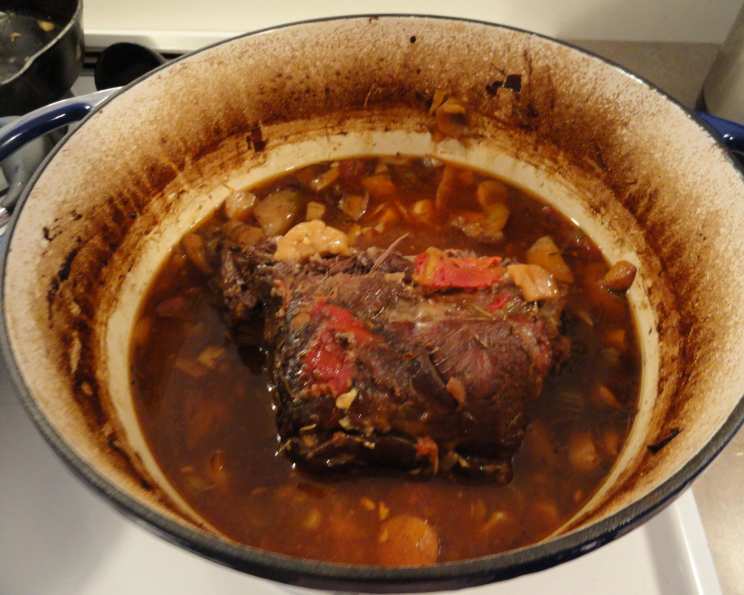
Dutch Oven Garlic Rosemary Studded Venison Rump
The aroma still lingers in my memory – that heady blend of woodsmoke, damp earth, and slowly braising venison. It was a crisp November afternoon, the kind that sends shivers down your spine and paints the leaves in fiery hues. My grandfather, a seasoned hunter, had just returned with a magnificent buck, and the entire family gathered in the kitchen, buzzing with anticipation. That night, nestled beside a crackling fire, we feasted on venison, slow-cooked to utter perfection in his trusty Dutch oven. It was a moment of pure, unadulterated joy, a tangible connection to the land and the traditions that bound us together. While this Garlic Rosemary Studded Venison Rump might not have been the exact recipe he used, it evokes that same feeling of warmth and comfort, transforming simple ingredients into something truly extraordinary.
Recipe Overview
- Prep Time: 30 minutes
- Cook Time: 2 hours
- Total Time: 2 hours 30 minutes
- Servings: 6-9
- Yield: One large roast with vegetables
- Dietary Type: Gluten-Free (naturally)
Ingredients
- 4-6 lbs boned-out rump roast
- 8 garlic cloves, peeled and crushed
- 1 tablespoon cracked pepper
- Kosher salt to taste
- 3 sprigs rosemary (whole sprigs)
- 3 tablespoons olive oil
- 2-3 large carrots, peeled and chopped
- 2 celery ribs, chopped
- ½ large Spanish onion, chopped
- 1 cup good quality red wine (like Cabernet Sauvignon or Merlot)
- 6 stewed plum tomatoes
- 6 cups unsalted beef stock or 6 cups bouillon
- 12-14 small onions, skin removed (cipollini or pearl onions work well)
- 6 parsnips, peeled and cut into ½ inch slices
- 2 tablespoons olive oil
- Salt and pepper to taste
Equipment Needed
- Large Dutch oven (6-quart or larger)
- Long, thin knife or meat skewer
- Large sauté pan
- Kitchen twine
Instructions
- Begin by preparing the rump roast. Remove any silver skin, sinew, and excess fat from the surface of the meat. This will help prevent the roast from becoming tough during cooking.
- Rub the meat with several of the crushed garlic cloves, ensuring a generous coating.
- Sprinkle the roast liberally with kosher salt and cracked pepper. The amount of salt will depend on the size of your roast, so season generously but taste as you go, keeping in mind that the beef stock will also add saltiness.
- Using kitchen twine, tie the meat into a compact, even roast. This will help it cook more uniformly and maintain its shape.
- Now, for the garlic and rosemary infusion: Using a long, thin knife or meat skewer, pierce the roast several inches deep in about a half-dozen evenly spaced areas.
- Using the handle of a teaspoon, carefully push crushed garlic pieces and fresh rosemary leaves into the slits. This will deeply infuse the venison with flavor.
- Rub the entire roast with 3 tablespoons of olive oil, ensuring it’s evenly coated.
- Preheat your oven to 350 degrees Fahrenheit (175 degrees Celsius).
- Place your Dutch oven on the stovetop over high heat. When the pot is hot (almost smoking), sear the roast, browning it on all sides. This step is crucial for developing rich, deep flavors. The browning process, known as the Maillard reaction, creates complex flavors that elevate the entire dish.
- Remove the seared roast from the Dutch oven and set it aside. Reduce the heat to medium. Add 1-2 tablespoons of olive oil to the pot.
- Sauté the chopped carrots, celery, and Spanish onion in the Dutch oven until they begin to brown, about 5-7 minutes. This will create a flavorful base for the braising liquid.
- Return the roast to the pot, nestling it among the sautéed vegetables.
- Pour 1 cup of red wine over the roast. Allow the wine to deglaze the bottom of the pot, scraping up any browned bits with a wooden spoon. This adds another layer of flavor.
- Add the stewed plum tomatoes to the pot.
- Pour in the unsalted beef stock (or bouillon) until it covers the roast. You may need to add a bit more stock depending on the size of your roast and Dutch oven.
- Bring the mixture to a simmer on the stovetop. Once simmering, cover the Dutch oven with its lid and place it in the preheated oven.
- While the rump is braising in the oven, prepare the cipollini onions and parsnips. Place a large sauté pan on the stovetop over medium-high heat.
- Add 2 tablespoons of olive oil to the sauté pan. Add the onions and parsnips and sauté until they are browned and slightly softened, about 8-10 minutes. Season with salt and pepper. Set aside.
- One hour into the rump’s cooking time, carefully remove the Dutch oven from the oven. Add the sautéed onions and parsnips to the pot, distributing them evenly around the roast.
- Replace the lid on the Dutch oven and return it to the oven. Continue cooking for an additional 30-60 minutes, or until the meat is fork-tender. The exact cooking time will depend on the size of your roast and your oven.
- To check for doneness, insert a fork into the thickest part of the roast. It should slide in and out easily with minimal resistance. The meat should also be easily shredded with the fork.
- Once the venison is cooked to your liking, remove the Dutch oven from the oven. Let the roast rest for at least 15-20 minutes before carving. This allows the juices to redistribute, resulting in a more tender and flavorful roast.
- To serve, remove the roast from the Dutch oven and carve it into slices. Serve the venison with the braised vegetables and plenty of the rich, flavorful braising liquid.
Expert Tips & Tricks
- Don’t skip the searing step! It’s essential for developing a deep, rich flavor. Ensure your pot is screaming hot before adding the roast.
- Use good quality red wine. The wine’s flavor will concentrate during the braising process, so choose one you enjoy drinking.
- For a thicker sauce, remove the roast and vegetables from the Dutch oven after cooking. Place the Dutch oven on the stovetop over medium-high heat. Bring the braising liquid to a simmer and cook until it reduces and thickens to your desired consistency. You can also whisk in a tablespoon of cornstarch slurry (cornstarch mixed with cold water) to thicken the sauce.
- If you don’t have a Dutch oven, you can use a large oven-safe pot with a tight-fitting lid.
- Make ahead: The venison can be braised a day ahead of time. Let it cool completely, then store it in the braising liquid in the refrigerator. Reheat gently on the stovetop or in the oven before serving.
Serving & Storage Suggestions
Serve the Garlic Rosemary Studded Venison Rump hot, sliced, and accompanied by the braised vegetables and pan juices spooned generously over the meat. Creamy mashed potatoes or polenta make excellent side dishes to soak up the flavorful sauce. A crusty loaf of bread is also perfect for mopping up every last drop.
Storage: Leftover venison rump can be stored in an airtight container in the refrigerator for up to 3-4 days. For longer storage, freeze the venison and vegetables separately for up to 2-3 months. Thaw overnight in the refrigerator before reheating.
Reheating: Reheat leftover venison gently in a saucepan over low heat, adding a little beef stock or water if needed to prevent it from drying out. You can also reheat it in a covered dish in a preheated oven at 300°F (150°C) until warmed through.
Nutritional Information
(Estimated values, may vary based on specific ingredients and portion size)
| Nutrient | Amount per Serving | % Daily Value |
|---|---|---|
| Calories | 650 kcal | 33% |
| Total Fat | 35g | 54% |
| Saturated Fat | 12g | 60% |
| Cholesterol | 180mg | 60% |
| Sodium | 700mg | 30% |
| Total Carbohydrate | 30g | 10% |
| Dietary Fiber | 8g | 32% |
| Sugars | 12g | N/A |
| Protein | 50g | 100% |
Variations & Substitutions
- Different Cuts of Venison: While this recipe calls for a rump roast, you can also use other cuts of venison, such as a shoulder roast or a neck roast. Cooking times may vary depending on the cut.
- Vegetable Variations: Feel free to add other vegetables to the braise, such as mushrooms, turnips, or sweet potatoes.
- Herb Variations: Experiment with different herbs, such as thyme, sage, or oregano.
- Wine Substitution: If you don’t have red wine on hand, you can substitute beef broth or chicken broth.
FAQs (Frequently Asked Questions):
Q: Can I use dried rosemary instead of fresh?
A: While fresh rosemary is preferred for its aroma and flavor, you can use dried rosemary in a pinch. Use about 1 teaspoon of dried rosemary for every sprig of fresh rosemary.
Q: How do I prevent the venison from drying out?
A: Braising the venison in a Dutch oven with plenty of liquid is the best way to keep it moist and tender. Be sure to cook it low and slow, and don’t overcook it.
Q: Can I make this recipe in a slow cooker?
A: Yes, you can adapt this recipe for a slow cooker. Sear the roast as directed, then transfer it to the slow cooker with the vegetables, wine, and stock. Cook on low for 6-8 hours, or until the meat is fork-tender.
Q: What is silver skin and why should I remove it?
A: Silver skin is a thin, tough membrane found on some cuts of meat. It doesn’t break down during cooking and can make the meat tough and chewy. Removing it before cooking will result in a more tender roast.
Q: Can I use a different type of stock?
A: While beef stock is recommended for its rich flavor, you can also use chicken stock or vegetable stock. The flavor of the braise will be slightly different, but it will still be delicious.
Final Thoughts
This Dutch Oven Garlic Rosemary Studded Venison Rump is more than just a recipe; it’s an invitation to create memories, to gather around a table with loved ones, and to savor the simple joys of life. Don’t be intimidated by the seemingly long list of ingredients or the braising process. Each step is designed to layer flavors and create a truly exceptional dish. So, gather your ingredients, fire up your oven, and prepare to be transported to a place where the aromas of garlic, rosemary, and slow-cooked venison fill the air, creating a symphony of taste and warmth. I encourage you to try this recipe, make it your own, and share it with the people you cherish. Serve it with a hearty red wine, and let the conversations flow as freely as the wine. I’d love to hear about your experience and any personal touches you add to the recipe. Happy cooking!