
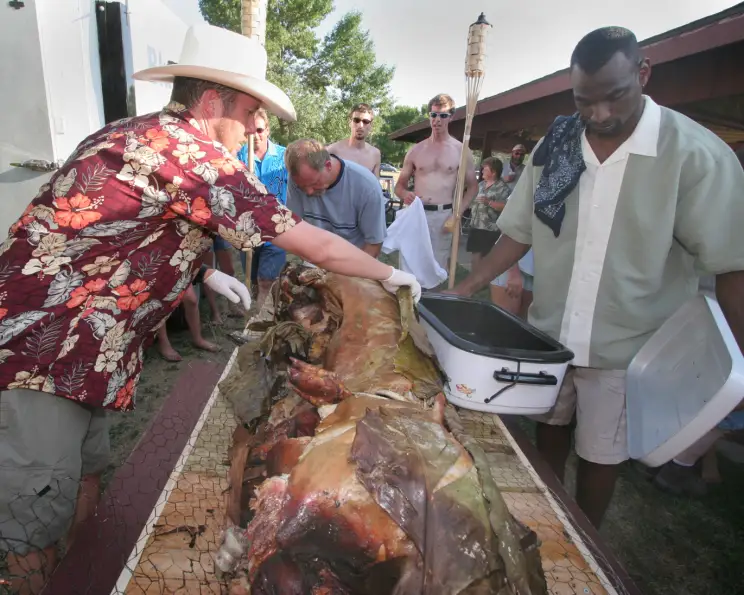
Earth Oven Roast Pig: A Culinary Journey Back in Time
The aroma still lingers in my memory – a smoky, earthy perfume interwoven with the succulent scent of roasted pork. It takes me back to a small village in Hawaii, where I witnessed my first imu pig roast. The community gathered, laughing and sharing stories as the pig was unearthed, steam billowing, the culmination of a day’s worth of communal effort. It wasn’t just a meal; it was a celebration of culture, connection, and the timeless art of cooking with the earth. This recipe captures that spirit, bringing the ancient technique of earth oven roasting to your backyard.
Recipe Overview
- Prep Time: 55 hours
- Cook Time: 7 hours
- Total Time: 62 hours
- Servings: 200
- Yield: Varies based on pig size
- Dietary Type: Not specified
Ingredients
- (100 lb) pig (any size)
- Salt
- Pepper
- Garlic Powder
- Onion
- Pineapple
Additional Items:
- Canvas tarp (large enough to anchor around the edge of the hole)
- Charcoal briquettes
- One cord of wood (adjust based on pig and pit size, overestimate)
- 40 cantaloupe-sized rocks (preferably lava rocks, river rocks will work)
- Chicken wire
- 30 or so green banana leaves
- Very sharp knives
- 20 wet burlap bags
- Metal chimney (approx. 3-foot length of 6-inch diameter aluminum pipe)
- Green corn husks (or cabbage/seaweed)
- Shovels
- Rope
- Carabiners (optional, for easier lowering and lifting)
- Charcoal lighter fluid
- Post-hole digger (optional, for handling hot rocks)
Equipment Needed
- Shovels
- Very sharp knives (box cutters are also useful)
- Rope
- Carabiners (optional)
- Post-hole digger (optional)
Instructions
-
Dig the Pit: This is the most physically demanding part. For a 200-pound hog, dig a pit that is approximately 5 feet by 7 feet and 3 feet deep. Adjust the dimensions based on the pig’s size, but ensure it is no less than 3 feet deep. Square walls are preferable for easier lowering and removal of the pig.
-
Prepare the Fire Pit: Place the chimney in the center of the pit. Fill the hole completely with wood, piling it up about 2 feet above the surface. Evenly space the rocks on top of the wood. Ensure you have enough rocks to completely cover the bottom of the pit once the wood burns down.
-
Ignite the Fire: Drop 10-15 charcoal briquettes down the chimney. Pour a whole can of charcoal lighter fluid onto the briquettes. Ignite the lighter fluid using a rolled-up piece of newspaper or brown paper bag soaked in lighter fluid. Carefully drop it down the chimney. Remove the chimney once the fire is well-established. Note that if using aluminum for the chimney, it will likely burn away in the intense heat.
-
Prepare the Pig: While the fire is burning, score the pig’s skin with extremely sharp knives, such as box cutters. Rub the skin generously with salt, pepper, and garlic powder. Sharpen knives frequently as pig skin is tough to cut. Stuff the cavity of the hog with the onions and pineapple. If desired, inject the meat with your favorite marinade at this stage.
-
Wait for the Fire to Burn Down: Allow the fire to burn down completely. If using river rocks, be aware that they can explode and crack due to trapped moisture. Placing chicken wire over the fire can help contain any flying pieces. The cracking will subside as the rocks heat up.
-
Add Rocks to the Pig’s Cavity: Once the fire has burned down and the rocks are hot, carefully place several of the hot rocks inside the pig’s cavity. Use a post-hole digger to handle the rocks safely. Use enough rocks to fill most of the cavity, but do not overfill.
-
Wrap the Pig: Wrap the pig first in the green banana leaves and then in chicken wire. The banana leaves prevent charring, while the chicken wire holds the pig together during cooking and facilitates placement and removal.
-
Create a Bed: On top of the hot rocks in the pit, create a bed of green corn husks. Cabbage or seaweed can be used as alternatives. Corn husks will impart a subtle sweetness to the meat. Cabbage will have a much stronger smell.
-
Lower the Pig: Carefully lower the wrapped pig onto the bed of corn husks. Use rope and carabiners to carefully lower the pig into the pit.
-
Cover with Burlap Bags: Thoroughly soak the burlap bags in water. Cover the entire pig with the wet burlap bags, creating a lid to trap the heat.
-
Seal the Pit: Cover the pit with the canvas tarp. Anchor the edges and corners securely. Moisten the tarp thoroughly. Use the dirt excavated from the hole to completely cover the tarp, starting at the edges to prevent slippage. Soak the dirt with water and keep it moist throughout the cooking process.
-
Cook the Pig: Allow the pig to cook for approximately 7 hours. A 200-pound hog may require up to 8 hours.
-
Unearth the Pig: After the cooking time, carefully remove the dirt, roll back the tarp, and remove the pig from the pit. Attach a length of rope with a carabiner to the chicken wire and use it to lift the pig out.
Expert Tips & Tricks
- Source Local: If possible, source your pig from a local farm to ensure freshness and support your community.
- Rock Selection: Lava rocks retain heat exceptionally well and are the preferred choice for an imu. If using river rocks, be prepared for potential cracking and popping.
- Flavor Infusion: Experiment with different marinades injected into the meat for unique flavor profiles. Consider using citrus-based marinades, Asian-inspired sauces, or traditional Hawaiian rubs.
- Temperature Control: While it’s challenging to precisely control the temperature, monitoring the moisture level of the dirt covering the tarp can help regulate the heat within the pit. Keep the dirt consistently damp.
- Safety First: Handling hot rocks requires caution. Use heat-resistant gloves or a post-hole digger to avoid burns. Keep children and pets away from the pit during the entire process.
Serving & Storage Suggestions
The Earth Oven Roast Pig is best served immediately after unearthing, allowing guests to witness the dramatic reveal. Carve the pork and serve it with traditional accompaniments such as poi (pounded taro root), lomi salmon (massaged salted salmon with tomatoes and onions), and haupia (coconut milk pudding).
Storage: Leftover pork can be stored in an airtight container in the refrigerator for up to 3-4 days. It can also be frozen for up to 2-3 months.
Reheating: Reheat leftover pork in the oven at 325°F (160°C) until heated through. Adding a little broth or water can help prevent it from drying out. You can also reheat individual portions in the microwave.
Nutritional Information
| Nutrient | Amount per Serving | % Daily Value |
|---|---|---|
| Calories | Varies | N/A |
| Total Fat | Varies | N/A |
| Saturated Fat | Varies | N/A |
| Cholesterol | Varies | N/A |
| Sodium | Varies | N/A |
| Total Carbohydrate | Varies | N/A |
| Dietary Fiber | Varies | N/A |
| Sugars | Varies | N/A |
| Protein | Varies | N/A |
Note: Nutritional information will vary significantly based on the size of the pig, the amount of fat, added ingredients, and serving size. These values are estimates only.
Variations & Substitutions
- Smaller Scale: If roasting a whole pig is too ambitious, adapt the technique for smaller cuts of pork, such as a pork shoulder or leg. Adjust the pit size and cooking time accordingly.
- Vegetarian Option: While not a direct substitute, you can adapt the earth oven technique for roasting large quantities of vegetables, such as squashes, potatoes, and corn on the cob.
- Regional Twists: Experiment with different flavor profiles based on your region. Use local herbs, spices, and fruits to create a unique and personalized roast.
- Smoke Enhancement: Add wood chips to the fire to infuse the pork with additional smoky flavor. Mesquite, applewood, and hickory are all excellent choices.
FAQs (Frequently Asked Questions)
Q: How do I know when the pig is done cooking?
A: The best way to check for doneness is to use a meat thermometer. The internal temperature of the thickest part of the pig should reach 190-200°F (88-93°C). The meat should be easily pulled apart with a fork.
Q: What if the rocks start exploding?
A: Exploding rocks are a common occurrence when using river rocks. Cover the fire with chicken wire to contain the pieces. The cracking will eventually subside as the rocks heat up.
Q: Can I use a gas grill instead of building an earth oven?
A: While a gas grill can be used to roast pork, it will not replicate the unique flavor and texture achieved through earth oven cooking. The earth oven imparts a subtle smoky and earthy flavor that cannot be duplicated.
Q: What do I do if it rains during the cooking process?
A: If it rains, ensure the tarp is securely anchored and that the dirt covering the tarp remains moist. A little rain will not significantly affect the cooking process.
Q: How far in advance should I start preparing for this recipe?
A: Plan to start preparing at least a week in advance. This allows ample time to source the pig, gather the necessary materials, dig the pit, and prepare the fire. The pit should ideally be dug a few days before the roast to allow for any necessary adjustments.
Final Thoughts
The Earth Oven Roast Pig is more than just a recipe; it’s an experience. It’s a testament to the power of community, the beauty of simple ingredients, and the enduring magic of cooking with the earth. While it requires dedication and hard work, the reward is immeasurable – a feast that will tantalize your senses and create lasting memories. Gather your friends and family, embrace the challenge, and embark on this culinary adventure. The taste of traditionally prepared, slow-cooked pork is well worth the effort. Don’t hesitate to experiment with seasonings and flavors to make it your own, and above all, enjoy the process! Share your experience and feedback – happy roasting!