
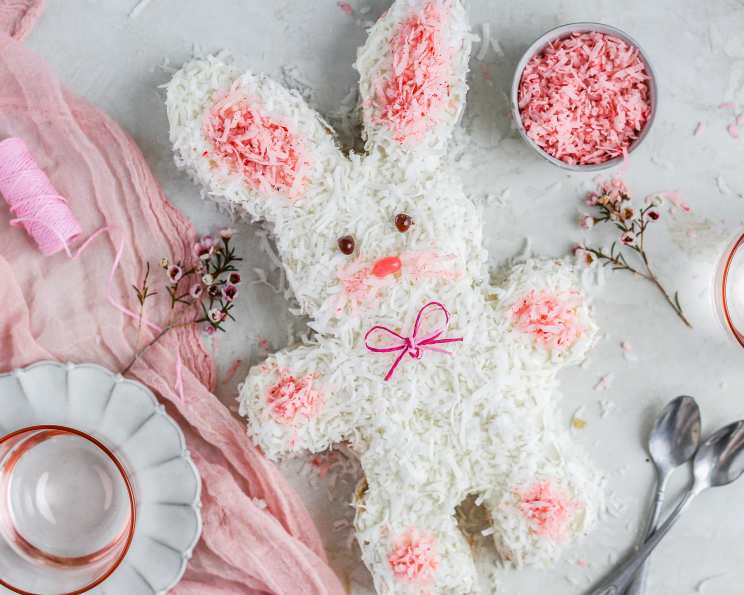
Hopping into Easter: Crafting the Perfect Bunny Cake
The memory is still so vivid: a pastel wonderland of sprinkles, coconut snow, and jelly bean eyes staring back at me from a cake shaped like a bunny. My grandmother, a master of all things homemade, would unveil her Easter Bunny cake every year, and it was always the centerpiece of our celebration. The sweet aroma of vanilla and the sticky-sweet frosting were pure, unadulterated joy. It wasn’t just a cake; it was a symbol of family, love, and the magic of Easter morning. Now, carrying on that tradition brings me just as much joy as it did back then.
Recipe Overview
- Prep Time: 30 minutes
- Cook Time: 30 minutes
- Total Time: 1 hour
- Servings: 8-10
- Yield: 1 Bunny Cake
- Dietary Type: Vegetarian
Ingredients
- 1 (18 ounce) box white cake mix (white or yellow are best)
- Eggs (as called for by your cake mix)
- 1/3 cup oil (or as called for by your cake mix)
- 1 1/3 cups water (or as called for by your cake mix)
- 1 (16 ounce) can white frosting (or use your favorite recipe)
- 1 (14 ounce) package coconut (either flaked or shredded will work)
- 1/2 yard ribbon (approx., for bow)
- Food coloring
- Jelly beans (for decorations, eyes, nose, etc.) or gumdrops (for decorations, eyes, nose, etc.)
Equipment Needed
- Two 9-inch round cake pans
- Mixing bowls
- Electric mixer
- Spatula
- Cookie sheet or large platter
- Small plastic sandwich bag
Instructions
-
Preheat your oven according to the directions on your cake mix box. Grease and flour two 9-inch round cake pans. This prevents the cake from sticking and ensures easy removal.
-
Prepare the cake mix according to the directions on the box for two 9-inch round layers. Follow the instructions carefully, paying attention to the mixing time and any specific requirements. Using the exact measurements recommended will produce the best results for your chosen cake mix.
-
Pour the batter evenly into the prepared cake pans. Ensure both pans have an equal amount of batter for even baking.
-
Bake the cakes according to the directions on the box. Check for doneness by inserting a toothpick into the center; if it comes out clean, the cakes are ready. Generally, this will be around 30 minutes at 350°F (175°C), but ovens vary, so keep a close eye on them.
-
Let the cakes cool in the pans for 10 minutes before inverting them onto a wire rack to cool completely. Cooling them completely will prevent crumbling during frosting.
-
While the cakes are cooling, prepare your decorations. Tint 1/4 cup of the coconut pink for the center of the ears and feet. Place the coconut in a small bowl, add a few drops of pink food coloring, and mix well until evenly tinted.
-
Tint 2 tablespoons of the frosting brown for decorating the face and feet. Similarly, place the frosting in a small bowl, add a few drops of brown food coloring, and mix well. Alternatively, you can use a store-bought decorating icing tube for this step.
-
Once the cakes are completely cool, it’s time to cut them into the shapes for the bunny. This is where the fun begins! Refer to the provided diagram to accurately cut the circles. Cut each circle into 4 sections. Four of those sections are trimmed along the rounded edges to form bunny feet.
-
Take four of the eight outer ring pieces (the bunny feet) and frost the tops. Place one of the remaining four pieces on top of each and frost top and sides. These will make the feet of the bunny, creating a nice sturdy base.
-
Place the round-cut center piece next to the top edge of the square, keeping them both flat, to form the body and head. Position them on your large cookie sheet or platter, leaving enough room for the feet and ears.
-
Assemble the four side pieces in twos, flat sides together (you can use a little frosting to hold them together) to form the ears and arrange at the top of the head. This gives the bunny its recognizable shape.
-
Now, frost the entire cake with the white frosting. Use a spatula to create a smooth, even layer. This is your canvas for decorating!
-
Attach the completed feet, two on each side of the body, using a bit of frosting to secure them.
-
Sprinkle coconut over the entire cake, creating a fluffy, bunny-like texture. Gently press the coconut into the frosting to ensure it adheres well.
-
Decorate with jelly beans or gumdrops for the eyes, nose, etc., as desired. Use the pink-tinted coconut for the center of the ears and feet. This adds a pop of color and detail.
-
Tie the ribbon in a bow and place it on the cake as a bowtie, or get creative and make buttons out of the candy, add a hat, or any other decorations that spark your imagination.
-
If you don’t have a pastry bag, spoon the brown tinted frosting into one corner of a small plastic sandwich baggie, twist tightly, and snip off the tip of the corner. Voila! An instant piping bag for creating the bunny’s facial features.
Expert Tips & Tricks
- For a more intense coconut flavor, toast the coconut lightly in a dry skillet before using. Watch it carefully to prevent burning.
- If your frosting is too thick, add a teaspoon of milk or water at a time until it reaches the desired consistency.
- To prevent the cake layers from sliding, use a small amount of frosting as “glue” on the serving platter before placing the first layer.
- Make sure your cakes are completely cooled before frosting. Warm cakes will melt the frosting and make decorating a sticky mess.
- For a richer flavor, try using a cream cheese frosting instead of traditional white frosting.
Serving & Storage Suggestions
Serve your Easter Bunny cake immediately or store it in the refrigerator until ready to serve. It’s best enjoyed within 2-3 days. The cake can be stored at room temperature for a few hours, but the frosting may soften. To store leftovers, cover the cake tightly with plastic wrap or place it in an airtight container. Freezing is not recommended, as the frosting and coconut texture may change upon thawing.
Nutritional Information
| Nutrient | Amount per Serving | % Daily Value |
|---|---|---|
| Calories | 473 kcal | 24% |
| Total Fat | 26g | 40% |
| Saturated Fat | 14g | 70% |
| Cholesterol | 35mg | 12% |
| Sodium | 289mg | 12% |
| Total Carbohydrate | 50g | 17% |
| Dietary Fiber | 4g | 16% |
| Sugars | 37g | N/A |
| Protein | 4g | 8% |
Variations & Substitutions
- Chocolate Bunny: Use a chocolate cake mix and chocolate frosting for a decadent twist.
- Carrot Cake Bunny: Substitute the white cake mix with a carrot cake mix for a more traditional Easter flavor.
- Lemon Bunny: Add lemon zest and lemon extract to the white cake mix for a refreshing citrus flavor. Use a lemon-flavored frosting.
- Gluten-Free Bunny: Use a gluten-free cake mix and ensure all other ingredients are also gluten-free.
- Vegan Bunny: Use a vegan cake mix and frosting, and substitute eggs with a flax egg or applesauce.
FAQs (Frequently Asked Questions)
Q: Can I make the cake layers ahead of time?
A: Yes, you can bake the cake layers a day or two in advance. Wrap them tightly in plastic wrap and store them at room temperature or in the refrigerator.
Q: How do I prevent the coconut from falling off the cake?
A: Make sure the frosting is still slightly wet when you sprinkle the coconut on. Gently press the coconut into the frosting to help it adhere.
Q: Can I use different types of candy for decoration?
A: Absolutely! Get creative and use any type of candy you like. Chocolate chips, sprinkles, and edible glitter are all great options.
Q: What if I don’t have 9-inch round cake pans?
A: You can use 8-inch round cake pans, but the baking time may need to be adjusted. Watch the cakes closely to prevent them from burning.
Q: Can I use homemade frosting instead of store-bought?
A: Yes, homemade frosting will work just as well, or even better! Just make sure you have enough to frost the entire cake.
Final Thoughts
This Easter Bunny cake is more than just a dessert; it’s a centerpiece of joy, a symbol of family traditions, and a canvas for your creativity. Don’t be afraid to experiment with different flavors, colors, and decorations to create a unique bunny that reflects your personal style. Whether you’re baking with kids, reliving childhood memories, or simply looking for a fun and festive dessert, this recipe is sure to bring a smile to everyone’s face. So, hop into the kitchen, gather your ingredients, and let the Easter Bunny magic begin! And please share your creations; I’d love to see your unique bunny designs!