
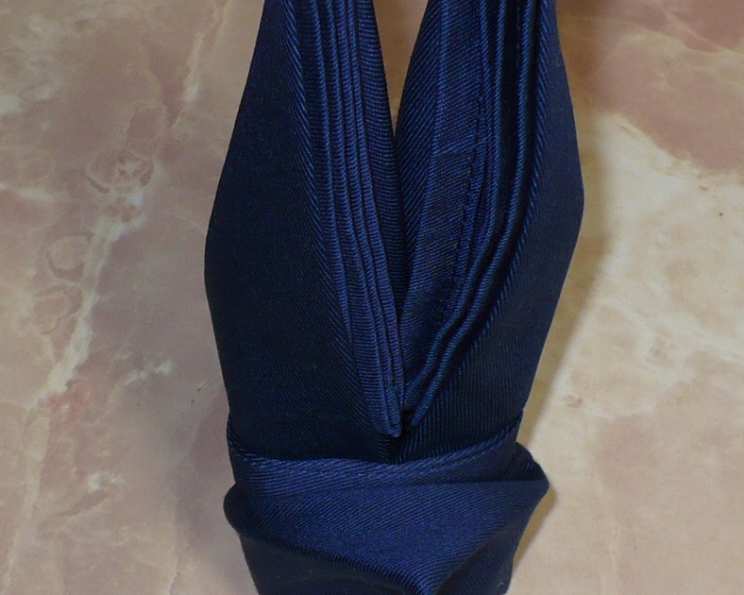
Hopping Good Easter: Crafting Bunny Napkins for a Festive Table
Easter at my grandmother’s was always a symphony of pastel colors, the scent of lilies, and the joyful chatter of family. While the Easter egg hunt and the chocolate bunnies were highlights for us kids, I remember being utterly fascinated by the way she set the table. Each detail was carefully considered, from the delicate china to the intricately folded napkins. One year, she crafted these adorable bunny-shaped napkins that instantly transformed our simple gathering into something truly magical. Now, years later, I carry on that tradition, and this simple fold remains one of my favorite ways to add a touch of whimsy to my Easter celebrations.
Recipe Overview
- Prep Time: 5 minutes
- Yields: 1 napkin
- Dietary Type: Not Applicable (This is a non-edible craft)
Ingredients
- 1 cloth serviette or napkin
Equipment Needed
- Flat surface
Instructions
- Begin with a lightly starched napkin. Light starch helps the napkin hold its shape.
- Lay the napkin right side up in a square on a flat surface. Make sure all the corners are aligned.
- Starting from the bottom, begin folding the napkin upward into 4 equal rectangular parts. Ensure each fold is crisp and even. This creates the base for the bunny shape.
- Find the middle of the folded rectangular napkin. This will be the central point for the next folds.
- Fold the right side of the napkin upward to the center of the rectangle. The edge of the right side should meet the centerline.
- Do the same with the left side. The edge of the left side should also meet the centerline, creating a pointed shape.
- Fold the top outer corners down to the center point. This forms the bunny’s ears.
- The napkin should now look like a diamond shape. Take care to make the folds even for symmetry.
- Fold the right and left points in to the center line. This narrows the body of the bunny.
- Carefully, turn the napkin over. This is a critical step to hide some folds and create a cleaner look.
- Take the bottom point and fold it upward so that the point is approximately 1 inch above the center line. This creates the bunny’s base.
- Carefully turn the napkin over again. This is the final turn to show the bunny’s front.
- Fold the right side in half, bringing the right edge towards the center.
- Fold the left side over so that it overlaps the right side. This secures the bunny’s body.
- Tuck the bottom left corner into the pocket of the right side to secure the napkin. This final tuck helps the bunny maintain its shape.
- The end result should resemble a bunny! Fluff the “ears” to give them a perky look.
Expert Tips & Tricks
- Fabric Choice: Linen or cotton napkins work best for this fold. Avoid overly thick or stiff napkins, as they can be difficult to manipulate.
- Starching: A lightly starched napkin will hold its shape much better. If you don’t have starch, you can lightly iron the napkin to give it some structure.
- Crisp Folds: The key to a well-defined bunny is crisp, clean folds. Use your fingers or a bone folder to create sharp creases.
- Practice Makes Perfect: Don’t be discouraged if your first attempt isn’t perfect. Like any craft, it takes practice to master this fold.
- Customize: Experiment with different colors and patterns to match your Easter theme. You can even add a ribbon around the “neck” of the bunny for an extra touch.
Serving & Storage Suggestions
These bunny napkins are meant to be displayed on your Easter table as a decorative element. They are not for consumption. After your Easter celebration, gently unfold the napkins and store them flat in a drawer or linen closet. They can be washed and ironed as needed. Avoid storing them folded for extended periods, as this can create permanent creases.
Nutritional Information
This recipe is for a napkin folding craft, not an edible dish, therefore nutritional information is not applicable.
| Nutrient | Amount per Serving | % Daily Value |
|---|---|---|
| Not Applicable | Not Applicable | Not Applicable |
| Not Applicable | Not Applicable | Not Applicable |
| Not Applicable | Not Applicable | Not Applicable |
Variations & Substitutions
- Color Coordination: Use different colored napkins to create a rainbow of bunnies on your table.
- Pattern Play: Experiment with patterned napkins, such as polka dots or stripes, for a more whimsical look.
- Seasonal Adaptations: While this is designed as an Easter bunny, you could adapt the colors and embellishments for other holidays. For example, use green napkins and add a shamrock for St. Patrick’s Day.
- Ribbon Accents: Tie a small ribbon around the “neck” of the bunny for a festive touch. Use pastel colors for Easter, or more vibrant colors for other occasions.
FAQs (Frequently Asked Questions)
Q: What type of napkin works best for this fold?
A: Linen or cotton napkins that are not too thick are ideal. They hold their shape well and are easy to fold.
Q: Can I use paper napkins for this?
A: While you can attempt it, paper napkins are often too flimsy and won’t hold the shape as well as cloth napkins.
Q: How can I make the bunny ears stand up straight?
A: Lightly starching the napkin before folding will help the ears stay upright. You can also use a bit of fabric stiffener if needed.
Q: Is it necessary to iron the napkin before folding?
A: Ironing the napkin is highly recommended, as it removes wrinkles and creates crisp, clean folds that are essential for a well-defined bunny shape.
Q: How can I prevent the napkin from unfolding during the meal?
A: Ensure that you tuck the bottom left corner securely into the pocket of the right side in the final step. This will help hold the fold in place.
Final Thoughts
I hope this Easter bunny napkin folding tutorial inspires you to add a touch of whimsy to your own celebrations. It’s a simple yet impactful way to elevate your table setting and create a memorable experience for your guests. Don’t be afraid to experiment with different colors, patterns, and embellishments to make it your own. Happy folding, and happy Easter!