
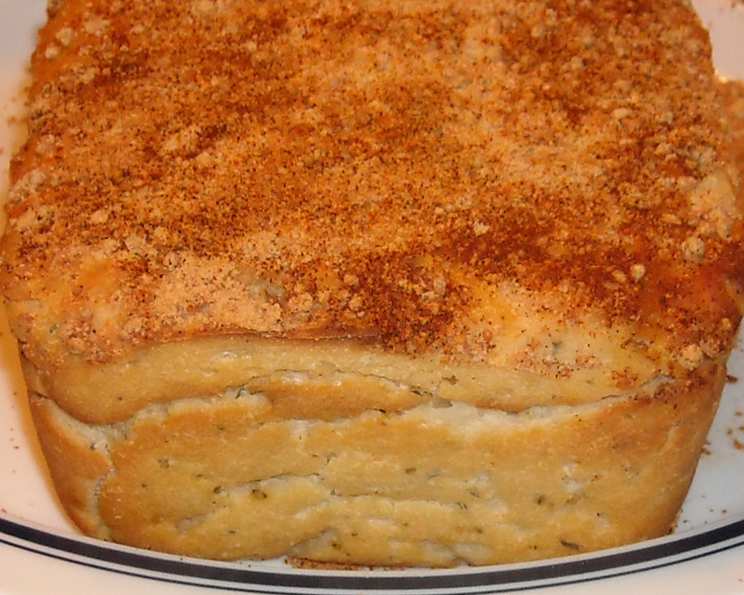
Easy Bake Herb and Garlic Bread: A Culinary Hug
The scent of freshly baked bread has always been my culinary comfort blanket. I remember being a child, perched on a stool in my grandmother’s sun-drenched kitchen, watching her knead dough with the rhythmic grace of a seasoned artisan. The air would be thick with the aroma of yeast and warmth, a promise of the simple, profound pleasure that only homemade bread can deliver. This Easy Bake Herb and Garlic Bread evokes that same feeling—it’s rustic, flavorful, and incredibly easy to make, a perfect way to bring a little bit of kitchen magic into your home.
Recipe Overview
- Prep Time: 10 minutes
- Cook Time: 50-60 minutes
- Total Time: 60-70 minutes
- Servings: 10
- Yield: 1 loaf
- Dietary Type: Vegetarian
Ingredients
- 3 cups self-raising flour
- 1 teaspoon dried thyme
- 1 teaspoon dried oregano
- 1 teaspoon salt
- 1/3 cup finely chopped parsley
- 500 milliliters buttermilk
- 1 egg
- 2 teaspoons crushed garlic
- Grated cheese, for the topping
- Paprika, for the topping
Equipment Needed
- Large mixing bowl
- Measuring cups and spoons
- Large baking tin (lined with parchment paper)
Instructions
- Preheat your oven to 180°C (350°F). This ensures the bread bakes evenly and gets a lovely golden crust.
- In a large mixing bowl, combine the self-raising flour, dried thyme, dried oregano, salt, and finely chopped parsley. Whisk these dry ingredients together to ensure they are evenly distributed. This step is important for a consistent flavor throughout the bread.
- In a separate bowl, beat together the buttermilk, egg, and crushed garlic. Make sure the egg is well incorporated into the buttermilk. The buttermilk adds a wonderful tang and moisture to the bread, while the egg contributes to its richness.
- Pour the wet mixture (buttermilk, egg, and garlic) into the bowl with the dry ingredients. Stir until just combined. Be careful not to overmix, as this can result in a tough bread. A few streaks of flour are perfectly fine at this stage.
- Spoon the batter into a large baking tin. There’s no need to grease the tin if it’s lined with parchment paper, which will also make it easier to remove the bread after baking.
- Smooth out the top of the loaf with a spatula or the back of a spoon. This will help the bread bake evenly.
- Sprinkle the top of the loaf generously with grated cheese and a dusting of paprika. The cheese will melt and create a delicious, savory crust, while the paprika adds a touch of color and smokiness.
- Bake in the preheated oven for 50 minutes to 1 hour, or until a wooden skewer inserted into the center comes out clean. The baking time may vary depending on your oven, so it’s essential to keep an eye on it. If the top starts to brown too quickly, you can loosely cover it with foil for the last 15-20 minutes of baking.
- Remove the bread from the oven and let it cool in the tin for a few minutes before transferring it to a wire rack to cool completely. This prevents the bottom from becoming soggy.
Expert Tips & Tricks
- For an even richer flavor, try using a combination of cheeses, such as cheddar, mozzarella, and Parmesan.
- If you don’t have self-raising flour, you can make your own by adding 1 1/2 teaspoons of baking powder and 1/2 teaspoon of salt to every cup of plain flour.
- To intensify the garlic flavor, roast the garlic cloves before crushing them. Simply wrap them in foil with a drizzle of olive oil and bake in the oven at 180°C (350°F) for about 30 minutes, or until soft and fragrant.
- If you want to prepare the dough ahead of time, you can mix all the ingredients together and store it in the refrigerator for up to 24 hours. Just bring it to room temperature before baking.
- If the bread is browning too quickly, you can tent it with aluminum foil during the last 15-20 minutes of baking.
Serving & Storage Suggestions
This Easy Bake Herb and Garlic Bread is best served warm, straight from the oven. It’s delicious on its own, or you can serve it with soup, salad, or as a side dish to your favorite meal. It’s especially good with pasta dishes!
To store leftovers, wrap the bread tightly in plastic wrap or foil and store it at room temperature for up to 2 days, or in the refrigerator for up to 5 days. You can also freeze it for up to 2 months. To reheat, simply wrap the bread in foil and warm it in the oven at 180°C (350°F) for about 10-15 minutes, or until heated through. You can also microwave individual slices for a quicker option, but be careful not to overcook them, or they will become tough.
Nutritional Information
| Nutrient | Amount per Serving | % Daily Value |
|---|---|---|
| Calories | 142.3 kcal | N/A |
| Calories from Fat | 8 g | 6% |
| Total Fat | 0.9 g | 1% |
| Saturated Fat | 0.2 g | 1% |
| Cholesterol | 21.1 mg | 7% |
| Sodium | 717.1 mg | 29% |
| Total Carbohydrate | 28.3 g | 9% |
| Dietary Fiber | 1.2 g | 4% |
| Sugars | 0.1 g | 0% |
| Protein | 4.5 g | 8% |
Note: Nutritional information is an estimate and may vary depending on specific ingredients and portion sizes.
Variations & Substitutions
- Gluten-Free: Substitute the self-raising flour with a gluten-free self-raising flour blend. You may need to add a binding agent like xanthan gum to help with the texture.
- Dairy-Free: Use a dairy-free buttermilk alternative, such as a mixture of almond milk and lemon juice. Let it sit for a few minutes to curdle before using. You can also use a dairy-free cheese substitute for the topping.
- Vegan: In addition to the dairy-free substitutions, replace the egg with a flax egg (1 tablespoon of ground flaxseed mixed with 3 tablespoons of water, let sit for 5 minutes to thicken).
- Herb Variations: Experiment with different herbs, such as rosemary, sage, or chives. You can also add a pinch of red pepper flakes for a touch of heat.
- Cheese Variations: Try different types of cheese, such as feta, goat cheese, or blue cheese, for a more intense flavor.
FAQs (Frequently Asked Questions)
Q: Can I use regular flour instead of self-raising flour?
A: If you don’t have self-raising flour, you can make your own by adding 1 1/2 teaspoons of baking powder and 1/2 teaspoon of salt to every cup of plain flour.
Q: How do I know when the bread is done?
A: Insert a wooden skewer into the center of the bread. If it comes out clean, the bread is done. If it’s still wet, continue baking for a few more minutes and check again.
Q: Can I freeze this bread?
A: Yes, you can freeze this bread for up to 2 months. Wrap it tightly in plastic wrap or foil to prevent freezer burn.
Q: The top of my bread is browning too quickly. What should I do?
A: Loosely cover the top of the bread with foil for the last 15-20 minutes of baking.
Q: Can I add other ingredients to this bread?
A: Absolutely! Feel free to experiment with different herbs, cheeses, or even vegetables. Sun-dried tomatoes, olives, or roasted peppers would be delicious additions.
Final Thoughts
This Easy Bake Herb and Garlic Bread is more than just a recipe; it’s an invitation to slow down, savor the simple pleasures of baking, and fill your home with the comforting aroma of freshly baked bread. It’s a recipe that’s forgiving, adaptable, and always delivers a delicious result. So, preheat your oven, gather your ingredients, and let the magic begin. I encourage you to try it, put your own personal spin on it, and share the joy with your loved ones. And of course, I’d love to hear about your baking adventures!