
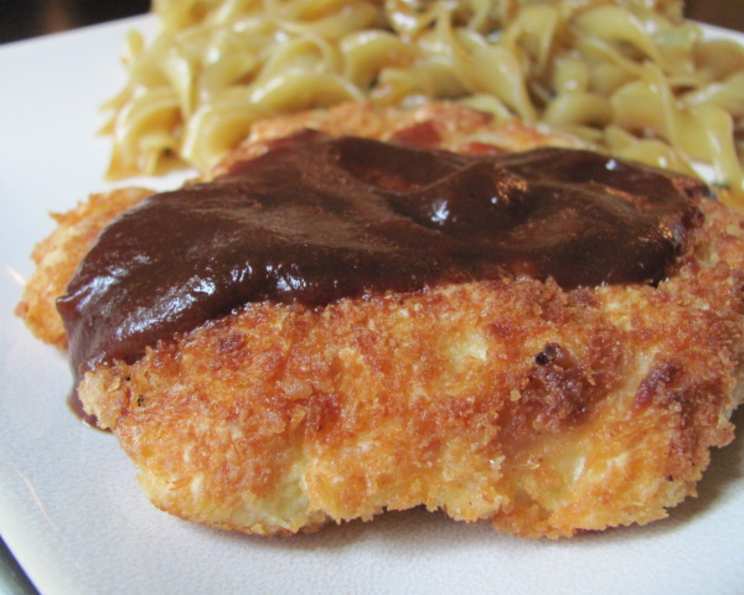
Easy Chicken Katsu: A Taste of Aloha at Home
The aroma of frying chicken katsu instantly transports me back to my college days in Honolulu. I remember the tiny hole-in-the-wall places, each fiercely proud of their katsu. We’d grab a plate lunch – a scoop of rice, macaroni salad, and a perfectly golden-brown cutlet, all doused in that sweet-tangy sauce. It wasn’t just a meal; it was a taste of home, a symbol of comfort food that nourished both body and soul. To this day, recreating that experience in my own kitchen is a comforting ritual.
Recipe Overview
- Prep Time: 20 minutes
- Cook Time: 20 minutes
- Total Time: 40 minutes
- Servings: 3-4
- Dietary Type: Not specified (contains gluten)
Ingredients
- 2 lbs boneless, skinless chicken thighs
- 1/2 cup flour
- 3 eggs, beaten
- 1 cup Japanese-style bread crumbs (panko flakes)
- Garlic salt, to taste
- Oil (for frying)
For the Sauce:
- 3 tablespoons applesauce
- 2 teaspoons sugar
- 2 tablespoons ketchup
- 1/2 tablespoon soy sauce
- 1 tablespoon Worcestershire sauce
- 1 teaspoon cooking sherry
- 1/8 teaspoon dry mustard
- 1/8 teaspoon ground allspice
- 1/8 teaspoon ground cloves
- 1/8 teaspoon garlic powder
Equipment Needed
- 3 shallow bowls or dishes
- Large skillet or deep fryer
- Tongs
- Paper towels
- Whisk
Instructions
-
Begin by preparing the sauce. In a medium-sized bowl, combine the applesauce, sugar, and ketchup. Whisk these ingredients together until they are well blended and smooth.
-
Next, add the soy sauce, Worcestershire sauce, and cooking sherry to the bowl. Continue to whisk the mixture until everything is fully incorporated.
-
Now, add the dry spices: dry mustard, ground allspice, ground cloves, and garlic powder. Whisk the sauce one last time to ensure all the spices are evenly distributed. For the best flavor, cover the sauce and refrigerate it for at least 30 minutes, or preferably a few hours, to allow the flavors to meld. This step is crucial in developing that signature katsu sauce taste.
-
Prepare the breading station. In the first shallow bowl, place the flour. In the second bowl, add the beaten eggs. In the third bowl, pour the panko flakes. This organized setup will streamline the breading process.
-
Prepare the chicken. Lightly sprinkle the chicken thighs with garlic salt. This simple seasoning will enhance the flavor of the chicken without overpowering the katsu.
-
Begin breading the chicken. First, dip a chicken thigh into the flour, ensuring it is completely coated. Shake off any excess flour.
-
Next, dip the floured chicken into the beaten eggs, making sure it is fully submerged. Allow any excess egg to drip off.
-
Now, dredge the egg-coated chicken in the panko flakes, pressing gently to ensure the flakes adhere to the chicken on all sides.
-
Repeat the egg and panko steps one more time: dip the panko-coated chicken back into the beaten eggs, then dredge it again in the panko flakes. This double coating is the key to achieving an extra crispy crust.
-
Heat the oil in a large skillet or deep fryer over medium heat. The oil should be about 1/2 inch deep in the skillet. You can test the oil temperature by dropping a few panko flakes into the oil; if they sizzle and turn golden brown quickly, the oil is ready.
-
Carefully place the breaded chicken thighs into the hot oil, ensuring not to overcrowd the pan. Overcrowding will lower the oil temperature and result in soggy katsu.
-
Fry the chicken for approximately 3-4 minutes per side, or until it is golden brown and cooked through. The internal temperature of the chicken should reach 165°F (74°C). Use a meat thermometer to ensure accurate doneness.
-
Remove the chicken katsu from the oil and place it on a plate lined with paper towels to drain any excess oil.
-
Serve the chicken katsu immediately with the prepared sauce and hot rice.
Expert Tips & Tricks
- For extra crispy katsu, consider refrigerating the breaded chicken for 30 minutes before frying. This helps the panko adhere better and prevents the breading from falling off during cooking.
- If you don’t have applesauce, you can substitute it with a small amount of pureed pear or even a tablespoon of honey for sweetness.
- To prevent the panko from burning while frying, maintain a consistent medium heat. If the panko starts to darken too quickly, reduce the heat slightly.
- If you prefer a baked version, preheat your oven to 400°F (200°C). Place the breaded chicken on a baking sheet lined with parchment paper, drizzle with oil, and bake for about 20-25 minutes, or until cooked through and golden brown, flipping halfway through.
Serving & Storage Suggestions
Serve the chicken katsu hot, sliced into strips, and drizzled generously with the homemade katsu sauce. It’s traditionally served with steamed white rice and a scoop of macaroni salad, just like they do in Hawaii. Leftovers can be stored in an airtight container in the refrigerator for up to 3 days. To reheat, bake in a preheated oven at 350°F (175°C) for about 10-15 minutes, or until heated through. You can also reheat it in a skillet over medium heat, but be careful not to burn the panko. Microwaving is not recommended, as it can make the crust soggy. The sauce can be stored separately in the refrigerator for up to a week.
Nutritional Information
| Nutrient | Amount per Serving | % Daily Value |
|---|---|---|
| Calories | 580 kcal | N/A |
| Calories from Fat | 155 g | 27% |
| Total Fat | 17.2 g | 26% |
| Saturated Fat | 4.7 g | 23% |
| Cholesterol | 437.8 mg | 145% |
| Sodium | 720.3 mg | 30% |
| Total Carbohydrate | 31.1 g | 10% |
| Dietary Fiber | 1.1 g | 4% |
| Sugars | 6.4 g | 25% |
| Protein | 69.3 g | 138% |
Note: Nutritional information is an estimate and may vary based on specific ingredients and preparation methods.
Variations & Substitutions
- For a gluten-free version, use gluten-free flour and panko breadcrumbs.
- Instead of chicken thighs, you can use chicken breasts, but be sure to pound them to an even thickness for consistent cooking.
- Experiment with different spices in the panko mixture, such as smoked paprika, onion powder, or cayenne pepper for a spicy kick.
- For a vegetarian option, try using firm tofu slices instead of chicken. Press the tofu to remove excess water, then bread and fry as directed.
FAQs (Frequently Asked Questions)
Q: Can I make the sauce ahead of time?
A: Absolutely! In fact, the sauce is best if made a few hours in advance and refrigerated to allow the flavors to meld.
Q: Can I use regular breadcrumbs instead of panko?
A: While you can use regular breadcrumbs, panko flakes are highly recommended for their light and airy texture, which creates a crispier crust.
Q: How do I prevent the breading from falling off the chicken?
A: Make sure to thoroughly coat the chicken with flour, egg, and panko, pressing gently to help the breadcrumbs adhere. Refrigerating the breaded chicken for 30 minutes before frying can also help.
Q: How do I know when the chicken is cooked through?
A: The internal temperature of the chicken should reach 165°F (74°C). Use a meat thermometer to ensure accurate doneness.
Q: Can I freeze the chicken katsu?
A: Yes, you can freeze cooked chicken katsu. Allow it to cool completely, then wrap it tightly in plastic wrap and store it in a freezer-safe bag for up to 2 months. Reheat in the oven for the best results.
Final Thoughts
Easy Chicken Katsu is more than just a recipe; it’s a journey to the islands. The crispy chicken, paired with that unforgettable sauce, is guaranteed to bring a smile to your face. So, gather your ingredients, put on some Hawaiian music, and get ready to experience a taste of Aloha in your own kitchen. I hope this recipe becomes a cherished favorite. Don’t hesitate to experiment and make it your own. Share your creations and feedback – I’d love to hear how your katsu turns out!