
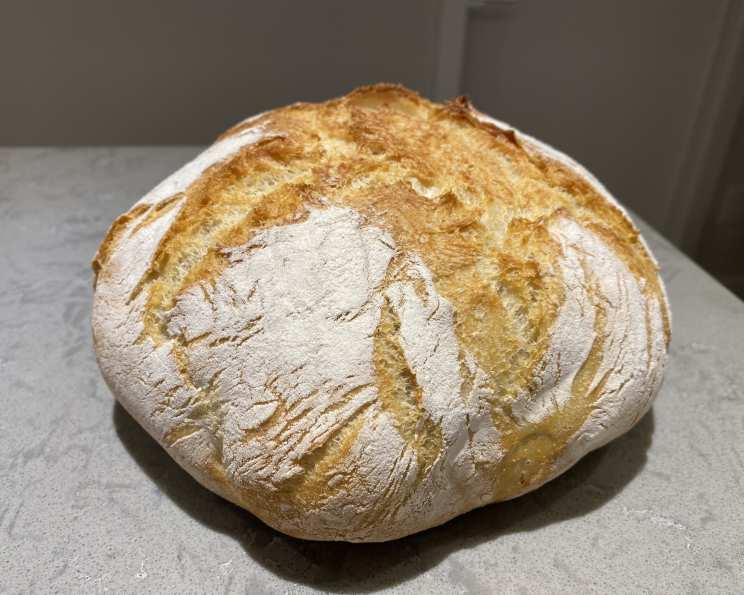
The Simple Joy of Homemade Crusty French Bread
The aroma of baking bread is a powerful time machine. For me, it instantly whisks me back to my grandmother’s kitchen, a sun-drenched space always filled with the comforting scent of yeast and flour. I can still picture her, her hands dusted white, expertly kneading dough with a rhythm born of years of practice. While her methods were complex and time-honored, I’ve discovered a way to capture that same magical essence – that incredible, crispy crust and soft, airy interior – with a remarkably simple recipe. This Easy Crusty French Bread is my tribute to her, a way to share the simple joy of freshly baked bread with everyone.
Recipe Overview
- Prep Time: 15 minutes
- Cook Time: 40-45 minutes
- Total Time: 2 hours 15 minutes
- Yields: 1 Loaf
- Serves: 6
- Dietary Type: Vegetarian
Ingredients
- 2 1⁄4 teaspoons active dry yeast
- 1 teaspoon sugar (use honey if you prefer)
- 1 1⁄4 cups warm water (300g)
- 1 1⁄2 teaspoons kosher salt
- 2 1⁄2 – 3 1⁄2 cups all-purpose flour, plus extra for dusting (360g)
Equipment Needed
- Large mixing bowl or stand mixer with dough hook
- Clean tea towel
- Large cutting board
- Proofing basket or medium bowl
- Dutch oven with lid
- Parchment paper (optional)
- Oven mitts
- Cooling rack
- Long spatula
Instructions
- In a large mixing bowl or the bowl of a stand mixer fitted with a dough hook, combine the yeast, sugar, and warm water. The water should be warm, not hot, about 105-115°F (40-46°C).
- Let the yeast proof for about 5 minutes, or until the mixture is foamy. This step ensures that the yeast is active and will properly leaven the bread. If the mixture doesn’t foam, your yeast may be old and needs to be replaced.
- Add the kosher salt and flour to the bowl. Begin with 2 1/2 cups of flour and add more as needed.
- Mix with your hands or a sturdy spatula, or mix on low speed with your stand mixer until all the flour is incorporated and the dough has just started to pull away from the sides of the bowl. For best results, mix until no dry bits of flour remain. This dough is relatively slack (wet), so it may seem a bit shaggy and sticky. Don’t worry – it will become smoother and more elastic as it rises.
- Lightly flour all sides of your dough (don’t mix the flour in – it’s just to keep the dough from sticking!) and turn it over inside the mixing bowl to coat with flour on all sides.
- Cover the bowl with a clean tea towel and let rise on the counter for about 1 hour, or until the dough has doubled in size. The exact rising time will depend on the temperature of your kitchen; a warmer environment will speed up the process.
- When the dough has risen, lightly flour a large cutting board.
- Tip the dough out of the bowl and onto the cutting board. DO NOT PUNCH THE DOUGH DOWN – you want to keep all those nice air bubbles intact so you have an airy, delicious loaf of bread. If the dough is sticking to the bowl a little bit, wet your hand with a bit of cold water and gently separate the dough from the bowl to get it all out.
- Sprinkle a bit of flour across the top of the dough, then begin shaping it into a round loaf. Pull each corner of the dough in towards the center (like you’re folding an envelope) and repeat until the dough feels tight and begins to resist your folds.
- Flip the dough over and tap it into a round loaf.
- Flour a proofing basket or a medium bowl and place your loaf into it seam-side down.
- Cover with a tea towel and let rise another 30 minutes or so while you preheat the oven.
- While the bread is rising, place an empty Dutch oven (with the lid on) in your oven and heat to 460 degrees Fahrenheit (238°C). This is crucial for creating that signature crusty exterior.
- BAKE! When the oven is hot, you’re ready to go! Use oven mitts to pull the Dutch oven out and remove the lid.
- Lay a piece of parchment paper down on your counter or cutting board (optional – it makes transferring the bread easier!).
- Tip your bread dough gently out of the proofing basket onto the parchment paper. Make sure the seam side is up this time – this is what will create those beautiful cracks on top of the bread!
- VERY CAREFULLY (without burning yourself!) use the sides of the parchment to lift the bread up and place it into the hot Dutch oven.
- Put your oven mitts back on, place the Dutch oven lid back on the pot, and slide the whole thing back into your hot oven.
- Cook bread for 30 minutes.
- After 30 minutes, remove the lid from your Dutch oven. The bread should be taller, crusty, and very lightly browned.
- Continue cooking the bread, uncovered, for 10-15 minutes more until the bread has deepened in color and you have a beautiful brown crust. Keep a close eye on it to prevent burning.
- When the bread is done, use oven mitts to pull the pot out of your oven.
- Use a long spatula or the corners of your parchment paper to lift the bread out of the Dutch oven and onto a cooling rack.
- Let cool for at least 30 minutes before cutting into it. This is essential to allow the bread’s internal structure to set properly, preventing a gummy texture.
Expert Tips & Tricks
- The key to a truly crusty loaf lies in the Dutch oven. The trapped steam creates a moist environment that allows the crust to develop fully. If you don’t have a Dutch oven, you can try placing a baking sheet with hot water on the bottom rack of your oven to create steam.
- Don’t be afraid of a slightly sticky dough. This wet dough is what gives the bread its open crumb and airy texture. Just make sure to flour your hands and work surface well to prevent it from sticking too much.
- For a deeper flavor, try using a combination of all-purpose flour and bread flour. Bread flour has a higher protein content, which will result in a chewier texture.
- If you prefer a sweeter loaf, you can increase the amount of sugar to 2 teaspoons.
- If the crust begins to darken too much during the final uncovered baking stage, tent it loosely with foil to prevent burning.
- Consider adding herbs or spices to the dough for a flavored bread. Rosemary, thyme, or garlic powder can add a delicious dimension.
Serving & Storage Suggestions
Serve your freshly baked Crusty French Bread warm, with a generous smear of butter, a drizzle of olive oil, or alongside your favorite soup or stew. It’s also delicious as part of a cheese board or charcuterie platter.
To store leftovers, wrap the bread tightly in plastic wrap or a reusable bread bag. It will keep at room temperature for 2-3 days. For longer storage, you can freeze the bread for up to 2 months. To reheat, thaw completely and then bake in a preheated oven at 350°F (175°C) for 10-15 minutes, or until warmed through. You can also slice the bread and toast it for a crispier texture.
Nutritional Information
| Nutrient | Amount per Serving | % Daily Value |
|---|---|---|
| Calories | 197.2 kcal | N/A |
| Calories from Fat | 5g | 3% |
| Total Fat | 0.6 g | 0% |
| Saturated Fat | 0.1 g | 0% |
| Cholesterol | 0 mg | 0% |
| Sodium | 584.7 mg | 24% |
| Total Carbohydrate | 41.1 g | 13% |
| Dietary Fiber | 1.8 g | 7% |
| Sugars | 0.8 g | 3% |
| Protein | 6 g | 11% |
Variations & Substitutions
- Whole Wheat Version: Substitute up to half of the all-purpose flour with whole wheat flour for a nuttier flavor and added fiber.
- Seeded Bread: Sprinkle the top of the loaf with sesame seeds, poppy seeds, or sunflower seeds before baking.
- Garlic Herb Bread: Add 1-2 cloves of minced garlic and 1-2 tablespoons of chopped fresh herbs (such as rosemary, thyme, or oregano) to the dough during the mixing process.
- Sourdough Twist: Add 1/4 cup of active sourdough starter to the dough for a tangier flavor. You may need to adjust the amount of flour and water depending on the consistency of your starter.
FAQs (Frequently Asked Questions)
Q: Why do I need to use a Dutch oven?
A: The Dutch oven traps steam inside, creating a moist environment that allows the crust to develop fully and become incredibly crusty.
Q: Can I use instant yeast instead of active dry yeast?
A: Yes, you can. If using instant yeast, you can skip the proofing step and add it directly to the flour.
Q: My dough is too sticky. What should I do?
A: A slightly sticky dough is normal, but if it’s unmanageable, add a tablespoon or two more flour at a time until it becomes easier to handle. Be careful not to add too much flour, as this can result in a dense loaf.
Q: How do I know when the bread is done?
A: The bread is done when it’s deeply golden brown and sounds hollow when tapped on the bottom. An internal temperature of 200-210°F (93-99°C) is ideal.
Q: Can I make the dough ahead of time?
A: Yes, you can. After the first rise, punch down the dough, wrap it tightly in plastic wrap, and refrigerate it for up to 24 hours. Let it come to room temperature before shaping and baking.
Final Thoughts
There’s something deeply satisfying about creating something as simple and essential as bread with your own two hands. This Easy Crusty French Bread recipe is a wonderful starting point for your baking journey. Don’t be afraid to experiment with variations, add your own personal touch, and most importantly, enjoy the process! Share your creations with friends and family, and let the comforting aroma of freshly baked bread fill your home. I’d love to hear about your experiences and any creative twists you come up with – happy baking!