
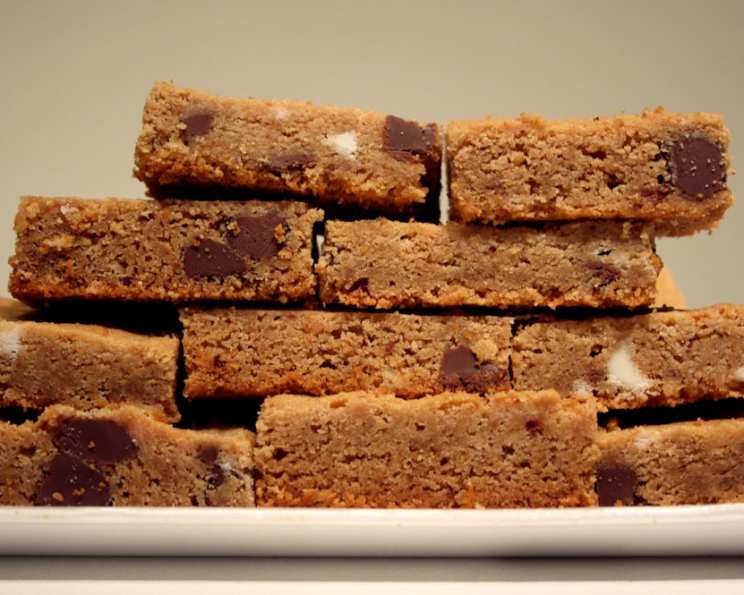
Easy Graham Bars: A Taste of Childhood Nostalgia
I can still picture it: the humid summer air hanging heavy in the kitchen, the comforting scent of graham crackers and chocolate swirling around me. My sisters and I, armed with measuring cups and wooden spoons, would transform into pint-sized pastry chefs, determined to bake the perfect batch of graham cracker bars for the county fair. Those were simpler times, filled with laughter, friendly competition, and the unwavering belief that our bars were the best in the whole wide world – a belief that, looking back, probably wasn’t too far from the truth. These Easy Graham Bars aren’t just a recipe; they’re a portal back to those cherished moments.
Recipe Overview
- Prep Time: 10 minutes
- Cook Time: 35 minutes
- Total Time: 45 minutes
- Servings: 18
- Yield: 1 (9-inch) pan of bars
- Dietary Type: Vegetarian (easily adaptable to vegan)
Ingredients
- 3 cups fine graham cracker crumbs (about 24 double graham crackers, crushed)
- 1 cup evaporated milk
- 1 cup sugar
- 1 (6 ounce) package semi-sweet chocolate chips
- ¼ cup soft margarine (or butter)
- ½ cup broken nuts (walnuts, pecans, or almonds work well)
- ½ teaspoon vanilla extract
Equipment Needed
- 9-inch square baking pan
- Mixing bowl
- Measuring cups and spoons
- Spatula or wooden spoon
- Oven
Instructions
- Preheat your oven to 350 degrees Fahrenheit (175 degrees Celsius). It’s essential to have the oven fully heated before baking to ensure even cooking.
- Thoroughly grease a 9-inch square baking pan. This step is crucial to prevent the bars from sticking to the pan, making them easier to remove and slice later. You can use butter, margarine, or cooking spray.
- In a large mixing bowl, combine all the ingredients: the 3 cups of fine graham cracker crumbs, 1 cup of evaporated milk, 1 cup of sugar, the 6-ounce package of semi-sweet chocolate chips, ¼ cup of soft margarine, ½ cup of broken nuts, and ½ teaspoon of vanilla extract.
- Using a spatula or wooden spoon, mix all ingredients together until well combined. The mixture should be evenly moistened and slightly sticky. Be sure to scrape the bottom of the bowl to incorporate any dry ingredients.
- Spoon the mixture into the prepared 9-inch square pan.
- Use the spatula or your fingers to spread the mixture evenly across the bottom of the pan, pressing down gently to create a compact layer. Ensure an even thickness for uniform baking.
- Bake at 350 degrees Fahrenheit (175 degrees Celsius) for 35 minutes, or until the edges of the cookie begin to pull away from the sides of the pan. The top should be lightly golden brown.
- Remove the pan from the oven and let the bars cool completely in the pan before cutting. This is important because they will continue to firm up as they cool. Trying to cut them while still warm can result in a crumbly mess.
- Once cooled, cut into 18 bars (or desired size) and serve.
Expert Tips & Tricks
- Graham Cracker Finesse: The finer your graham cracker crumbs, the better the texture of the bars. Using a food processor or a rolling pin to crush the crackers into a fine powder will give you the best results.
- Nutty Nuances: Toasting your nuts before adding them to the batter will enhance their flavor and add a delightful crunch to the bars. Simply spread the nuts on a baking sheet and toast in the oven at 350°F (175°C) for 5-7 minutes, or until fragrant.
- Margarine Magic: While margarine works well, using real butter will give your bars a richer, more decadent flavor. Consider using salted butter to balance the sweetness of the sugar and chocolate chips.
- Cooling is Key: Resist the urge to cut into the bars while they’re still warm! Allowing them to cool completely is crucial for them to set properly and prevent crumbling. For a cleaner cut, chill the bars in the refrigerator for 30 minutes before slicing.
- Chocolate Chip Choices: Feel free to experiment with different types of chocolate chips. Milk chocolate, dark chocolate, or even white chocolate chips would all be delicious additions. You could also add other mix-ins like peanut butter chips, butterscotch chips, or dried fruit.
- Vegan Option: To make these bars vegan, substitute the evaporated milk with an equal amount of your favorite plant-based milk (almond, soy, or oat milk work well). Use a vegan margarine alternative.
- Doneness Test: To ensure the bars are fully baked, insert a toothpick into the center. If it comes out clean or with a few moist crumbs, they’re ready.
Serving & Storage Suggestions
These Easy Graham Bars are best served at room temperature. They are delicious on their own or paired with a cold glass of milk or a scoop of vanilla ice cream.
- Storage: Store leftover bars in an airtight container at room temperature for up to 3 days, in the refrigerator for up to a week, or in the freezer for up to 2 months.
- Reheating: If you prefer warm bars, you can reheat them in the microwave for a few seconds or in a preheated oven at 350°F (175°C) for a few minutes.
Nutritional Information
| Nutrient | Amount per Serving | % Daily Value |
|---|---|---|
| Calories | 161 kcal | N/A |
| Calories from Fat | 68 kcal | 42% |
| Total Fat | 7.6 g | 11% |
| Saturated Fat | 2.9 g | 14% |
| Cholesterol | 4.1 mg | 1% |
| Sodium | 78.8 mg | 3% |
| Total Carbohydrate | 23.2 g | 7% |
| Dietary Fiber | 1 g | 4% |
| Sugars | 17.9 g | N/A |
| Protein | 2.4 g | 4% |
Note: Nutritional information is an estimate and may vary based on specific ingredients and portion sizes.
Variations & Substitutions
- Gluten-Free Graham Bars: Use gluten-free graham crackers to make these bars suitable for those with gluten sensitivities.
- Peanut Butter Bliss: Add a layer of peanut butter to the top of the bars before baking for a delicious peanut butter and chocolate combination.
- Coconut Craze: Sprinkle shredded coconut on top of the bars before baking for a tropical twist.
- Seasonal Spice: Add a pinch of cinnamon, nutmeg, or pumpkin pie spice to the batter for a warm and comforting flavor during the fall and winter months.
- Different Nuts: Experiment with different types of nuts, such as macadamia nuts, cashews, or hazelnuts, to add variety to the flavor and texture.
FAQs (Frequently Asked Questions)
Q: Can I use regular milk instead of evaporated milk?
A: While you can use regular milk, evaporated milk is recommended because it has a higher concentration of milk solids, which helps to bind the ingredients together and create a chewier texture.
Q: Can I make these bars ahead of time?
A: Absolutely! These bars can be made a day or two in advance and stored in an airtight container at room temperature or in the refrigerator.
Q: How do I prevent the bars from sticking to the pan?
A: Thoroughly greasing the pan is essential. You can also line the pan with parchment paper, leaving an overhang on the sides, to easily lift the bars out after baking.
Q: Can I freeze these bars?
A: Yes, these bars freeze well. Wrap them individually in plastic wrap or foil, or place them in a freezer-safe container. They can be stored in the freezer for up to 2 months.
Q: Are there other flavor variations that would work well with these bars?
A: Absolutely! Consider adding other extracts like almond or peppermint. Using white chocolate chips with dried cranberries and orange zest would also make for a festive variation.
Final Thoughts
These Easy Graham Bars are a testament to the simple pleasures in life. With minimal ingredients and effort, you can create a treat that evokes feelings of warmth, nostalgia, and pure delight. Whether you’re baking them with your children, sharing them with friends, or simply enjoying a quiet moment to yourself, these bars are sure to bring a smile to your face. So, gather your ingredients, preheat your oven, and get ready to experience the joy of homemade graham cracker bars. Don’t hesitate to experiment with variations, and most importantly, savor every delicious bite. Feel free to share your baking adventures and any creative twists you add to this classic recipe. Happy baking!