
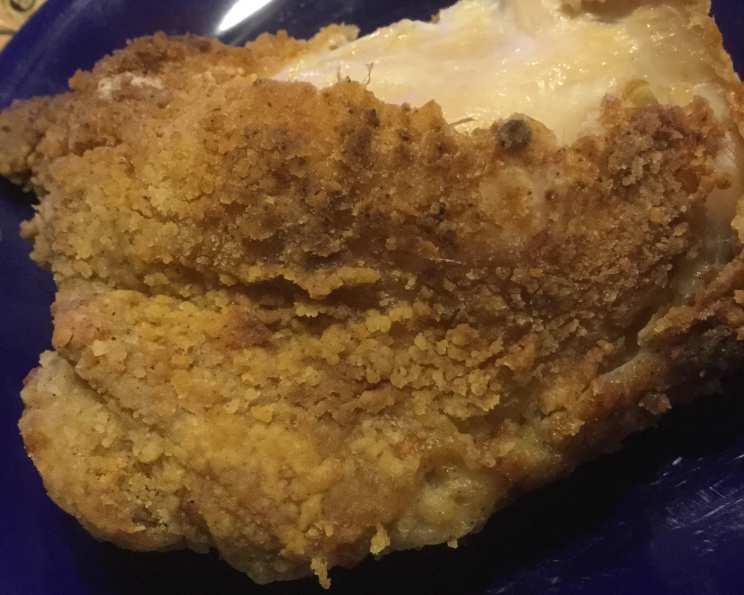
Easy Idiot Proof Crispy Convection Chicken Thighs
I’ll never forget the Christmas my family decided we were “adulting” and exchanged practical gifts. My sister got a fancy stand mixer, my brother a high-end vacuum, and I unwrapped a Breville convection oven. It felt a bit daunting, honestly. The instruction manual was thick, and the included recipe booklet was…missing! I spent the next few weeks experimenting, determined to master this culinary gadget. This recipe for crispy convection chicken thighs was one of my early triumphs, born from a need for simple, delicious weeknight dinners.
Recipe Overview
- Prep Time: 10 minutes
- Cook Time: 60 minutes
- Total Time: 1 hour 10 minutes
- Servings: 5
- Yields: 10 Chicken Thighs
- Dietary Type: Varies (depending on seasonings used)
Ingredients
- 1 cup flour
- ½ cup panko breadcrumbs
- 2 tablespoons seasoned salt
- 1 tablespoon onion powder
- 1 tablespoon poultry seasoning
- 1 teaspoon black pepper, or to taste
- 10 bone-in chicken thighs
Equipment Needed
- Gallon-size resealable bag
- Broiling pan
- Convection oven
Instructions
-
First, prepare your seasoned coating. In a gallon-size resealable bag, combine the flour, panko breadcrumbs, seasoned salt, onion powder, poultry seasoning, and black pepper. Close the bag securely and shake vigorously to ensure all ingredients are thoroughly mixed. This creates your homemade “shake ‘n bake” coating.
-
Preheat your convection oven to 375 degrees Fahrenheit. Make sure the convection setting is enabled. This ensures even cooking and maximum crispiness.
-
Prepare the chicken thighs by rinsing them under cold water and then patting them completely dry with paper towels. This step is crucial for achieving crispy skin. Excess moisture will steam the chicken instead of allowing it to brown properly.
-
Now it’s time to coat the chicken. Working in batches of about three at a time (to avoid overcrowding the bag), drop the chicken thighs into the bag containing the seasoned flour mixture. Seal the bag and shake well, ensuring each piece is evenly coated.
-
Lightly oil your broiling pan. This will prevent the chicken from sticking and promote even browning on the underside.
-
Arrange the coated chicken thighs on the prepared broiling pan, making sure to leave space between each piece. This allows for proper air circulation and ensures that the chicken crisps up nicely. If you cannot fit all 10 thighs on the pan at once, cook them in two batches. I typically cook 6, and then the remaining 4 due to space limitations.
-
Place the broiling pan in the preheated convection oven and set the timer for 60 minutes. Make sure your oven is set to BAKE with the convection setting turned on.
-
After 60 minutes, check the internal temperature of the chicken using a meat thermometer. It should reach 165 degrees Fahrenheit in the thickest part of the thigh to ensure it is fully cooked. If not, continue cooking for an additional 5-10 minutes, checking frequently.
-
Once the chicken thighs are cooked through and the skin is beautifully crispy, remove them from the oven and let them rest for a few minutes before serving. This allows the juices to redistribute, resulting in a more tender and flavorful chicken.
-
Serve hot and enjoy!
Expert Tips & Tricks
- Don’t Overcrowd the Pan: As mentioned earlier, spacing out the chicken thighs on the baking sheet is key to crispy skin. If they are too close together, they will steam instead of crisping.
- Dry Chicken is Key: Make sure the chicken thighs are completely dry before coating. This helps the flour mixture adhere better and prevents a soggy result.
- Adjust Seasonings to Taste: Feel free to customize the seasoning blend to your preferences. Add a pinch of cayenne pepper for a little heat, or garlic powder for a more savory flavor.
- Check for Doneness: Always use a meat thermometer to ensure the chicken is cooked to a safe internal temperature. Insert the thermometer into the thickest part of the thigh, avoiding the bone.
- For extra crispy skin: You can broil the chicken for the last 5 minutes of cooking, keeping a close eye on it to prevent burning.
Serving & Storage Suggestions
Serve these crispy convection chicken thighs with your favorite sides. They pair perfectly with mashed potatoes, roasted vegetables, coleslaw, or a simple salad. For a complete meal, consider adding a side of cornbread or biscuits.
Leftover chicken can be stored in an airtight container in the refrigerator for up to 3-4 days. To reheat, preheat your oven to 350 degrees Fahrenheit and bake for 15-20 minutes, or until heated through. You can also reheat the chicken in a microwave, but the skin will lose some of its crispiness.
For longer storage, cooked chicken can be frozen for up to 2-3 months. Wrap the chicken tightly in plastic wrap and then place it in a freezer-safe bag or container. To thaw, transfer the chicken to the refrigerator overnight.
Nutritional Information
| Nutrient | Amount per Serving | % Daily Value |
|---|---|---|
| Calories | 539 kcal | N/A |
| Calories from Fat | 266 g | 49% |
| Total Fat | 29.6 g | 45% |
| Saturated Fat | 8.2 g | 41% |
| Cholesterol | 157.9 mg | 52% |
| Sodium | 223.8 mg | 9% |
| Total Carbohydrate | 28.8 g | 9% |
| Dietary Fiber | 1.6 g | 6% |
| Sugars | 0.9 g | 3% |
| Protein | 36.8 g | 73% |
Note: Nutritional information is an estimate and may vary based on specific ingredients and portion sizes.
Variations & Substitutions
- Gluten-Free: Substitute the all-purpose flour with a gluten-free blend for a gluten-free version. Ensure your other seasonings are also gluten-free.
- Spicy: Add a pinch of cayenne pepper or a dash of hot sauce to the flour mixture for a spicy kick.
- Italian Herb: Use Italian seasoning instead of poultry seasoning for a different flavor profile.
- Lemon Pepper: Add lemon zest and more black pepper to the flour mixture.
- Chicken Breast: While this recipe is designed for chicken thighs, you can also use boneless, skinless chicken breasts. Reduce the cooking time to 30-40 minutes, or until the chicken is cooked through.
FAQs (Frequently Asked Questions)
Q: Can I use bone-in, skin-on chicken breasts instead of thighs?
A: Yes, you can, but be aware that the cooking time may need to be adjusted, and the result will be drier than using thighs. Keep a close eye on the internal temperature to prevent overcooking.
Q: Can I prepare the chicken ahead of time?
A: You can coat the chicken with the seasoning mixture up to 24 hours in advance. Store the coated chicken in the refrigerator until ready to bake.
Q: What is a convection oven, and why is it important for this recipe?
A: A convection oven uses a fan to circulate hot air, which helps to cook food more evenly and quickly. In this recipe, the convection feature is essential for achieving crispy skin on the chicken thighs.
Q: How do I know when the chicken is done?
A: The best way to check for doneness is to use a meat thermometer. Insert the thermometer into the thickest part of the thigh, avoiding the bone. The chicken is done when the internal temperature reaches 165 degrees Fahrenheit.
Q: Can I use different types of breadcrumbs?
A: Yes, you can experiment with different types of breadcrumbs, such as Italian breadcrumbs or seasoned breadcrumbs. However, panko breadcrumbs tend to give the crispiest result.
Final Thoughts
This “idiot-proof” crispy convection chicken thigh recipe is a testament to the idea that delicious food doesn’t have to be complicated. It’s a weeknight winner that’s sure to please even the pickiest eaters. So, preheat that convection oven, gather your ingredients, and get ready to enjoy some seriously crispy and flavorful chicken. Don’t be afraid to experiment with different seasonings to create your own unique flavor combinations. And most importantly, have fun in the kitchen! I’d love to hear your feedback and any variations you try. Consider pairing this chicken with a crisp, dry white wine or a light-bodied red for a truly satisfying meal.