
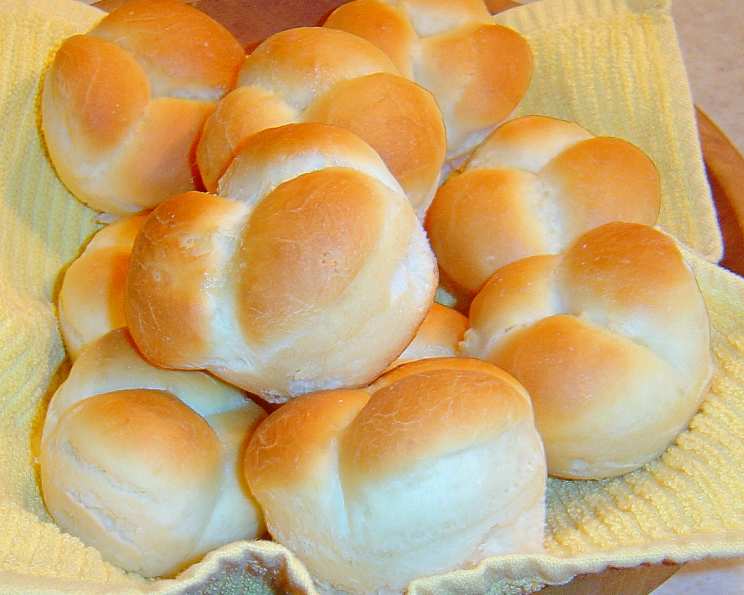
Easy Make-Ahead Cloverleaf Dinner Rolls
The smell of warm bread baking in the oven always takes me back to my grandmother’s kitchen. She would spend hours kneading and proofing dough, the rhythmic motion a comforting soundtrack to my childhood visits. Her dinner rolls, pillowy soft and fragrant, were always the highlight of our meals, and they disappeared in minutes. While I don’t always have the time for a full day of baking, these make-ahead cloverleaf rolls are the perfect way to recapture that nostalgic warmth and bring a touch of homemade goodness to any dinner table. The ability to pull out a few frozen dough balls and bake them fresh whenever the craving strikes is a game-changer, especially during busy weeknights.
Recipe Overview
- Prep Time: 30 minutes
- Cook Time: 12-15 minutes
- Total Time: 3 hours 30 minutes (includes proofing and freezing time)
- Servings: 24 rolls
- Yield: 24 rolls
- Dietary Type: Vegetarian
Ingredients
- 1 cup warm water (110F)
- 2 (1/2 ounce) envelopes active dry yeast
- 1/2 cup unsalted butter, melted and cooled
- 1/2 cup sugar
- 3 eggs, lightly beaten, at room temperature
- 1 teaspoon salt
- 5 1/2 cups all-purpose flour, plus more for dusting
Equipment Needed
- Stand mixer with dough hook
- Large bowl
- Plastic wrap
- Baking sheet
- Waxed paper
- Freezer bag
- Muffin tin
- Oven
Instructions
-
Activate the Yeast: In the bowl of your stand mixer, add the warm water (110F). Be sure your water isn’t too hot, or it will kill the yeast. If you don’t have a thermometer, the water should feel comfortably warm to the touch, like bath water. Sprinkle the active dry yeast over the water and let it sit for about 5-10 minutes, or until it becomes foamy. This indicates that the yeast is alive and active.
-
Combine Wet Ingredients: Add the melted and cooled butter, sugar, lightly beaten eggs (at room temperature), and salt to the yeast mixture. Room temperature eggs will incorporate more easily and help the dough rise better.
-
Mix the Dough: Attach the dough hook to your stand mixer. Turn the mixer on low speed and gradually add the flour, about 1/2 cup at a time. The key here is to add the flour slowly, allowing it to incorporate fully into the wet ingredients. This will prevent the dough from becoming too dry. Continue adding flour until the dough comes together and forms a ball, pulling away from the sides of the bowl. You may not need to use all 5 1/2 cups of flour, or you may need a little more, depending on the humidity and the type of flour you are using.
-
Knead the Dough: Once the dough has come together, continue to knead it in the mixer on low speed for about 5-7 minutes, or until it is smooth and elastic. The dough should be slightly tacky but not sticky. If it is too sticky, add a little more flour, 1 tablespoon at a time.
-
First Rise: Lightly oil a large bowl. Turn the dough out into the oiled bowl, turning it to coat all sides. Cover the bowl tightly with plastic wrap and refrigerate for at least 2 hours. This slow, cold fermentation in the refrigerator develops flavor and makes the dough easier to handle.
-
Shape the Rolls: After the dough has chilled for 2 hours, turn it out onto a lightly floured surface. Divide the dough in half, then divide each half into 4 pieces, and then divide each of those pieces into thirds. You should have a total of 24 pieces of dough. Roll each piece into a log, then cut each log into three equal pieces. Roll each small piece in between lightly oiled hands into smooth balls.
-
Freeze the Dough Balls: Place the dough balls on waxed paper on a baking sheet. Make sure they are not touching, as they will expand slightly as they freeze. Freeze the dough balls until they are firm, about an hour or so. Once frozen, transfer the dough balls to a freezer bag. They can be stored in the freezer for up to 3 months.
-
Proofing: When you are ready to bake the rolls, grease a muffin tin. Place three frozen dough balls into each cup. Cover the muffin tin loosely with plastic wrap and let it sit in a warm, draft-free place for several hours, or until the dough balls have doubled in size. This can take anywhere from 3-5 hours, depending on the temperature of your kitchen. You can speed up the proofing process by placing the muffin tin in a slightly warmed oven (turned off!) with a pan of hot water.
-
Bake: Preheat your oven to 375F (190C). Once the rolls have doubled in size, bake them for 12-15 minutes, or until they are golden brown. Keep a close eye on them, as baking times may vary depending on your oven.
-
Cool and Serve: Remove the rolls from the oven and let them cool in the muffin tin for a few minutes before transferring them to a wire rack to cool completely. Serve warm with butter, jam, or honey.
Expert Tips & Tricks
- Flour Power: As mentioned, flour isn’t created equal! The type of flour you use can affect the texture of your rolls. If you’re using a high-protein bread flour, you may need to add a little more water to the dough. If you’re using a lower-protein cake flour, you may need to add a little less water.
- Temperature Matters: Make sure your water is not too hot when activating the yeast, or you’ll kill it. Also, room temperature ingredients (like the eggs and butter) will incorporate more easily into the dough.
- Overnight Proofing: For even more flavor, you can proof the rolls in the refrigerator overnight. This will slow down the proofing process and allow the dough to develop a deeper, more complex flavor. Just be sure to cover the muffin tin tightly with plastic wrap to prevent the rolls from drying out.
- Shiny Finish: For a shiny, golden-brown crust, brush the rolls with melted butter or an egg wash before baking.
- Flavor Boost: Add a pinch of garlic powder, onion powder, or dried herbs to the dough for extra flavor.
Serving & Storage Suggestions
These cloverleaf dinner rolls are best served warm, straight from the oven. They are delicious on their own or served with butter, jam, honey, or your favorite spread. They also make a great addition to any meal, from soups and salads to roasts and casseroles.
Leftover rolls can be stored in an airtight container at room temperature for up to 2 days or in the refrigerator for up to 5 days. To reheat, wrap the rolls in foil and warm them in a 350F (175C) oven for about 10 minutes, or until heated through. You can also reheat them in the microwave, but they may become slightly tough.
Frozen baked rolls can be stored in a freezer bag for up to 1 month. Thaw completely before reheating.
Nutritional Information
| Nutrient | Amount per Serving | % Daily Value |
|---|---|---|
| Calories | 167 kcal | N/A |
| Calories from Fat | 43 kcal | N/A |
| Total Fat | 4.8 g | 7% |
| Saturated Fat | 2.7 g | 13% |
| Cholesterol | 33.4 mg | 11% |
| Sodium | 107.8 mg | 4% |
| Total Carbohydrate | 26.6 g | 8% |
| Dietary Fiber | 1.1 g | 4% |
| Sugars | 4.3 g | N/A |
| Protein | 4.3 g | 8% |
Note: Nutritional information is an estimate and may vary based on specific ingredients and preparation methods.
Variations & Substitutions
- Dairy-Free: Substitute the unsalted butter with a plant-based butter alternative.
- Gluten-Free: Use a gluten-free all-purpose flour blend. Be sure to add a binding agent such as xanthan gum to help with the structure of the dough. You may also need to adjust the amount of liquid in the recipe.
- Sweet Rolls: Add a tablespoon of cinnamon and a 1/4 cup of brown sugar to the dough for sweet cinnamon rolls. After baking, drizzle with a cream cheese frosting.
- Herb Rolls: Add a tablespoon of chopped fresh herbs, such as rosemary, thyme, or oregano, to the dough for savory herb rolls.
- Garlic Rolls: Brush the baked rolls with garlic butter for a flavorful garlic bread alternative.
FAQs (Frequently Asked Questions)
Q: Can I use instant yeast instead of active dry yeast?
A: Yes, you can. If using instant yeast, you can skip the proofing step and add it directly to the dry ingredients.
Q: How do I know when the rolls are done proofing?
A: The rolls should have doubled in size and look puffy and light. Gently poke the dough; if the indentation slowly springs back, it’s ready to bake.
Q: Can I freeze the baked rolls instead of the dough?
A: Yes, you can freeze the baked rolls. Let them cool completely before wrapping them tightly in plastic wrap and freezing them.
Q: What if my dough doesn’t rise?
A: There could be several reasons why your dough didn’t rise. Make sure your yeast is fresh and active, your water is the correct temperature, and your kitchen is warm enough.
Q: Can I make these rolls without a stand mixer?
A: Yes, you can make these rolls by hand. It will require more kneading, but it is definitely possible. Knead the dough on a lightly floured surface for about 10-12 minutes, or until it is smooth and elastic.
Final Thoughts
These easy make-ahead cloverleaf dinner rolls are a delightful way to bring the warmth and comfort of homemade bread to your table without spending hours in the kitchen. The convenience of having frozen dough balls ready to bake at a moment’s notice makes them perfect for busy weeknights, holidays, or any special occasion. Don’t hesitate to experiment with different flavors and variations to create your own signature rolls. I hope you enjoy baking and sharing these delicious rolls with your loved ones! Feel free to share your baking results and any variations you tried!