
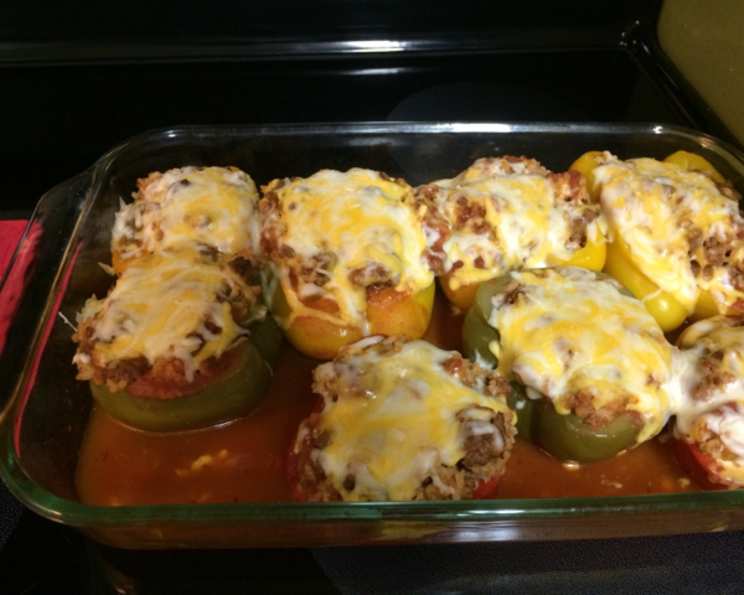
Easy Weeknight Stuffed Bell Peppers
I remember the first time I ever had stuffed bell peppers. It was at my Grandma Rose’s house, a veritable haven of comforting, home-cooked meals. The aroma alone – sweet bell peppers mingling with savory ground beef and tangy tomato sauce – was enough to make my mouth water. Grandma Rose always made them with such love, carefully scooping the filling into each pepper with a gentle hand. To this day, that familiar scent instantly transports me back to her cozy kitchen, filled with warmth, laughter, and the simple joy of family.
Recipe Overview
- Prep Time: 20 minutes
- Cook Time: 30 minutes
- Total Time: 50 minutes
- Servings: 6
- Yield: 6 Stuffed Peppers
- Dietary Type: Can be easily adapted to be Gluten-Free or Dairy-Free.
Ingredients
- 6 medium green bell peppers
- 1 1/2 lbs ground beef
- 1/2 medium onion, chopped
- 1 cup instant rice
- 1 (14 1/2 ounce) can diced tomatoes, with juice
- 2 (8 ounce) cans tomato sauce
- 1 (8 ounce) can tomato sauce (optional)
- 1 cup shredded Colby cheese, if desired
- 1-2 tablespoons Worcestershire sauce
- Salt, to taste
- Pepper, to taste
Equipment Needed
- Large skillet
- Casserole dish (9×13 inch recommended)
- Knife
- Cutting board
- Mixing spoon
Instructions
-
Preheat your oven to 400°F (200°C). Ensure the oven rack is positioned in the center.
-
Prepare the bell peppers: Carefully cut the tops off the peppers using a sharp knife. Remove and discard the stems and seeds from the inside of each pepper. Make sure to scrape out all the seeds to avoid a bitter taste.
-
Arrange the peppers in the casserole dish. If necessary, trim a small slice from the bottom of each pepper to help them stand upright in the dish. This will prevent them from tipping over during baking.
-
In a large skillet over medium-high heat, brown the 1 1/2 lbs of ground beef along with the 1/2 cup of chopped onion. Use a spoon to break the beef into smaller pieces as it cooks.
-
Once the beef is fully browned and the onions are translucent, carefully drain off any excess fat from the skillet. This step is crucial for preventing a greasy final dish.
-
Add the 1 can of diced tomatoes (with juice), the 2 cans of tomato sauce, and the 1-2 tablespoons of Worcestershire sauce to the skillet with the browned beef and onions. Season with salt and pepper to taste. Remember that you can always add more seasoning later, so start with a smaller amount and adjust as needed.
-
Bring the mixture to a boil over medium heat, stirring occasionally. Once boiling, stir in the 1 cup of uncooked instant rice.
-
Cover the skillet, remove it from the heat, and let it stand for 3-5 minutes. This allows the rice to partially cook and absorb some of the sauce.
-
Remove the lid and stir the meat mixture thoroughly.
-
Carefully spoon the meat mixture into the prepared bell peppers, filling each one generously.
-
Optional: Pour the remaining 8 oz can of tomato sauce around the bottom of the baking dish. If the sauce is too thick, you can thin it out with a little bit of water. If you are not using the additional can of sauce, be sure to add 3-4 tablespoons of hot water to the bottom of the baking dish to prevent the peppers from drying out.
-
Cover the baking dish tightly with aluminum foil.
-
Bake in the preheated oven for approximately 30 minutes, or until the peppers are tender when pierced with a fork. The cooking time may vary slightly depending on the size and thickness of the peppers.
-
Remove the foil from the baking dish. Sprinkle the tops of the peppers with the 1 cup of shredded Colby cheese (if desired).
-
Bake for a few more minutes, until the cheese is melted and bubbly.
-
Remove from the oven and let cool slightly before serving.
Expert Tips & Tricks
- Pepper Choice: While green bell peppers are classic, feel free to experiment with other colors like red, yellow, or orange for a sweeter flavor and a more visually appealing dish.
- Meat Variations: You can substitute ground turkey, chicken, or even a plant-based ground meat alternative for the ground beef. Adjust seasonings accordingly.
- Rice Alternatives: If you don’t have instant rice, you can use pre-cooked rice or other grains like quinoa or couscous. Just adjust the amount of liquid in the filling to compensate.
- Spice It Up: Add a pinch of red pepper flakes or a dash of hot sauce to the meat mixture for a little extra heat.
- Make Ahead: Prepare the filling and stuff the peppers up to a day in advance. Store them covered in the refrigerator and bake as directed when ready to serve. This is a great time-saver for busy weeknights.
Serving & Storage Suggestions
Serve the stuffed bell peppers hot, straight from the oven. A dollop of sour cream or Greek yogurt can add a nice touch of coolness and tanginess. These are fantastic served on their own or with a simple side salad.
Leftover stuffed bell peppers can be stored in an airtight container in the refrigerator for up to 3-4 days. To reheat, simply microwave individual peppers for a few minutes until heated through, or bake them in a preheated oven at 350°F (175°C) until warmed.
Stuffed bell peppers can also be frozen for longer storage. Wrap each pepper individually in plastic wrap and then place them in a freezer-safe bag or container. They can be frozen for up to 2-3 months. Thaw them in the refrigerator overnight before reheating as described above.
Nutritional Information
| Nutrient | Amount per Serving | % Daily Value |
|---|---|---|
| Calories | 450 kcal | 23% |
| Total Fat | 24g | 37% |
| Saturated Fat | 11g | 55% |
| Cholesterol | 95mg | 32% |
| Sodium | 770mg | 32% |
| Total Carbohydrate | 31g | 10% |
| Dietary Fiber | 5g | 19% |
| Sugars | 10g | – |
| Protein | 30g | 60% |
Variations & Substitutions
- Gluten-Free: Ensure the Worcestershire sauce you use is gluten-free. Some brands contain gluten. Also, use a gluten-free rice alternative like brown rice or quinoa.
- Dairy-Free: Omit the Colby cheese or substitute with a dairy-free cheese alternative. Nutritional yeast can also add a cheesy flavor.
- Vegetarian/Vegan: Replace the ground beef with lentils, crumbled tempeh, or a vegetarian ground meat substitute. Increase the amount of vegetables like diced carrots, zucchini, or mushrooms.
- Mediterranean Style: Use ground lamb instead of beef, and add Mediterranean spices like oregano, thyme, and cumin. Incorporate feta cheese (or a dairy-free alternative) and chopped Kalamata olives.
- Mexican Style: Use ground beef or turkey and add a packet of taco seasoning, corn, black beans, and salsa to the filling. Top with shredded cheddar cheese and a dollop of sour cream.
FAQs (Frequently Asked Questions)
Q: Can I use brown rice instead of instant rice?
A: Yes, you can use cooked brown rice. Reduce the liquid slightly as the brown rice will not absorb as much liquid as instant rice.
Q: Do I have to use tomato sauce?
A: While tomato sauce adds a classic flavor, you can experiment with other sauces like marinara or even a creamy pesto sauce for a different twist.
Q: Can I make this recipe ahead of time?
A: Absolutely! As mentioned in the tips, you can prepare the filling and stuff the peppers a day in advance. Just store them covered in the refrigerator until ready to bake.
Q: How do I know when the peppers are done?
A: The peppers are done when they are tender when pierced with a fork. The exact cooking time may vary depending on the size and thickness of the peppers.
Q: Can I freeze the stuffed peppers?
A: Yes, you can freeze them for up to 2-3 months. Wrap each pepper individually in plastic wrap and then place them in a freezer-safe bag or container. Thaw them in the refrigerator overnight before reheating.
Final Thoughts
These Easy Weeknight Stuffed Bell Peppers are a fantastic way to enjoy a satisfying and flavorful meal with minimal effort. Whether you stick to the classic recipe or experiment with different variations, I encourage you to give this dish a try. It’s a comforting and versatile recipe that’s sure to become a family favorite. Don’t be afraid to get creative with the fillings and seasonings to suit your own tastes. And, most importantly, enjoy the process of creating something delicious and sharing it with those you love! Consider serving with a crisp green salad and a light vinaigrette to round out the meal.