
Edible Chocolate Sprinkle Bowls: A Recipe for Sweet Celebrations
The memory is etched in my mind: a cascade of vibrant sprinkles raining down, sticking to melted chocolate, forming the most whimsical little bowls imaginable. It was my niece’s fifth birthday, and instead of a traditional cake, we crafted these delightful vessels, each one filled with scoops of ice cream and topped with even more sprinkles. The sheer joy on her face – and the slightly sticky fingers – remains a cherished family moment, a testament to the simple magic of chocolate and sprinkles. These aren’t just desserts; they’re edible memories waiting to be made.
Recipe Overview
- Prep Time: 10 minutes
- Cook Time: 2 minutes
- Total Time: 12 minutes
- Yields: 4 bowls
- Dietary Type: Vegetarian (check candy wafers to confirm)
Ingredients
- 1 (12 ounce) bag of candy wafers (or chocolate)
- 2 cups rainbow candy sprinkles
Equipment Needed
- 2 small bowls
- Sharp pin
- Baking sheet
- Parchment paper
- Microwave-safe bowl
Instructions
-
Prepare Your Balloons: Blow up small balloons, about 6 inches in diameter. Tie them off securely. The size is important here; too big, and your bowls will be unwieldy!
-
Ready the Workspace: Prepare a baking sheet by lining it with a layer of parchment paper. This prevents the bowls from sticking and makes for easy cleanup.
-
Melt the Chocolate: In a microwaveable bowl, melt the candy wafers or chocolate in 30-second increments. Stir well after each increment to ensure even melting and prevent burning. Continue until the chocolate is smooth and completely melted. This step requires patience; don’t rush it! Overheated chocolate can seize up.
-
Dip the Balloons: Hold each balloon by the knot and dip it straight down into the bowl of melted chocolate, pushing it down until the chocolate has gone up the sides as far as you want it to. Aim for a uniform thickness for stability.
-
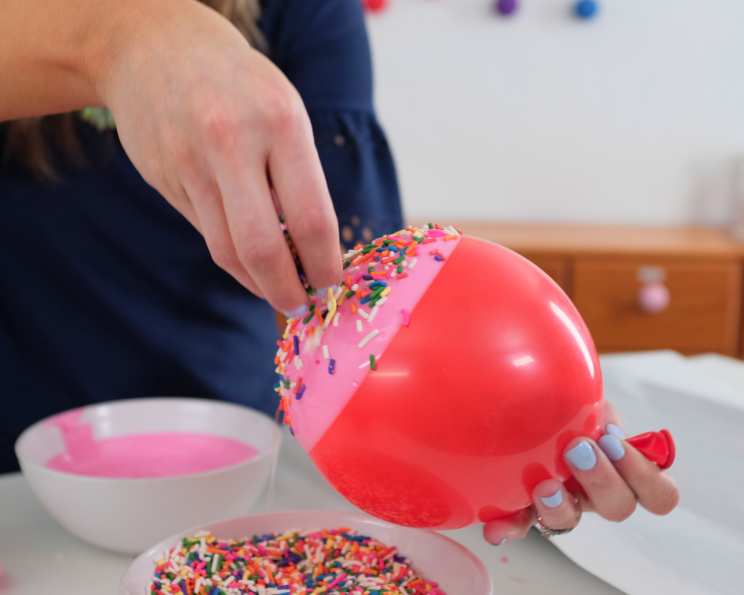
Drip and Decorate: Lift the balloon straight up, allowing the excess chocolate to drip off for a few seconds. Avoid shaking the balloon, as this can create an uneven coating. Immediately add the sprinkles to the bowls by tossing them generously onto the chocolate. The sooner you add the sprinkles, the better they’ll adhere to the melted chocolate.
-
Freeze for Hardening: Set the balloons down onto the prepared parchment-lined sheet and freeze for about 2 minutes, depending on the type of chocolate used. Keep a close eye on them; you want the chocolate to harden but not become brittle.
-
Pop and Peel: Once the chocolate has hardened, remove the balloons from the freezer and use a sharp pin to pop them. The balloon should deflate easily.
-
Carefully Remove the Balloon: Peel the plastic away from the chocolate bowl slowly and carefully. If it’s sticking, try gently easing it away with your fingers. Patience is key here to avoid breaking the delicate chocolate.
-
Serve and Enjoy: Fill with ice cream and your desired toppings! These bowls are best enjoyed immediately after filling to prevent them from softening.
Expert Tips & Tricks
- Chocolate Tempering (Optional): For a truly professional finish and a beautiful shine, consider tempering your chocolate. This involves a specific heating and cooling process that stabilizes the cocoa butter, resulting in a smoother, snappier chocolate.
- Even Coating: To achieve a more uniform chocolate coating, try rotating the balloon gently as you dip it into the melted chocolate.
- Sprinkle Application: For even coverage with the sprinkles, try placing the bowl of melted chocolate into a slightly larger bowl and pouring the sprinkles over the dipped balloon while it’s positioned over the larger bowl. This will catch any excess sprinkles, making them easy to reuse.
- Troubleshooting Broken Bowls: If a bowl breaks during the peeling process, don’t despair! You can often patch it up with a bit more melted chocolate. Simply apply a small amount to the broken area and let it set in the freezer for a few minutes.
- Balloon Size Matters: Be sure to use small balloons (around 6 inches). Larger balloons will result in bowls that are too big and difficult to handle.
- Chocolate Quality: The quality of the chocolate directly impacts the taste and appearance of your bowls. Opt for high-quality candy wafers or chocolate for the best results.
- Room Temperature is the Enemy: These bowls melt quickly at room temperature. Keep them refrigerated until ready to fill.
Serving & Storage Suggestions
These chocolate sprinkle bowls are best served immediately after filling. The cold ice cream helps to keep the chocolate firm. If you need to make them ahead of time, store the empty bowls in an airtight container in the refrigerator for up to 2 days. Avoid freezing the empty bowls, as this can cause the chocolate to become brittle and crack. Once filled, the bowls should be eaten within 30 minutes to prevent the chocolate from melting.
Nutritional Information
Please note: Nutritional information is an estimate and can vary based on specific ingredients used.
| Nutrient | Amount per Serving | % Daily Value |
|---|---|---|
| Calories | 350 kcal (estimated) | 18% |
| Total Fat | 20g (estimated) | 31% |
| Saturated Fat | 12g (estimated) | 60% |
| Cholesterol | 0mg | 0% |
| Sodium | 50mg (estimated) | 2% |
| Total Carbohydrate | 40g (estimated) | 13% |
| Dietary Fiber | 1g (estimated) | 4% |
| Sugars | 35g (estimated) | N/A |
| Protein | 2g (estimated) | 4% |
Variations & Substitutions
- Dairy-Free: Use dairy-free chocolate or candy wafers to make this recipe dairy-free. Ensure that the sprinkles are also dairy-free.
- Vegan: In addition to dairy-free chocolate, use vegan sprinkles, as some sprinkles contain confectioner’s glaze (shellac), which is derived from insects.
- Different Chocolates: Experiment with different types of chocolate, such as dark chocolate, white chocolate, or even flavored chocolates like mint or raspberry.
- Sprinkle Variety: Use different types of sprinkles to customize the bowls. Consider using chocolate sprinkles, nonpareils, or even edible glitter.
- Nutty Bowls: Add chopped nuts to the melted chocolate for a crunchy texture and nutty flavor.
- Peppermint Bowls: Add a few drops of peppermint extract to the melted chocolate and top with crushed peppermint candies for a festive holiday treat.
- Caramel Swirl: Drizzle caramel sauce inside the bowl before adding ice cream for an extra layer of sweetness.
FAQs (Frequently Asked Questions)
Q: Can I make these bowls ahead of time?
A: Yes, you can make the bowls ahead of time and store them in an airtight container in the refrigerator for up to 2 days.
Q: What if the chocolate is too thick to dip the balloons easily?
A: Add a teaspoon of vegetable oil or shortening to the melted chocolate and stir until smooth. This will thin the chocolate slightly.
Q: The balloons are sticking to the chocolate when I try to peel them off. What can I do?
A: Try placing the bowls back in the freezer for a few minutes to harden the chocolate further. Then, gently ease the balloon away from the chocolate with your fingers.
Q: Can I use regular chocolate chips instead of candy wafers?
A: Yes, you can use regular chocolate chips, but you may need to add a little shortening or vegetable oil to help them melt smoothly and prevent them from seizing up.
Q: How do I keep the bowls from melting too quickly?
A: Keep the bowls refrigerated until ready to fill and serve. Use very cold ice cream and add toppings just before serving.
Final Thoughts
So, go ahead – unleash your inner child and create these whimsical chocolate sprinkle bowls. They’re the perfect way to add a touch of magic to any occasion, from birthday parties to simple weeknight desserts. Don’t be afraid to experiment with different flavors, colors, and toppings to create your own unique masterpieces. Share your creations with friends and family and spread the joy! And if you try this recipe, please leave a comment and let me know how it turned out. Bon appétit!