
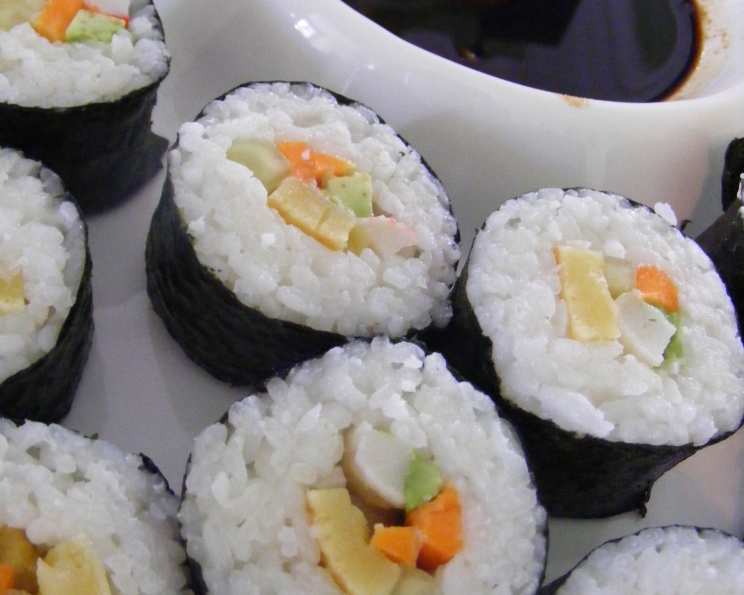
Tamago: The Sweet & Savory Egg Filling for Sushi
The first time I tasted tamago in sushi, I was utterly captivated. It wasn’t the vinegared rice or the nori that grabbed my attention; it was the delicate, slightly sweet egg filling. It was at a tiny, unassuming sushi bar tucked away on a side street in Kyoto. I remember the chef, with his weathered hands and quiet smile, placing a piece of nigiri before me. The fluffy, golden tamago sat atop the rice like a crown. The sweetness danced on my tongue, perfectly complementing the savory flavors of soy sauce and the subtle tang of the rice vinegar. From that moment on, I was determined to master the art of making perfect tamago.
Recipe Overview
- Prep Time: 5 minutes
- Cook Time: 5 minutes
- Total Time: 10 minutes
- Servings: 1
- Yield: About 1/2 inch thick omelette
- Dietary Type: Vegetarian
Ingredients
- 2 large eggs
- 2 tablespoons all-purpose flour
- 2 tablespoons granulated sugar
- 1 teaspoon salt
Equipment Needed
- Mixing bowl
- Whisk
- Small non-stick frying pan (6-8 inches recommended)
- Spatula
Instructions
- In a medium-sized mixing bowl, combine the eggs, flour, sugar, and salt.
- Use a whisk to beat all the ingredients together until the mixture is smooth and homogenous. Ensure there are no lumps of flour remaining. The batter should be relatively thin.
- Place a small, non-stick frying pan over medium heat. If you don’t have a non-stick pan, lightly oil the pan with a neutral oil like vegetable or canola oil. Be careful not to overheat the oil, as this can cause the tamago to burn.
- Once the pan is heated, pour the egg mixture into the pan. The amount you pour will determine the thickness of the omelette. For sushi, a relatively thin omelette (about 1/4 to 1/2 inch thick) is ideal.
- Cook the tamago until the bottom is golden brown and the top is nearly set. This should take about 2-3 minutes. Gently lift the edges with a spatula to check for browning.
- Carefully flip the tamago using a spatula. Cook the other side until it is also golden brown, about 1-2 minutes.
- Remove the cooked tamago from the pan and place it on a cutting board to cool completely.
- Once cooled, slice the tamago into strips approximately 1/2 inch thick. These strips are now ready to be used as a filling for your sushi.
Expert Tips & Tricks
- Achieving the right sweetness: The balance of sugar in the tamago is crucial. Feel free to adjust the amount of sugar slightly to suit your personal preference. A touch more sugar will result in a sweeter tamago, while less sugar will make it more savory.
- Preventing lumps: To ensure a smooth batter, gradually add the flour while whisking continuously. If lumps do form, you can pass the batter through a fine-mesh sieve.
- Controlling the heat: Medium heat is essential for even cooking. If the heat is too high, the tamago will burn on the outside before it is cooked through. If the heat is too low, it will take too long to cook, resulting in a rubbery texture.
- Using a square pan: If you have a square tamagoyaki pan (a specialized Japanese omelette pan), you can use it to create a more uniform and visually appealing tamago. Cook the tamago in thin layers, rolling it up as you go.
- Adding Mirin: For an extra layer of authentic flavor, consider adding a teaspoon of Mirin (sweet rice wine) to the egg mixture. This will enhance the sweetness and add a subtle depth of flavor.
- Enhancing the Color: A tiny pinch of turmeric powder can give the tamago a more vibrant yellow hue. Be careful not to add too much, as it can affect the flavor.
Serving & Storage Suggestions
The tamago slices are best used immediately in sushi rolls or nigiri. They can be paired with a variety of other fillings, such as avocado, cucumber, spring onions, and mayonnaise.
To store leftover tamago, wrap it tightly in plastic wrap and refrigerate it. It will keep in the refrigerator for up to 3 days.
Reheat the tamago gently in a microwave or frying pan before using. Be careful not to overheat it, as this can make it rubbery.
Nutritional Information
| Nutrient | Amount per Serving | % Daily Value |
|---|---|---|
| Calories | 301.4 kcal | N/A |
| Calories from Fat | N/A | 30% |
| Total Fat | 10.1 g | 15% |
| Saturated Fat | 3.1 g | 15% |
| Cholesterol | 423 mg | 141% |
| Sodium | 2465.8 mg | 102% |
| Total Carbohydrate | 37.9 g | 12% |
| Dietary Fiber | 0.4 g | 1% |
| Sugars | 26 g | N/A |
| Protein | 14.2 g | 28% |
Note: Nutritional information is an estimate and may vary based on specific ingredients and preparation methods.
Variations & Substitutions
- Gluten-Free: Substitute the all-purpose flour with a gluten-free flour blend. Ensure the blend contains xanthan gum for binding.
- Lower Sugar: Reduce the amount of sugar or use a sugar substitute like stevia or erythritol.
- Savory Tamago: Omit the sugar and add a splash of soy sauce and a pinch of dashi powder for a more savory flavor.
- Vegetable Additions: Finely chop some vegetables like spinach, carrots, or mushrooms and add them to the egg mixture for added flavor and nutrients.
- Dairy-Free: While the recipe doesn’t contain dairy, ensure that any oil used for cooking is also dairy-free.
FAQs (Frequently Asked Questions)
Q: Can I make this ahead of time?
A: Yes, you can make the tamago a day or two in advance. Store it tightly wrapped in the refrigerator and slice it just before using it in your sushi.
Q: What if my tamago sticks to the pan?
A: Make sure you are using a non-stick pan or that you have adequately oiled the pan before cooking. If the tamago still sticks, try lowering the heat slightly.
Q: Can I use this tamago for other dishes besides sushi?
A: Absolutely! It’s delicious in sandwiches, salads, or as a side dish. It can also be enjoyed on its own as a simple snack.
Q: How can I make my tamago fluffier?
A: Whisk the eggs vigorously for a longer period to incorporate more air into the mixture. This will result in a lighter and fluffier tamago.
Q: Can I freeze tamago?
A: Freezing is not recommended, as it can alter the texture of the eggs, making them rubbery when thawed. It’s best to consume the tamago fresh or within a few days of making it.
Final Thoughts
Making tamago for sushi is a surprisingly simple yet rewarding culinary endeavor. It’s more than just a filling; it’s a delicate balance of sweet and savory, a testament to the art of Japanese cuisine. I encourage you to try this recipe and experience the joy of creating your own homemade tamago. Don’t be afraid to experiment with the variations and find your perfect balance of flavors. Pair your tamago sushi with a refreshing cup of green tea or a crisp, dry sake for a truly authentic and delightful culinary experience. And most importantly, share your creations and get ready for the compliments!