
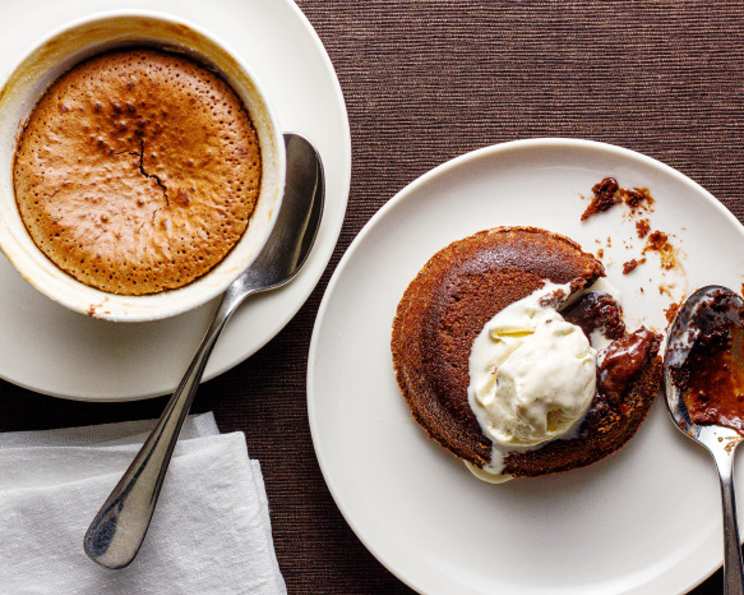
The Only Chocolate Dessert Recipe You’ll Ever Need
I’ll never forget the night my best friend called, utterly distraught after a terrible breakup. Tears and heartbreak filled the phone line. Of course, I offered the usual platitudes, but I knew what she really needed: chocolate. Unfortunately, I had nothing in the house – or so I thought. A frantic rummage through the pantry and fridge revealed the essentials, and within minutes, the aroma of warm, melting chocolate filled my apartment. That night, these little molten chocolate puddings didn’t just satisfy a craving; they offered comfort and a moment of pure, unadulterated joy in the face of sadness. This recipe, born from a late-night emergency, has become my go-to for any occasion that calls for instant chocolate gratification.
Recipe Overview
- Prep Time: 5 minutes
- Cook Time: 12 minutes
- Total Time: 17 minutes
- Servings: 2
- Yield: 2 ramekins
- Dietary Type: Vegetarian
Ingredients
- 4 ounces semisweet chocolate
- 2 ounces unsalted butter
- 2 eggs
- 2 tablespoons brown sugar
- 2 tablespoons flour
- 1/2 teaspoon vanilla extract
- 1 pinch salt
Equipment Needed
- 2 small ovenproof dishes or ramekins
- Baking tray
- Microwaveable dish
- Medium bowl
- Whisk (balloon whisk preferred)
Instructions
-
Preheat your oven to 200°C (400°F). Grease 2 small ovenproof dishes or ramekins generously with butter. Place them on a baking tray. This will make it easier to get them in and out of the oven and prevent any spills from burning on the oven floor.
-
Chop the semisweet chocolate if it isn’t already in small pieces. Place it in a microwaveable dish. Add the unsalted butter.
-
Microwave in 30-second bursts, stirring in between, until the chocolate and butter are completely melted. Be careful not to overheat the chocolate, as it can seize and become grainy. In my microwave, this usually takes about 2 minutes on medium power. Remove the dish from the microwave, stir gently to ensure everything is smooth and well combined, and allow the mixture to cool slightly. This is crucial to prevent the eggs from scrambling in the next step.
-
In a medium bowl, crack the eggs. Add the brown sugar, salt, and vanilla extract.
-
Beat the eggs and sugar together with the salt and vanilla until very well combined. You can use a handheld mixer for this, but I find a balloon whisk works just as well and allows for more control. Continue whisking until the mixture is slightly pale and frothy. This incorporates air, which helps create a light and airy texture in the final dessert.
-
Gently stir the slightly cooled chocolate mixture into the egg mixture. Fold it in carefully to avoid deflating the air you whisked in.
-
Add the flour and mix until just combined. Be careful not to over-beat the batter, as this can develop the gluten in the flour and result in a tougher dessert. A few streaks of flour are okay; they will disappear during baking.
-
Divide the mixture evenly between the two prepared ramekins.
-
Place the baking tray with the ramekins in the preheated oven and bake for 12 minutes.
-
After 12 minutes, check the puddings. The tops should be just beginning to crack, but the centers should still be soft and molten. This is the key to achieving that perfect fudgy texture. If the tops are not cracking, you may need to bake them for another minute or two, but keep a close eye on them to prevent them from overbaking.
-
Remove the baking tray from the oven and let the puddings sit for 5 minutes before serving. This allows them to set slightly and makes them easier to handle.
-
If desired, run a knife around the edge of each pudding to loosen it from the ramekin. Invert the ramekins onto plates to unmold the puddings. Alternatively, you can serve them directly in the ramekins.
-
Serve immediately while warm.
Expert Tips & Tricks
- The quality of the chocolate matters. Use the best quality semisweet chocolate you can find for the richest flavor.
- Don’t overbake! The key to the molten center is to underbake slightly. The edges should be set, but the center should still be gooey.
- If you don’t have brown sugar, you can substitute white sugar. However, the brown sugar adds a subtle caramel flavor that enhances the chocolate.
- For an extra decadent treat, add a tablespoon of your favorite liqueur (such as coffee liqueur or Irish cream) to the batter before baking.
- If you find your puddings are sinking in the middle after baking, it’s likely that they are slightly underbaked. Next time, bake them for an extra minute or two.
- To prevent the chocolate from seizing when melting, make sure the bowl and utensils are completely dry. A single drop of water can cause the chocolate to become grainy.
Serving & Storage Suggestions
These emergency chocolate puddings are best served warm, straight from the oven. They are delicious on their own, but you can also serve them with a scoop of vanilla ice cream, a dollop of whipped cream, fresh berries, or a dusting of cocoa powder.
If you have any leftovers (which is unlikely!), store them in an airtight container in the refrigerator for up to 2 days. To reheat, microwave them for 20-30 seconds until warmed through. The molten center may not be as gooey after reheating, but they will still be delicious. I do not recommend freezing.
Nutritional Information
| Nutrient | Amount per Serving | % Daily Value |
|---|---|---|
| Calories | 450 kcal | 23% |
| Total Fat | 30g | 46% |
| Saturated Fat | 18g | 90% |
| Cholesterol | 150mg | 50% |
| Sodium | 50mg | 2% |
| Total Carbohydrate | 40g | 13% |
| Dietary Fiber | 2g | 8% |
| Sugars | 30g | 60% |
| Protein | 5g | 10% |
Variations & Substitutions
- Dairy-Free: Substitute the butter with coconut oil or a dairy-free butter alternative.
- Gluten-Free: Substitute the all-purpose flour with a gluten-free all-purpose blend.
- Dark Chocolate: Use dark chocolate instead of semisweet for a more intense chocolate flavor.
- Espresso Chocolate: Add a teaspoon of instant espresso powder to the chocolate mixture for a mocha flavor.
- Nutty: Add a tablespoon of chopped nuts (such as walnuts, pecans, or almonds) to the batter.
- Spiced: Add a pinch of cinnamon or chili powder to the batter for a warm and spicy twist.
FAQs (Frequently Asked Questions)
Q: Can I make these ahead of time?
A: While best served immediately, you can prepare the batter ahead of time and store it in the refrigerator for up to 24 hours. Bake just before serving.
Q: Can I use different types of chocolate?
A: Yes, you can use milk chocolate or dark chocolate depending on your preference. The sweetness and intensity of the dessert will vary accordingly.
Q: What if I don’t have ramekins?
A: You can use any oven-safe dish, such as small mugs or custard cups. Just make sure they are greased well.
Q: My puddings are too runny. What did I do wrong?
A: They may be underbaked. Try baking them for a few more minutes until the edges are set. Oven temperatures can vary, so adjust baking time accordingly.
Q: Can I add chocolate chips to the batter?
A: Absolutely! Feel free to add a handful of chocolate chips (milk, dark, or white) to the batter for extra chocolatey goodness.
Final Thoughts
Don’t wait for an emergency to whip up these incredible chocolate puddings. They are so quick, easy, and satisfying that they deserve a place in your regular baking repertoire. Experiment with different flavors and variations to create your own signature dessert. Share your creations with friends and family and watch their faces light up with joy. And most importantly, don’t forget to enjoy every warm, gooey, chocolatey bite! These little puddings are a reminder that even in the midst of chaos, a little bit of chocolate can make everything better.