
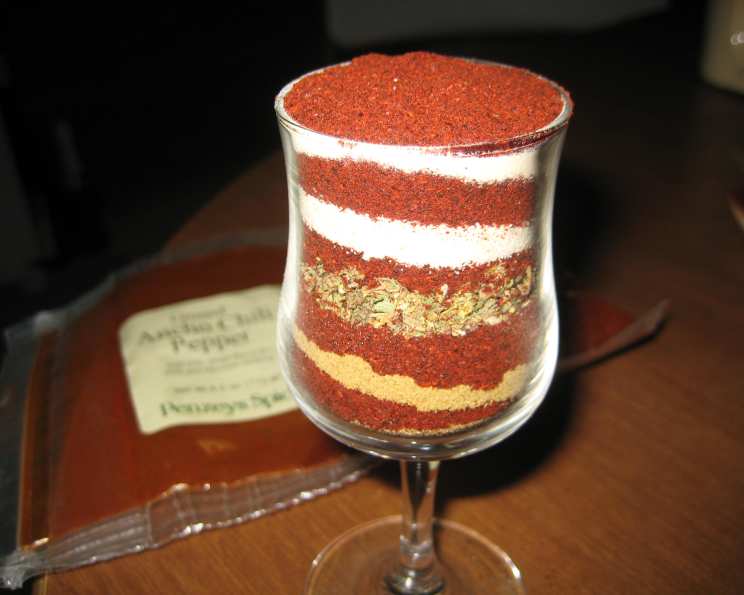
Southwest Spice Symphony: Crafting Your Own Enchilada Sauce Mix
My grandmother’s kitchen always smelled of simmering chilies and warm tortillas. It was a place of comfort, where simple ingredients transformed into culinary magic. One of my fondest memories is helping her prepare enchiladas, the air thick with the aroma of the homemade sauce. While she had her own secret blend, this recipe for enchilada sauce mix reminds me of those cherished moments and allows me to easily recreate that taste of home, whenever I need it. The convenience of having a ready-to-go mix, perfect for spicing up weeknight dinners, is truly a gift.
Recipe Overview
- Prep Time: 15 minutes
- Cook Time: 10 minutes
- Total Time: 25 minutes
- Yields: 5 cups (sauce)
- Dietary Type: Vegetarian
Ingredients
For the Mix:
- 6 tablespoons powdered pure red chilies, divided
- 1 tablespoon ground coriander, powdered
- 1 tablespoon ground cumin
- 1 tablespoon ground oregano (Mexican is best)
- 1 tablespoon garlic powder
- 1 tablespoon onion powder
For the Sauce:
- 1/4 cup olive oil
- 1/2 cup flour
- 4 cups water
- 1/4 cup cider vinegar
Equipment Needed
- Small mixing bowls
- Measuring spoons
- 4 oz Jelly Jars or airtight containers for storage
- 2-quart saucepan
- Whisk
- Stirring spoon
Instructions
- Prepare the Mix: In a mixing bowl, get ready to create your layered spice blend. Starting with red chili powder, add 1 tablespoon to the bottom of your jar or airtight container.
- Layer the Spices: Follow the red chili powder with a layer of ground coriander, gently tapping it down with a tamper tool (or the back of a spoon).
- Continue Layering: Next, add a layer of ground cumin, followed by another tablespoon of red chili powder. Tap down each layer.
- More Spices: Repeat the layering process with ground oregano, then another layer of red chili powder. Again, make sure to gently tap down each layer.
- Almost Done: Add a layer of garlic powder, followed by a layer of red chili powder, tapping down each layer.
- Final Layers: Add a layer of onion powder, and top it all off with a final tablespoon of red chili powder. Ensure each layer is gently compacted.
- Seal and Store: Seal the jar or container tightly and store in a cool, dark place until ready to use.
Making the Sauce:
- Create the Roux: In a 2-quart saucepan, heat olive oil over medium-high heat. Add flour to the olive oil and stir continuously to form a paste, also known as a roux.
- Cook the Roux: Continue cooking the roux, stirring constantly, until it begins to brown. This step is crucial for developing the rich, nutty flavor of the sauce. Be careful not to burn it.
- Add the Seasoning Mix: Add the prepared enchilada seasoning mix to the browned roux and stir to combine, ensuring the spices are evenly distributed. The aroma will be amazing!
- Incorporate Water: Slowly whisk in water, a little at a time, to avoid lumps. Continue whisking until the sauce is smooth and has a gravy-like consistency.
- Simmer: Stir in the cider vinegar, then bring the sauce to a gentle simmer, stirring continuously to prevent sticking or burning.
- Cook to Perfection: Continue simmering the sauce for 10 minutes, stirring constantly, until it has thickened slightly and the flavors have melded together beautifully. The sauce should coat the back of a spoon.
- Cool and Use: Remove the saucepan from the heat. The enchilada sauce is now ready to use!
Expert Tips & Tricks
- Spice Level Adjustment: For a milder sauce, reduce the amount of red chili powder in the mix. For a spicier kick, add a pinch of cayenne pepper to the mix or sauce.
- Quality of Chilies: Using high-quality, pure red chili powder is essential for the best flavor. Look for chili powder made from specific chili varieties like ancho, guajillo, or New Mexico chilies for distinct flavor profiles.
- Roux Mastery: Don’t rush the roux! Cooking it until it’s nicely browned is key to a rich, flavorful sauce. If the roux burns, start over, as the burnt taste will ruin the entire sauce.
- Smooth Sauce Secrets: Adding the water slowly and whisking constantly is essential to avoid lumps in your sauce. If lumps do form, you can use an immersion blender to smooth them out.
- Vinegar Alternatives: If you don’t have cider vinegar, you can substitute it with white vinegar or even a splash of lime juice. The acidity helps to balance the flavors of the sauce.
Serving & Storage Suggestions
This enchilada sauce is incredibly versatile. Use it to smother your favorite enchiladas, drizzle over breakfast burritos, or add depth to chili or stews.
- Serving: Serve your enchiladas immediately after baking for the best flavor and texture. Garnish with shredded cheese, sour cream, chopped onions, or cilantro.
- Storage: Leftover enchilada sauce can be stored in an airtight container in the refrigerator for up to 5 days.
- Freezing: The sauce also freezes well. Divide it into 1- or 2-cup containers and freeze for up to 3 months. Thaw completely in the refrigerator before reheating.
- Reheating: Reheat leftover sauce in a saucepan over medium heat, stirring occasionally, until heated through. You may need to add a splash of water if the sauce has thickened too much during storage.
Nutritional Information
Note: Nutritional information is an estimate and can vary based on specific ingredients used.
| Nutrient | Amount per Serving (approx. 1/2 cup) | % Daily Value* |
|---|---|---|
| Calories | 120 kcal | 6% |
| Total Fat | 7g | 9% |
| Saturated Fat | 1g | 5% |
| Cholesterol | 0mg | 0% |
| Sodium | 50mg | 2% |
| Total Carbohydrate | 12g | 4% |
| Dietary Fiber | 2g | 7% |
| Sugars | 2g | |
| Protein | 2g | 4% |
*Percent Daily Values are based on a 2,000 calorie diet.
Variations & Substitutions
- Gluten-Free Enchilada Sauce: Ensure the flour you use is a gluten-free blend. A one-to-one gluten-free baking flour works well.
- Vegan Enchilada Sauce: This recipe is naturally vegan. Make sure your spices are sourced from vegan-friendly suppliers.
- Smoky Enchilada Sauce: Add 1-2 teaspoons of smoked paprika to the spice mix for a smoky depth of flavor.
- Spicy Enchilada Sauce: Incorporate dried chili flakes or a pinch of cayenne pepper to kick up the heat.
- Vegetable Broth: Substitute vegetable broth for water to add another layer of flavor.
- Add Chocolate: Incorporate a small square of unsweetened Mexican chocolate into the sauce as it simmers. This adds a deep, complex flavor that pairs wonderfully with the chilies.
FAQs (Frequently Asked Questions)
Q: How long does the enchilada sauce mix last?
A: The enchilada sauce mix can last up to 6 months if stored in an airtight container in a cool, dark place.
Q: Can I use this mix to make other sauces or dips?
A: Absolutely! This mix can be used as a base for various Southwestern-inspired sauces and dips. Experiment with adding it to sour cream, yogurt, or even hummus for a unique twist.
Q: Can I adjust the thickness of the enchilada sauce?
A: Yes, you can adjust the thickness by simmering the sauce for a longer or shorter period. For a thicker sauce, simmer longer to allow more liquid to evaporate. For a thinner sauce, add a splash of water.
Q: What kind of red chili powder should I use?
A: The best red chili powder to use is pure, ground chili powder made from specific chili varieties like ancho, guajillo, or New Mexico chilies. Avoid blends with added spices or fillers for the purest flavor.
Q: Can I make this sauce ahead of time?
A: Yes, the enchilada sauce can be made ahead of time and stored in the refrigerator for up to 5 days or frozen for up to 3 months. Just be sure to reheat it thoroughly before using.
Final Thoughts
Making your own enchilada sauce mix is a rewarding experience that brings the vibrant flavors of the Southwest right into your kitchen. It’s a simple yet impactful way to elevate your homemade enchiladas and countless other dishes. Don’t be afraid to experiment with different chili powders and spice combinations to create a blend that perfectly suits your taste. Gather your ingredients, follow the steps, and enjoy the delicious results! I’d love to hear about your favorite variations or how you’re using this mix in your kitchen.