
Everlasting Yeast: A Baker’s Secret for Infinite Bread
The aroma of freshly baked bread is a time machine. It instantly transports me back to my grandmother’s kitchen, a warm haven filled with the comforting scent of rising dough. She always seemed to have bread ready, no matter what. Her secret? A little something she called “everlasting yeast.” It sounded like magic to my young ears, and the idea that she could keep yeast alive indefinitely captivated me. Little did I know, years later, I would be using that very same technique to ensure I always have the heart of great bread at my fingertips.
Recipe Overview
- Prep Time: 20 minutes
- Rise Time: variable, several hours
- Total Time: Variable, several hours
- Yields: 1 “start” for continuous use
- Dietary Type: Vegetarian
Ingredients
- 1 quart warm potato water (water that potatoes have been boiled in, cooled to lukewarm)
- 1 teaspoon salt
- 2 cups white flour or 2 cups wheat flour
- 1/2 tablespoon dry yeast
- 2 tablespoons sugar
Equipment Needed
- Large mixing bowl (non-metal recommended)
- Non-metal mixing spoon or spatula
- Measuring cups and spoons
- Large jar or container with a lid
Instructions
- In a large bowl, combine the warm potato water, salt, flour (either white or wheat), dry yeast, and sugar. It’s recommended to use a non-metal bowl and utensils, though the impact of metal is minimal.
- Mix all the ingredients thoroughly until a smooth batter forms. There may be some lumps, but try to get it as consistent as possible.
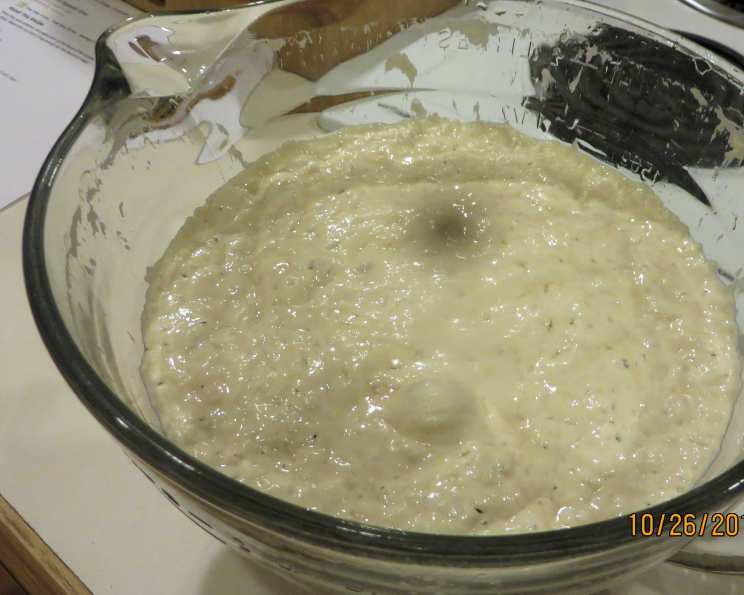
- Place the mixture in a warm place to rise. The exact rising time will depend on the temperature of your environment. It can take several hours. You are looking for the batter to double in size and become bubbly.
- Once the mixture has risen, reserve approximately 1/3 cup of the mixture as your “start” for the next batch. This is your everlasting yeast base.
- Store the reserved “start” in a covered jar in the refrigerator until you are ready to bake again.
- A few hours before you plan to bake, remove the “start” from the refrigerator.
- To refresh the “start” and prepare it for baking, add it to a bowl with the following ingredients, EXCEPT YEAST: warm potato water, salt, flour, and sugar. Use similar ratios to the original recipe, scaling down the amounts proportionally to the amount of starter you have. You don’t need to add more yeast to this.
- Allow the mixture to rise again in a warm place until bubbly and active, usually a few hours.
- Once activated, you can use this refreshed “everlasting yeast” to make your bread or other baked goods according to your chosen recipe.
Expert Tips & Tricks
- Potato water is key: The starch in potato water provides extra nourishment for the yeast, helping it thrive. Don’t discard that precious liquid after boiling potatoes! Let it cool and reserve it for your everlasting yeast.
- Temperature is everything: Yeast loves a warm environment. A slightly warm (but not hot!) spot will encourage the yeast to multiply and the dough to rise faster. A good trick is to turn on your oven to the lowest setting for a few minutes, then turn it off and place the bowl inside.
- Don’t use metal? While the advice to avoid metal bowls and utensils is a common practice, the actual scientific impact is often overstated. The idea is that metal can potentially react with the yeast and affect its activity. However, short-term contact with stainless steel is unlikely to cause a significant problem.
- Consistency is Important: The texture of your “everlasting yeast” starter should be like a thick batter. If it seems too thin, add a little more flour. If it’s too thick, add a touch more potato water.
- Watch for signs of life: A healthy “everlasting yeast” start will be bubbly and have a slightly sour aroma. If it smells off or develops mold, discard it and start a new batch.
- Feed regularly: Even if you don’t bake every day, “feeding” your everlasting yeast every week or two will keep it active and strong. Simply take it out of the fridge, add fresh flour and potato water, let it rise, and then return it to the fridge.
Serving & Storage Suggestions
Since the “everlasting yeast” is a starter rather than a finished dish, there are no direct serving suggestions. However, consider pairing the bread you bake with this yeast with soups, salads, or enjoy it simply with butter and a sprinkle of sea salt.
The “everlasting yeast” starter should be stored in a covered jar in the refrigerator. It can last indefinitely as long as it is regularly “fed” and shows no signs of spoilage (off odors, mold). When you refresh the starter, use as much as you need for your recipe and return the leftover starter to the fridge.
Nutritional Information
The nutritional information for the “everlasting yeast” itself is negligible, as only a small amount is used in baking. The primary nutritional impact will come from the bread or other baked goods you make with it. This is a breakdown of approx. nutritional info per 100g of starter.
| Nutrient | Amount per 100g | % Daily Value* |
|---|---|---|
| Calories | 150 kcal | 7.5% |
| Total Fat | 0.5g | 1% |
| Saturated Fat | 0.1g | 0.5% |
| Cholesterol | 0mg | 0% |
| Sodium | 300mg | 12.5% |
| Total Carbohydrate | 30g | 10% |
| Dietary Fiber | 2g | 8% |
| Sugars | 3g | – |
| Protein | 4g | 8% |
*Based on a 2,000 calorie diet.
Variations & Substitutions
- Gluten-free everlasting yeast: Use a gluten-free flour blend instead of wheat flour. Be aware that the texture may be slightly different.
- Sweet everlasting yeast: Increase the amount of sugar to 4 tablespoons for a sweeter starter, ideal for sweet breads or rolls. You can also add a teaspoon of honey.
- Rye everlasting yeast: Substitute half of the white or wheat flour with rye flour for a more complex flavor.
- Different liquid: While potato water is traditional, you can experiment with other starchy liquids, such as water from cooked rice or pasta.
- Whole wheat only: To make this recipe purely with whole wheat, consider adding a teaspoon of vital wheat gluten to help give the starter more structure.
FAQs (Frequently Asked Questions)
Q: What does “everlasting” really mean? Does this yeast truly last forever?
A: While nothing lasts literally forever, this method allows you to maintain a yeast culture indefinitely as long as you care for it by regularly feeding and refreshing it.
Q: My starter isn’t rising. What could be the problem?
A: The most common culprits are temperature (too cold) or inactive yeast. Ensure your starter is in a warm place and that your yeast was fresh when you initially made the starter.
Q: Can I use this starter to make any kind of bread?
A: Yes! You can adapt this starter to any bread recipe that calls for yeast. You might need to adjust the liquid and flour in your main recipe to account for the starter’s contribution.
Q: How will I know if my starter has gone bad?
A: A healthy starter will have a slightly sour, yeasty aroma. If it develops mold, turns pink, or smells strongly of alcohol or vinegar, it should be discarded.
Q: What if I forget to feed my starter for a long time?
A: If you neglect your starter for an extended period, a layer of liquid may form on top (called “hooch”). This is normal. Simply pour it off, refresh the starter with flour and water, and give it time to reactivate.
Final Thoughts
The concept of everlasting yeast might seem daunting at first, but it’s a surprisingly simple and rewarding process. By creating and maintaining your own starter, you are not only ensuring a constant supply of yeast but also connecting with a centuries-old baking tradition. So, take a leap, gather your ingredients, and embark on this culinary adventure. The delicious, homemade bread that awaits you is well worth the effort. Don’t be afraid to experiment, and most importantly, enjoy the process! The satisfying smell of fresh, homemade bread made with your very own everlasting yeast will be a constant reminder of the magic you’ve created. Now, go bake something amazing!