
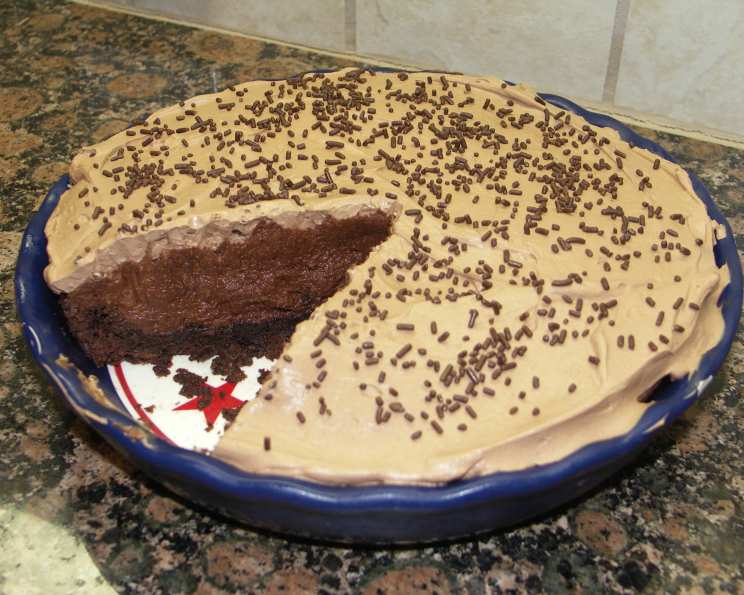
Extreme Chocolate Mud Pie: A Decadent Descent into Chocolate Bliss
I remember the first time I tasted a truly great chocolate mud pie. It wasn’t at some fancy patisserie, but at a humble potluck in my college dorm. Sarah, a girl known more for her chaotic energy than her baking prowess, brought this unassuming pie. One bite, and everything changed. The intense chocolate flavor, the fudgy texture, the sheer unapologetic richness of it all… it was a revelation. That pie sparked my obsession with chocolate desserts, a journey that eventually led me to create this Extreme Chocolate Mud Pie – a tribute to that first, unforgettable bite.
Recipe Overview
- Prep Time: 30 minutes
- Cook Time: 10-12 minutes
- Total Time: 3 hours 20 minutes (including chilling)
- Servings: 10-12
- Yield: 1 pie
- Dietary Type: Not specified
Ingredients
For the Crust:
- 2 eggs
- 1/4 cup water
- 1 teaspoon vanilla
- 8 ounces brownie mix
- 1/2 teaspoon baking soda
- 1/2 cup flour
For the Filling:
- 1 cup sugar
- 3/4 cup butter, softened
- 8 ounces cream cheese, softened
- 6 ounces unsweetened chocolate, melted & cooled
- 1 teaspoon vanilla
- 1/2 cup chocolate chips OR 1/2 cup nuts (combined together)
For the Topping:
- 1 cup whipping cream
- 1/4 cup sugar
- 1/4 cup cocoa powder
- Snowflake-shaped or chocolate decors (optional)
Equipment Needed
- 9-inch pie plate
- Mixing bowls
- Electric mixer
- Spatula
- Measuring cups and spoons
- Microwave-safe bowl or double boiler
- Whisk
Instructions
- Preheat your oven to 350 degrees Fahrenheit (175 degrees Celsius).
- Grease the bottom and sides of a 9-inch pie plate thoroughly. This will prevent the crust from sticking.
- Prepare the Crust: In a mixing bowl, blend together the eggs, water, and vanilla. Mix well until combined.
- Add the brownie mix, baking soda, and flour to the wet ingredients. Stir until everything is well blended. Be careful not to overmix, as this can lead to a tough crust.
- Spoon the brownie mixture into the prepared pie plate. Spread it evenly across the bottom.
- Bake the crust for 10-12 minutes. Keep a close eye on it, referring to the directions on your brownie mix packaging as a guide. The crust should be set but still slightly soft.
- Remove the baked crust from the oven. Note that it will likely be puffy. Cool the crust for 30-60 minutes. This is crucial to prevent the filling from melting later.
- Press the cooled crust down gently with the back of a large spoon. Shape it to the sides of the pan to create a hollow for the filling. Continue to cool the crust while you prepare the filling.
- Prepare the Filling: In a clean mixing bowl, mix the sugar and softened butter on medium speed for about 4 minutes, or until the mixture is very fluffy and light in color. Be sure to scrape the sides of the bowl down several times to ensure even mixing.
- Add the softened cream cheese to the butter and sugar mixture. Continue beating for another minute or two, until smooth and fully incorporated.
- Pour the cooled, melted unsweetened chocolate into the mixture. It’s essential that the chocolate is cooled to prevent it from melting the butter and cream cheese. Beat to incorporate everything, then add the vanilla. Scrape down the sides of the bowl again to ensure a homogenous mixture.
- Slather the chocolate filling evenly over the cooled crust.
- Sprinkle the chocolate chips or nuts (or a combination of both!) over the filling, if using. Press them in gently.
- Chill the pie thoroughly in the refrigerator.
- Prepare the Topping: In the same mixing bowl (no need to wash it!), combine the whipping cream with the sugar and cocoa powder.
- Whip the cream mixture until soft peaks form. Continue whipping for another 30 seconds to stiffen the peaks slightly. Be careful not to overwhip, or you’ll end up with butter!
- Sploosh the whipped cream topping over the chilled chocolate filling, making delightful swirls and peaks.
- Chill the pie for several hours in the refrigerator, or speed things up by placing it in the freezer for a shorter amount of time.
- Right before serving, sprinkle the pie with several dashes of snowflake-shaped or chocolate decors, if desired.
Expert Tips & Tricks
- Melting the Chocolate: The best way to melt chocolate is in a double boiler or in the microwave using short intervals (30 seconds), stirring in between to prevent burning.
- Cooling is Key: Ensure both the crust and the melted chocolate are adequately cooled before assembling the pie. This prevents the filling from becoming soupy.
- Room Temperature Ingredients: Using softened butter and cream cheese is crucial for a smooth, lump-free filling. Leave them out at room temperature for at least an hour before starting.
- Chocolate Selection: The quality of your chocolate significantly impacts the flavor. Use a good quality unsweetened chocolate for the best results.
- Nuts or Chips?: Toasting the nuts lightly before adding them to the filling enhances their flavor.
Serving & Storage Suggestions
Serve this Extreme Chocolate Mud Pie chilled, straight from the refrigerator (or freezer, after a brief thawing period). A dollop of extra whipped cream or a scoop of vanilla ice cream makes an excellent accompaniment.
Leftover pie should be stored in an airtight container in the refrigerator. It will keep for up to 3-4 days. You can also freeze individual slices for longer storage (up to 2 months). Thaw frozen slices in the refrigerator before serving. The pie is best enjoyed cold.
Nutritional Information
| Nutrient | Amount per Serving | % Daily Value |
|---|---|---|
| Calories | 654.7 kcal | N/A |
| Calories from Fat | 421 g | 64% |
| Total Fat | 46.9 g | 72% |
| Saturated Fat | 27.3 g | 136% |
| Cholesterol | 136.5 mg | 45% |
| Sodium | 329.8 mg | 13% |
| Total Carbohydrate | 61.2 g | 20% |
| Dietary Fiber | 4.2 g | 16% |
| Sugars | 30 g | 120% |
| Protein | 8.2 g | 16% |
Note: Nutritional information is an estimate and may vary based on specific ingredients and portion sizes.
Variations & Substitutions
- Gluten-Free: Use a gluten-free brownie mix and gluten-free flour for the crust.
- Dairy-Free: Substitute the butter with a plant-based butter alternative, the cream cheese with a dairy-free cream cheese alternative, and the whipping cream with coconut cream (chilled and whipped).
- Different Chocolate: Experiment with different types of chocolate for the filling, such as dark chocolate or milk chocolate, for a slightly different flavor profile.
- Seasonal: In the fall, add a hint of cinnamon or pumpkin spice to the filling for a cozy, seasonal twist.
- Mint Chocolate: Add a few drops of peppermint extract to the filling for a refreshing mint chocolate mud pie.
FAQs (Frequently Asked Questions)
Q: Can I use a pre-made crust instead of making my own?
A: While a homemade crust offers the best flavor and texture, a store-bought graham cracker or chocolate cookie crust can be used as a convenient alternative.
Q: Can I make the pie ahead of time?
A: Absolutely! In fact, this pie benefits from chilling, so making it a day or two in advance is a great idea. Just wait to add the whipped cream topping until right before serving.
Q: What if my filling is too runny?
A: If your filling seems too runny, it’s likely that the melted chocolate wasn’t cooled enough before adding it to the other ingredients. Try chilling the filling for a longer period of time to allow it to set.
Q: Can I freeze the entire pie?
A: Yes, you can freeze the entire pie. Wrap it tightly in plastic wrap and then foil. Thaw in the refrigerator before serving. The texture of the whipped cream topping may change slightly after freezing.
Q: How do I prevent the crust from getting soggy?
A: Blind baking the crust for a few extra minutes can help prevent it from getting soggy. Also, make sure the crust is completely cooled before adding the filling.
Final Thoughts
This Extreme Chocolate Mud Pie isn’t just a dessert; it’s an experience. It’s a journey into the heart of chocolate indulgence, a celebration of rich flavors and textures. Whether you’re a seasoned baker or a kitchen novice, I encourage you to try this recipe. It’s a guaranteed crowd-pleaser and a surefire way to satisfy any chocolate craving. Share your creations, experiment with variations, and most importantly, enjoy the decadent bliss of this extraordinary mud pie! Don’t forget to pair it with a strong cup of coffee or a sweet dessert wine for the ultimate indulgence.