
Family Fun’s Butterfly Cake: A Whimsical Delight
I remember my niece Lily’s 5th birthday party like it was yesterday. Her eyes lit up brighter than the candles on her cake, a butterfly creation that my sister and I had painstakingly assembled the night before. It wasn’t perfect – the licorice antennae kept sliding off, and a few too many sprinkles ended up on the tablecloth – but Lily adored it, and that’s all that mattered. It was that day I learned that the joy of baking is often less about the final product and more about the shared experience. It was that day I learned that even a “cakewreck” can be a masterpiece.
Recipe Overview
- Prep Time: 30 minutes
- Cook Time: Varies (based on cake mix instructions)
- Total Time: 1 hour + cooling time
- Servings: 8-10
- Yield: 1 Butterfly Cake
- Dietary Type: Varies based on ingredients
Ingredients
- 1 baked 8-or-9-inch round cake (yellow, white, chocolate, etc.)
- 2 cups frosting, your choice (chocolate frosting recommended)
- 1 cup yellow frosting
- 1 Hostess Twinkie
- Candies to decorate (your choice)
- Jelly fruit slices
- Assorted candy (gumdrops, jelly beans, mini chocolate chips, etc.)
- Red string licorice (for antennae) or black string licorice (for antennae)
Equipment Needed
- 8-or-9-inch round cake pan (or cast iron skillet)
- Knife
- Wire cooling rack
- Cake serving plate
- Spatulas
- Toothpick (optional, for creating inner wing design)
- Piece of paper (optional, for inner wing design pattern)
Instructions
- First, bake your cake. You can use your favorite recipe or a box mix. If you’re using a box mix, follow the package instructions. For best results, consider using a 9-inch cast iron skillet.
- Allow the cake to cool completely before proceeding. This is crucial for preventing the frosting from melting and ensuring the cake holds its shape when cut.
- Once the cake is completely cooled, use a knife to carefully loosen the edges of the cake from the pan.
- Place a wire cooling rack over the top of the pan and carefully invert it. Gently tap the bottom of the pan to release the cake.
- Use two spatulas to carefully transfer the cake from the wire rack to your cake serving plate.
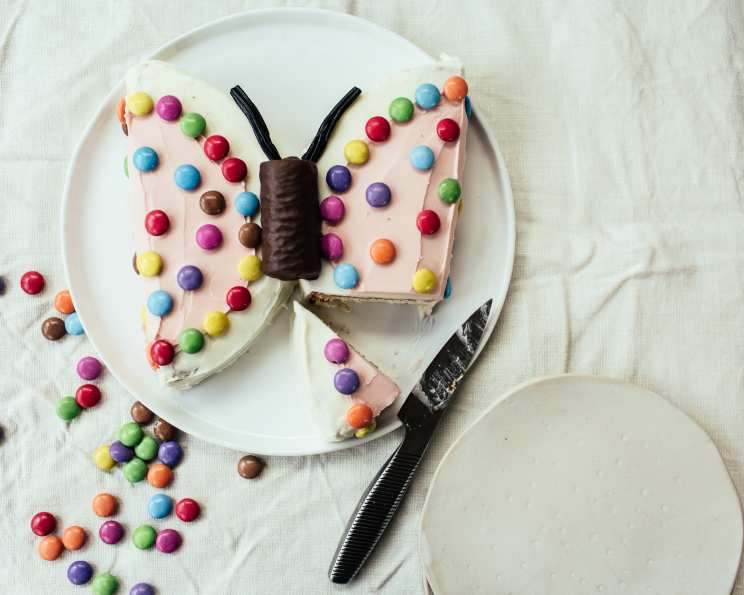
- Cut the cake in half. This will form the two wings of the butterfly.
- Arrange the two halves on the serving plate with the cut sides facing outwards and the rounded edges facing each other. Leave a gap of about 3/4 inch between the two halves. This space will accommodate the Twinkie body.
- Now it’s time to frost the cake. You can use any frosting you like, but chocolate frosting is a classic choice for the wings.
- Frost the top and sides of each cake half, creating a smooth, even layer.
- Use the yellow frosting to frost the Twinkie.
- Place the frosted Twinkie between the two cake halves to form the butterfly’s body.
- If you’d like to add an inner wing design, create a pattern on a piece of paper. Place the paper on each cake half and use a toothpick to make small holes around the edge of the pattern. Remove the paper and carefully frost the inner wing area.
- Decorate the wings with candies. Use jelly fruit slices, gumdrops, jelly beans, mini chocolate chips, M&Ms, or any other candies you like. Be creative and have fun!
- Attach the licorice antennae to the Twinkie’s head. You can curl the ends of the licorice to make them look more whimsical.
Expert Tips & Tricks
- Cooling is Key: Ensure the cake is completely cooled before frosting. A warm cake will melt the frosting and make decorating difficult.
- Frosting Consistency: Use a smooth, easily spreadable frosting. If your frosting is too stiff, add a tablespoon or two of milk or water to thin it out.
- Candy Placement: Consider the colors and shapes of your candies when decorating. A symmetrical arrangement can create a visually appealing effect.
- Cast Iron Advantage: Baking in a cast iron skillet results in a cake with a slightly crisper edge and more even cooking.
- Mistakes Happen: Don’t be afraid to experiment! Even if your cake isn’t perfect, it will still taste delicious.
Serving & Storage Suggestions
Serve the butterfly cake immediately after decorating for the best presentation. If you’re using M&Ms, be aware that the dye may run if the cake sits for too long.
To store leftover cake, cover it loosely with plastic wrap or place it in an airtight container. The cake will last for 2-3 days at room temperature or up to a week in the refrigerator. For longer storage, you can freeze the cake for up to 2 months. Thaw it overnight in the refrigerator before serving.
Nutritional Information
(Note: Nutritional information is an estimate and can vary based on specific ingredients and portion sizes.)
| Nutrient | Amount per Serving | % Daily Value |
|---|---|---|
| Calories | 450 kcal | 23% |
| Total Fat | 20g | 31% |
| Saturated Fat | 8g | 40% |
| Cholesterol | 0mg | 0% |
| Sodium | 300mg | 13% |
| Total Carbohydrate | 65g | 22% |
| Dietary Fiber | 1g | 4% |
| Sugars | 40g | – |
| Protein | 3g | 6% |
Variations & Substitutions
- Cake Flavor: Experiment with different cake flavors, such as lemon, red velvet, or spice cake.
- Frosting: Use cream cheese frosting, Swiss meringue buttercream, or a vegan frosting alternative.
- Gluten-Free: Use a gluten-free cake mix or recipe.
- Dairy-Free: Use a dairy-free frosting and cake mix.
- Fruit Filling: Add a layer of fruit filling between the cake halves for extra flavor.
FAQs (Frequently Asked Questions)
Q: Can I make this cake ahead of time?
A: Yes, you can bake the cake a day in advance and store it wrapped tightly at room temperature. Frost and decorate the cake closer to serving time.
Q: What if my cake crumbles when I cut it?
A: Make sure the cake is completely cooled before cutting. If it still crumbles, try using a serrated knife and gently sawing through the cake.
Q: Can I use store-bought frosting?
A: Absolutely! Store-bought frosting is a convenient option for saving time.
Q: What other candies can I use to decorate the cake?
A: Get creative! You can use anything from sprinkles and chocolate shavings to gummy worms and edible glitter.
Q: How do I prevent the M&M dye from running?
A: Decorate the cake with M&Ms shortly before serving. Alternatively, use candies that are less likely to bleed dye.
Final Thoughts
Creating this butterfly cake is more than just following a recipe; it’s about crafting a centerpiece for joyful memories. So, gather your ingredients, preheat your oven, and let your creativity take flight. Don’t worry about perfection—embrace the imperfections and enjoy the process of creating something special. I hope you and your loved ones enjoy this whimsical delight as much as my family does. I can’t wait to hear how your butterfly cake turns out! Share your photos and feedback – I’m excited to see your creations!