
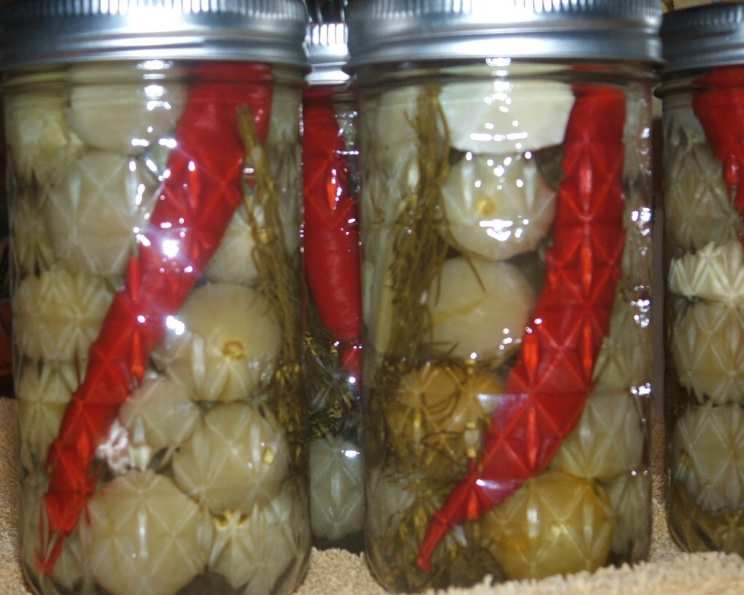
Fire Balls: Pickled Cherry Tomatoes with a Fiery Kick
There’s a memory seared into my mind: my grandmother, standing over a steaming pot in her sun-drenched kitchen, the air thick with the aroma of vinegar, garlic, and something…fiery. She was a master of canning, and one of her most talked-about creations was her “Fire Balls” – pickled cherry tomatoes that packed a punch. As a kid, I was both terrified and fascinated by them. That initial sweetness, followed by an intense heat that made your eyes water, was an experience unlike any other. These weren’t just tomatoes; they were a conversation starter, a culinary adventure, and a testament to my grandmother’s bold spirit in the kitchen.
Recipe Overview
- Prep Time: 30 minutes
- Cook Time: 10 minutes
- Total Time: 40 minutes
- Yields: 4 quarts
- Dietary Type: Vegan
Ingredients
- 14 lbs small green cherry tomatoes
- 4 cloves garlic
- 4 stalks celery
- 4 hot red peppers (use caution, these are where the fire comes from!)
- 4 heads dill
- 1 quart water
- ½ cup pickling salt
- 2 quarts white vinegar
Equipment Needed
- Large pot
- Canning jars (4 quart-sized), with lids and bands
- Jar lifter
- Large saucepan
- Boiling water bath canner
Instructions
-
The first step is crucial for safely preserving your Fire Balls: sterilize your canning jars. Wash the jars, lids, and bands in hot, soapy water. Rinse thoroughly. Place the jars in a large pot, cover with water, and bring to a boil. Boil for 10 minutes. Keep the jars hot until ready to use. You can leave them in the hot water or place them in a warm oven (200°F) to maintain their temperature.
-
Now, let’s prepare the stars of the show: the cherry tomatoes. It’s best to use smaller, green cherry tomatoes for this recipe; they hold their shape better during the pickling process. Gently wash the tomatoes under cool, running water. Remove any stems or blemishes.
-
Prepare your flavor enhancers. Peel the garlic cloves. Wash the celery stalks and cut them into roughly 4-inch pieces. Handle the hot red peppers with care, using gloves if you are sensitive to capsaicin. You can leave them whole or slice them in half lengthwise to release more heat. Wash the dill heads.
-
Now it’s time to pack the jars. Remember, you’ll want approximately 3 ½ pounds of cherry tomatoes in each quart jar. Divide the tomatoes evenly among the four sterilized jars.
-
Add the flavorings to each jar. To each quart jar, add one clove of garlic, one celery stalk, one hot red pepper, and one head of dill. Arrange them artfully so they are nicely visible through the jar.
-
Now, let’s create the pickling brine. In a large saucepan, combine the water, pickling salt, and white vinegar.
-
Bring the brine to a boil over high heat, stirring until the salt is completely dissolved. This hot brine is crucial for proper preservation.
-
Carefully pour the boiling brine into the jars, leaving ½ inch of headspace (the space between the top of the liquid and the lid). Use a clean utensil (like a chopstick or plastic knife) to remove any air bubbles trapped inside the jars.
-
Wipe the rims of the jars with a clean, damp cloth to ensure a good seal. Place the lids on the jars and screw on the bands until they are fingertip-tight (not too tight, or the air can’t escape during processing).
-
Now for the final step: processing the jars in a boiling water bath. Place the filled jars in a boiling water bath canner. Ensure the water covers the jars by at least 1 inch. Bring the water to a rolling boil.
-
Once the water is boiling vigorously, process the jars for 10 minutes. Adjust processing time for altitude. If you live at a higher altitude, you’ll need to increase the processing time to ensure proper preservation. Consult your local extension office for specific recommendations.
-
After processing, turn off the heat and carefully remove the jars from the canner using a jar lifter. Place the jars on a towel-lined surface, leaving some space between them to allow for air circulation.
-
Let the jars cool completely, undisturbed, for 12-24 hours. As they cool, you should hear a “popping” sound as the lids seal.
-
After the cooling period, check the seals. Press down on the center of each lid. If the lid flexes or pops back up, it is not properly sealed and the jar should be refrigerated and consumed within a few weeks, or reprocessed with a new lid. Jars that are properly sealed can be stored in a cool, dark place for at least a year.
Expert Tips & Tricks
- Spice it up (or down): Adjust the number of hot peppers to control the heat level. For a milder version, use fewer peppers or remove the seeds and membranes before adding them to the jars. For a truly fiery experience, try using hotter varieties of peppers like habaneros or Scotch bonnets (with extreme caution!).
- Celery Variation: Play around with using celery seeds in addition to, or in place of the celery stalks for a subtle variation.
- Vinegar options: While white vinegar is traditional, you can experiment with other vinegars like apple cider vinegar for a slightly sweeter and more complex flavor profile. Be sure to use a vinegar with at least 5% acidity for safe preservation.
- Patience is key: Resist the urge to open the jars immediately! The flavors need time to meld and develop. Let the pickled tomatoes sit for at least 2-3 weeks before opening for the best flavor.
Serving & Storage Suggestions
Serve these Fire Balls as a zesty appetizer, a flavorful addition to salads, or a spicy garnish for grilled meats or fish. They are also fantastic in Bloody Marys or as a unique condiment on sandwiches. Once opened, store the Fire Balls in the refrigerator. They should last for several weeks, but their quality may degrade over time. Properly sealed, unopened jars can be stored in a cool, dark place for at least a year.
Nutritional Information
Note: Nutritional information is an estimate and will vary based on the size and variety of tomatoes used.
| Nutrient | Amount per Serving (approx. 1/2 cup) | % Daily Value |
|---|---|---|
| Calories | 50 kcal | 3% |
| Total Fat | 0.5g | 1% |
| Saturated Fat | 0g | 0% |
| Cholesterol | 0mg | 0% |
| Sodium | 700mg | 29% |
| Total Carbohydrate | 10g | 3% |
| Dietary Fiber | 2g | 8% |
| Sugars | 6g | – |
| Protein | 1g | 2% |
Variations & Substitutions
- Sweet Heat: Add a tablespoon or two of sugar to the brine for a sweeter, more balanced flavor.
- Garlic Infusion: Roast the garlic cloves before adding them to the jars for a more mellow, sweeter garlic flavor.
- Herb Garden: Experiment with other herbs like oregano, thyme, or rosemary in addition to the dill.
- Spicy Brine: Infuse the brine with other spices like peppercorns, mustard seeds, or coriander seeds for added complexity.
- Rainbow Fire Balls: Use a variety of different colored cherry tomatoes for an eye-catching presentation.
FAQs (Frequently Asked Questions)
Q: Can I use ripe, red cherry tomatoes instead of green ones?
A: While you can use ripe tomatoes, they may become softer during the pickling process. Green tomatoes hold their shape better and offer a firmer texture.
Q: How long do I need to wait before eating the pickled tomatoes?
A: For the best flavor, wait at least 2-3 weeks before opening the jars. This allows the flavors to fully develop and meld together.
Q: What if my jars don’t seal properly?
A: If a jar doesn’t seal, you can either reprocess it with a new lid or store it in the refrigerator and consume it within a few weeks.
Q: Can I use dried dill instead of fresh dill?
A: Fresh dill provides a more vibrant flavor, but you can substitute dried dill if necessary. Use about 1 tablespoon of dried dill per jar.
Q: Are these Fire Balls really spicy?
A: The spiciness depends on the type and quantity of hot peppers used. Start with one pepper per jar and adjust to your preference. You can always add more heat, but you can’t take it away!
Final Thoughts
These Fire Balls are more than just pickled tomatoes; they’re a flavor explosion waiting to happen. Whether you’re a seasoned canner or a curious beginner, I encourage you to give this recipe a try. It’s a fantastic way to preserve the bounty of the garden and add a spicy kick to your culinary repertoire. Share your creations with friends and family, and don’t be afraid to experiment with different variations to make it your own. And who knows, maybe these Fire Balls will become a cherished family tradition for you, just like they are for me. Enjoy the heat!