
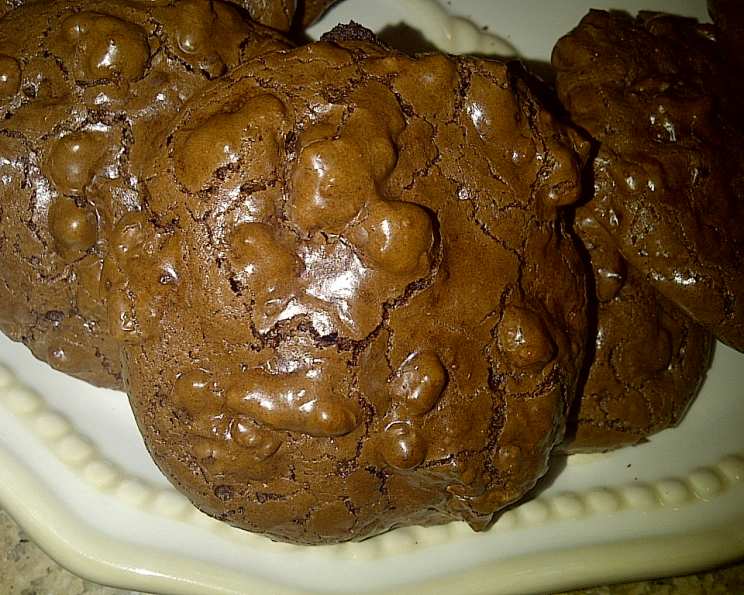
Flourless Chocolate-Walnut Cookies: A Decadent Delight
I remember the first time I tasted a flourless chocolate cookie. It was at a tiny Parisian patisserie, tucked away on a cobblestone street. The air was thick with the scent of warm butter and dark chocolate, and I was mesmerized by the rows of delicate pastries. I chose one that looked deceptively simple – a cracked, dark dome studded with walnuts. One bite, and I was hooked. The intensely chocolatey flavor, the chewy texture, and the satisfying crunch of the walnuts created a symphony in my mouth. I knew I had to recreate this magic at home. This recipe, adapted from François Payard’s Chocolate Epiphany, is my attempt to capture that Parisian memory.
Recipe Overview
- Prep Time: 15 minutes
- Cook Time: 23-25 minutes
- Total Time: 38-40 minutes
- Servings: 24
- Yield: 24 cookies
- Dietary Type: Gluten-Free
Ingredients
- 2 ¾ cups walnut halves
- 3 cups confectioners’ sugar
- ½ cup unsweetened dutch cocoa, plus 3 tablespoons unsweetened dutch cocoa
- ½ teaspoon salt
- 4 large egg whites, at room temperature
- 1 tablespoon pure vanilla extract
Equipment Needed
- Large-rimmed baking sheet
- Work surface
- Two large-rimmed baking sheets
- Parchment paper
- Large bowl
- Whisk (or electric mixer)
- Wire racks
Instructions
- Preheat your oven to 350°F (175°C). Spread the walnut halves on a large-rimmed baking sheet and toast in the oven for about 9 minutes, until they are golden and fragrant. Keep a close eye on them; you want them toasted, not burnt. The aroma will be a good indicator.
- Let the toasted walnuts cool slightly. Then, transfer them to a work surface and coarsely chop them. Don’t chop them too finely; you want discernible pieces in the cookies for texture.
- Position two racks in the upper and lower thirds of the oven and lower the temperature to 320°F (160°C). Line two large-rimmed baking sheets with parchment paper. This is crucial to prevent the cookies from sticking.
- In a large bowl, whisk (or combine in an electric mixer on low speed) the confectioners’ sugar with the ½ cup of cocoa powder and salt, followed by the chopped walnuts. Ensure the dry ingredients are evenly distributed before adding the wet ingredients.
- While whisking (or once you change the speed to medium), add the egg whites and vanilla extract and beat just until the batter is moistened. Do not overbeat, or it will stiffen. You’re aiming for a thick, fudgy consistency. Overmixing develops gluten (which we don’t want since these are flourless) and can result in tough cookies.
- Spoon the batter onto the baking sheets in 12 evenly spaced mounds per sheet. Use a tablespoon or a small cookie scoop for consistency. Sprinkle the 3 tablespoons of remaining cocoa powder over the cookies evenly.
- Bake for 14 to 16 minutes, until the tops are glossy and lightly cracked. Shift the pans from front to back and top to bottom halfway through to ensure even baking. Because ovens can vary, start checking for doneness at 14 minutes. The cookies should be set around the edges but still slightly soft in the center.
- Slide the parchment paper (with the cookies) onto two wire racks. Let the cookies cool completely on the parchment paper. This is essential for them to firm up properly.
- Once cooled, carefully peel the cookies from the parchment paper and store in an airtight container for up to 3 days. They’re best enjoyed within the first day or two when they are at their chewiest.
Expert Tips & Tricks
- Toast those walnuts! Toasting the walnuts deepens their flavor and adds a wonderful aroma that complements the chocolate beautifully. Don’t skip this step!
- Room temperature egg whites: Using room temperature egg whites allows them to whip up more easily, resulting in a lighter cookie.
- Don’t overmix: Overmixing the batter can develop gluten (even though there’s no flour!) and make the cookies tough. Mix just until combined.
- Parchment paper is your friend: Flourless cookies are often delicate, so using parchment paper is a surefire way to prevent sticking.
- Adjust baking time: Every oven is different, so keep an eye on the cookies during the last few minutes of baking. They should be set around the edges and slightly soft in the center.
- For a richer flavor, use a high-quality Dutch-processed cocoa powder. The difference is noticeable.
- If your batter seems too wet, try chilling it for 15-20 minutes before scooping. This will help the cookies hold their shape better during baking.
Serving & Storage Suggestions
These Flourless Chocolate-Walnut Cookies are delicious on their own, but they also pair wonderfully with a scoop of vanilla ice cream, a dollop of whipped cream, or a dusting of powdered sugar. They also complement a strong cup of coffee or a glass of dessert wine.
Store the cookies in an airtight container at room temperature for up to 3 days. They can also be stored in the freezer for up to a month. To freeze, place the cooled cookies in a single layer on a baking sheet and freeze for 30 minutes. Then, transfer them to a freezer-safe container or bag. Thaw at room temperature before serving.
Nutritional Information
| Nutrient | Amount per Serving | % Daily Value |
|---|---|---|
| Calories | 187 kcal | 9% |
| Total Fat | 10.9g | 16% |
| Saturated Fat | 1.2g | 6% |
| Cholesterol | 0mg | 0% |
| Sodium | 70.5mg | 2% |
| Total Carbohydrate | 22g | 7% |
| Dietary Fiber | 2.1g | 8% |
| Sugars | 18.2g | 72% |
| Protein | 3.8g | 7% |
Variations & Substitutions
- Nut Variations: Experiment with other nuts like pecans, almonds, or hazelnuts instead of walnuts. Toast them before adding to the batter for the best flavor.
- Chocolate Chips: Add ½ cup of chocolate chips (dark, milk, or white) to the batter for an extra chocolatey treat.
- Espresso Powder: A teaspoon of espresso powder will enhance the chocolate flavor.
- Spice it up: Add a pinch of cayenne pepper for a subtle kick.
- Citrus Zest: Orange or lemon zest can add a bright and refreshing flavor.
- Dairy-Free Option: While this recipe is naturally gluten-free, it is not dairy-free due to the egg whites. There is no direct substitute for the egg whites that will provide the same structure. This recipe can also be made with meringue powder to stablize the cookie further.
FAQs (Frequently Asked Questions)
Q: Can I use regular cocoa powder instead of Dutch-processed cocoa?
A: While you can, Dutch-processed cocoa powder will give the cookies a richer, smoother chocolate flavor. Regular cocoa powder may result in a slightly drier cookie.
Q: Why are my cookies spreading too much?
A: This could be due to several factors. Ensure you are using room-temperature egg whites and haven’t overmixed the batter. Also, check your oven temperature for accuracy. If the batter seems too wet, chill it for 15-20 minutes before scooping.
Q: How do I know when the cookies are done?
A: The cookies are done when the tops are glossy and lightly cracked, and the edges are set. They should still be slightly soft in the center.
Q: Can I make the batter ahead of time?
A: It’s best to bake the cookies right away for the best texture. However, you can prepare the batter a few hours in advance and store it in the refrigerator. Let it come to room temperature slightly before scooping.
Q: My cookies are sticking to the parchment paper. What am I doing wrong?
A: Make sure you are using parchment paper, not wax paper. Also, ensure the cookies are completely cool before attempting to peel them off the parchment paper.
Final Thoughts
These Flourless Chocolate-Walnut Cookies are a testament to the fact that sometimes, the simplest recipes are the most satisfying. The combination of intense chocolate flavor, chewy texture, and crunchy walnuts is simply irresistible. I encourage you to try this recipe and experience the magic for yourself. Don’t be afraid to experiment with variations and make it your own. And most importantly, share your creations with friends and family – because good food is always best enjoyed in good company. Happy baking!