
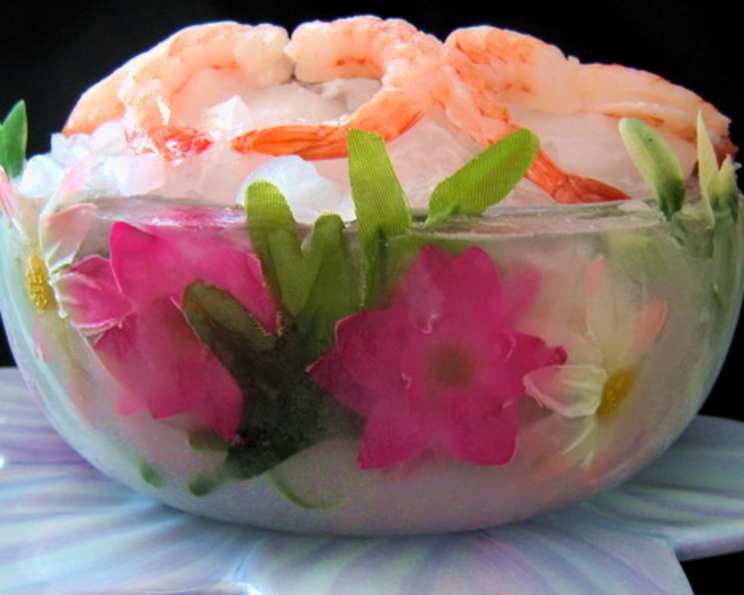
Flower Ice Bowls: A Culinary Masterpiece
I remember the first time I saw a flower ice bowl. It was at a summer solstice party, and as the sun dipped below the horizon, casting a golden glow across the garden, these ethereal bowls appeared, filled with chilled cucumber and mint soup. The delicate flowers, suspended in the ice, shimmered like jewels. It wasn’t just the beauty of the bowls, but the sheer ingenuity and artistry that captivated me. That night, I knew I had to learn how to make them, bringing a touch of magic and elegance to my own table.
Recipe Overview
- Prep Time: 30 minutes
- Freeze Time: 12-16 hours
- Total Time: 12.5-16.5 hours
- Yields: 1 bowl
- Dietary Type: Gluten-Free, Vegan
Ingredients
- Water
- Fresh edible flowers (such as roses, pansies, sunflowers, basil blossoms, honeysuckle, lavender, violets) Ensure they are organically grown and safe for consumption.
Equipment Needed
- 1 metal or ceramic bowl (large)
- 1 smaller bowl that fits inside the larger bowl
- Duct tape
- Optional: Blow torch
Instructions
-
Begin by selecting your edible flowers. Remember to source them from a trusted source that guarantees they haven’t been treated with pesticides or harmful chemicals. Wash and gently dry the flowers.
-
Fill the larger metal or ceramic bowl approximately 3/4 full with water. Distilled water will yield the clearest ice.
-
Carefully arrange the flower petals and blossoms within the water. Distribute them evenly for a visually appealing effect. You can experiment with different flower arrangements – some floating on the surface, others gently submerged.
-
Place the smaller bowl inside the larger bowl. This will create the hollow space that forms the bowl.
-
Use duct tape to secure the smaller bowl in the center of the larger bowl. This is crucial to prevent the smaller bowl from shifting during the freezing process, which could result in an uneven ice bowl. Ensure the tape is taut and firmly attached to both bowls.
-
Carefully transfer the assembled bowls to your freezer. Make sure the surface is level to ensure the ice bowl freezes evenly.
-
Freeze the bowls for at least 12-16 hours, or preferably overnight, until the water is completely frozen solid.
-
Once frozen, remove the bowls from the freezer.
-
Remove the duct tape.
-
Carefully remove the smaller bowl. You may need to run some warm water around the inside of the smaller bowl to loosen it. Be patient and gentle to avoid cracking the ice.
-
To release the finished ice bowl from the larger bowl, you have two options:
- Blow Torch Method (Optional): If you possess a blow torch, briefly flash the outside of the larger bowl with the flame. This will gently melt the ice and release the bowl. Be extremely careful not to overheat the ice bowl, as this could cause it to crack or melt unevenly.
- Room Temperature Method: Alternatively, simply allow the larger bowl to sit at room temperature for 10-15 minutes. The ice will gradually melt, releasing the bowl.
-
Once the ice bowl is released, immediately fill it with your desired chilled soup, salad, or dessert and serve. The ice will start to melt gradually, so swiftness is key.
Expert Tips & Tricks
- Clarity is Key: Use distilled water for the clearest ice. Tap water can contain minerals that make the ice cloudy.
- Flower Selection: Choose flowers that are not only edible but also visually appealing. Experiment with different colors, shapes, and textures to create unique designs.
- Prevent Cracking: To minimize the risk of cracking, avoid drastic temperature changes. Allow the bowl to thaw slightly at room temperature before attempting to remove it from the mold.
- Pre-Chill: For longer-lasting bowls, pre-chill them in the freezer for about 30 minutes before adding food. This will help slow down the melting process.
- Floral Placement: Consider the angle from which the bowl will be viewed when placing the flowers. Layering flowers or creating specific patterns can elevate the presentation.
Serving & Storage Suggestions
Flower ice bowls are best served immediately after being released from the mold. Their beauty and function are both temporary. They are designed for single-use and should be filled just before serving to maximize their lifespan. If you need to prepare ahead of time, you can make the ice bowls in advance and store them in the freezer. However, be aware that they may become slightly frosted or cloudy during storage. Once filled, ice bowls will begin to melt at room temperature. Estimate the melting time based on the ambient temperature and the thickness of the ice. These bowls are not suitable for long-term storage or reheating.
Nutritional Information
| Nutrient | Amount per Serving | % Daily Value |
|---|---|---|
| Calories | 0 kcal | 0% |
| Total Fat | 0g | 0% |
| Saturated Fat | 0g | 0% |
| Cholesterol | 0mg | 0% |
| Sodium | 0mg | 0% |
| Total Carbohydrate | 0g | 0% |
| Dietary Fiber | 0g | 0% |
| Sugars | 0g | 0% |
| Protein | 0g | 0% |
Variations & Substitutions
- Fruit Ice Bowls: Incorporate slices of fruit, such as lemons, limes, oranges, or berries, along with the flowers for added flavor and visual appeal.
- Herb-Infused Ice: Add fresh herbs, such as mint, basil, or rosemary, to the water for a subtle herbal flavor.
- Colored Ice: Use food coloring to tint the water before freezing for a vibrant, eye-catching effect.
- Different Liquids: Experiment with other liquids besides water, such as diluted fruit juice or herbal tea, to create ice bowls with unique flavors.
FAQs (Frequently Asked Questions)
Q: What kind of flowers can I use?
A: Use only organically grown, edible flowers. Some popular choices include roses, pansies, sunflowers, basil blossoms, honeysuckle, lavender, and violets. Ensure they are safe for consumption and free from pesticides.
Q: How do I prevent the ice bowl from cracking?
A: Use distilled water for clearer, stronger ice. Avoid drastic temperature changes and allow the bowl to thaw slightly at room temperature before attempting to remove it from the mold.
Q: How long will the ice bowl last?
A: The lifespan of an ice bowl depends on the ambient temperature. They are designed for single-use and will gradually melt at room temperature. Pre-chilling the bowl can help extend its lifespan.
Q: Can I reuse the ice bowl molds?
A: Yes, the bowls used as molds can be reused indefinitely to create more flower ice bowls. Wash and dry them thoroughly after each use.
Q: Can I make the ice bowls ahead of time?
A: Yes, you can make the ice bowls in advance and store them in the freezer. However, be aware that they may become slightly frosted or cloudy during storage.
Final Thoughts
Creating flower ice bowls is a labor of love, a delicate dance between artistry and culinary skill. While they require a bit of patience, the results are well worth the effort. These enchanting bowls transform any dish into a show-stopping centerpiece, perfect for summer gatherings, garden parties, or any occasion that calls for a touch of elegance. So, gather your edible flowers, embrace the chill, and let your creativity blossom! I encourage you to try this recipe and share your beautiful creations with the world. Perhaps pair your flower ice bowls with a light and refreshing gazpacho or a delicate fruit soup. The possibilities are endless!