
Rustic Focaccia: A Taste of Italy in Your Kitchen
The scent of baking focaccia instantly transports me back to a sun-drenched piazza in Rome. I remember the first time I tasted it, a simple slab glistening with olive oil and sprinkled with sea salt, bought from a tiny bakery tucked away on a side street. The warm, chewy bread, with its crisp, golden crust, was a revelation – a humble yet exquisite expression of Italian culinary simplicity. I’ve been chasing that taste ever since, and this recipe comes pretty close to capturing that memory.
Recipe Overview
- Prep Time: 30 minutes
- Cook Time: 15-20 minutes
- Total Time: 1 hour 45 minutes (includes rising time)
- Servings: 8
- Yield: 1 loaf
- Dietary Type: Vegetarian
Ingredients
- 2 teaspoons fast rising yeast
- 1 cup water, warm
- 2 tablespoons sugar
- 3 1/2 – 4 cups flour
- 1 tablespoon coarse salt
- 1/4 cup olive oil
- Cornmeal, for dusting
Toppings:
- 2 tablespoons olive oil
- 1 onion, diced
- 2 garlic cloves, minced
- 10 kalamata olives, pitted and quartered
- 1/4 cup shredded parmesan cheese
- 1 tablespoon coarse salt
- Fresh ground black pepper
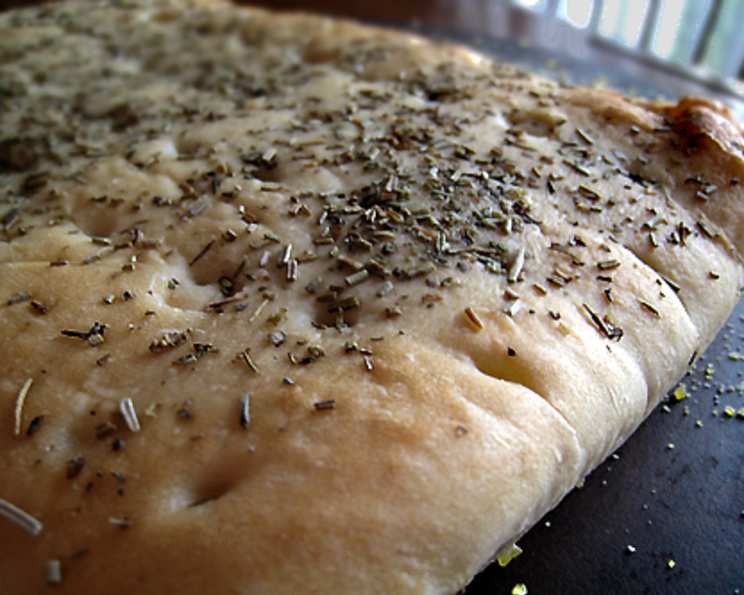
- 2 tablespoons fresh rosemary
Equipment Needed
- Standing mixer with dough hook
- Measuring cups and spoons
- Mixing bowl
- Plastic wrap or damp towel
- Sheet pan
- Small saute pan
Instructions
- In the bowl of a standing mixer fitted with a dough hook, proof the yeast by combining it with the warm water and sugar. Stir gently to dissolve.
- Let stand for 3 minutes until foam appears. This step is crucial; if your yeast doesn’t foam, it’s likely inactive and your dough won’t rise properly. You’ll need to start again with fresh yeast.
- Turn the mixer on low speed and slowly add the flour to the bowl. Gradually incorporating the flour prevents it from clumping and ensures a smooth dough.
- Dissolve the coarse salt in 2 tablespoons of water and add it to the mixture. Dissolving the salt ensures even distribution throughout the dough, which is essential for flavor development.
- Pour in the 1/4 cup of olive oil. The olive oil adds richness and contributes to the characteristic chewy texture of focaccia.
- When the dough starts to come together, increase the speed to medium. Stop the machine periodically to scrape the dough off the hook. This helps ensure that all the ingredients are properly incorporated.
- Mix until the dough is smooth and elastic, about 10 minutes, adding flour as necessary. The dough should pull away from the sides of the bowl and form a slightly sticky ball. Be careful not to add too much flour, as this can result in a dry, dense focaccia.
- Turn the dough out onto a lightly floured work surface and fold it over itself a few times. This helps to develop gluten strength and improve the final texture.
- Form the dough into a round and place it in an oiled bowl, turning to coat the entire ball with oil so it doesn’t form a skin. This step prevents the dough from drying out during the rising process.
- Cover the bowl with plastic wrap or a damp towel and let it rise in a warm place (like over a gas pilot light on the stovetop or in a slightly warmed oven) until doubled in size, about 45 minutes. Proper rising is key to a light and airy focaccia.
- Coat a sheet pan with a little olive oil and cornmeal. The cornmeal adds a subtle crunch to the bottom of the focaccia.
- Once the dough is doubled and domed, turn it out onto the counter. Handle it gently to avoid deflating it too much.
- Roll and stretch the dough out to an oblong shape about 1/2-inch thick. Don’t be afraid to use your hands to gently stretch the dough; it should be fairly elastic.
- Lay the flattened dough on the prepared sheet pan and cover with plastic wrap.
- Let it rest for 15 minutes. This allows the gluten to relax, making the focaccia more tender.
- In the meantime, coat a small saute pan with olive oil, add the diced onion, and cook over low heat for 15 minutes until the onions caramelize. Caramelizing the onions brings out their sweetness and adds depth of flavor to the focaccia. Watch carefully to prevent burning.
- Preheat oven to 400 degrees F (200 degrees C). Ensure your oven is fully preheated before baking for even cooking.
- Uncover the dough and dimple it with your fingertips. These dimples create pockets for the olive oil and toppings, preventing them from sliding off during baking.
- Brush the surface with more olive oil and then add the caramelized onions, minced garlic, quartered kalamata olives, shredded parmesan cheese, coarse salt, fresh ground black pepper, and fresh rosemary. Distribute the toppings evenly across the surface of the dough.
- Bake on the bottom rack for 15 to 20 minutes, or until golden brown and cooked through. Baking on the bottom rack helps to crisp the bottom crust. If the top starts to brown too quickly, you can loosely cover it with foil. Check for doneness by inserting a toothpick into the center; it should come out clean.
Expert Tips & Tricks
- For extra flavor, try infusing your olive oil with herbs like rosemary or thyme before brushing it onto the focaccia.
- Don’t overcrowd the pan. If you’re making a large batch, bake the focaccia in two separate pans to ensure even cooking.
- If your dough is too sticky to handle, lightly flour your hands and the work surface.
- To get a crispier crust, try spraying the focaccia with water a few times during the first few minutes of baking.
- Make the dough ahead of time. The dough can be made a day in advance and stored in the refrigerator. Just bring it to room temperature before shaping and baking.
Serving & Storage Suggestions
Serve the focaccia warm or at room temperature, either on its own or as an accompaniment to soups, salads, or pasta dishes. It’s also delicious served with dips like hummus or baba ghanoush.
Store leftover focaccia in an airtight container at room temperature for up to 2 days. To freeze, wrap tightly in plastic wrap and then foil, and store for up to 2 months. To reheat, thaw completely and then warm in a preheated oven at 350 degrees F (175 degrees C) for 5-10 minutes, or until heated through. You can also revive day-old focaccia by briefly toasting it.
Nutritional Information
| Nutrient | Amount per Serving | % Daily Value |
|---|---|---|
| Calories | 330.9 kcal | N/A |
| Calories from Fat | 110 g | 33% |
| Total Fat | 12.2 g | 18% |
| Saturated Fat | 2.1 g | 10% |
| Cholesterol | 2.8 mg | 0% |
| Sodium | 1842.9 mg | 76% |
| Total Carbohydrate | 47.5 g | 15% |
| Dietary Fiber | 2.1 g | 8% |
| Sugars | 3.9 g | N/A |
| Protein | 7.5 g | 14% |
Note: Nutritional information is an estimate and may vary depending on specific ingredients and portion sizes.
Variations & Substitutions
- For a vegan version, omit the parmesan cheese or substitute it with a vegan parmesan alternative.
- Experiment with different toppings. Try adding sun-dried tomatoes, roasted red peppers, or your favorite herbs.
- For a gluten-free version, use a gluten-free flour blend designed for bread making. You may need to adjust the amount of liquid and rising time.
- Add a touch of sweetness by drizzling honey or maple syrup over the focaccia after baking.
FAQs (Frequently Asked Questions)
Q: Can I use active dry yeast instead of fast-rising yeast?
A: Yes, you can. However, you’ll need to proof it for a longer period of time (about 10-15 minutes) before adding it to the other ingredients.
Q: My dough isn’t rising. What could be the problem?
A: The most common reason is that the yeast is inactive. Make sure your yeast is fresh and that the water is warm, but not too hot. Also, ensure that the room is warm enough for the dough to rise properly.
Q: Can I make focaccia without a stand mixer?
A: Absolutely! You can knead the dough by hand on a lightly floured surface for about 15-20 minutes, or until it’s smooth and elastic.
Q: How do I prevent the toppings from burning during baking?
A: If the toppings start to brown too quickly, loosely cover the focaccia with foil during the last few minutes of baking.
Q: Can I add other cheeses to the focaccia?
A: Yes, feel free to experiment with different cheeses like mozzarella, provolone, or feta. Just be sure to adjust the baking time accordingly.
Final Thoughts
I truly hope this recipe inspires you to create your own piece of Italian sunshine right in your kitchen. The beauty of focaccia lies in its simplicity and versatility – it’s a blank canvas for your culinary creativity. Don’t be afraid to experiment with different flavors and toppings, and most importantly, enjoy the process! And if you find yourself with a particularly delicious creation, don’t hesitate to share your success (and maybe even a slice!) with friends and family. Buon appetito!