
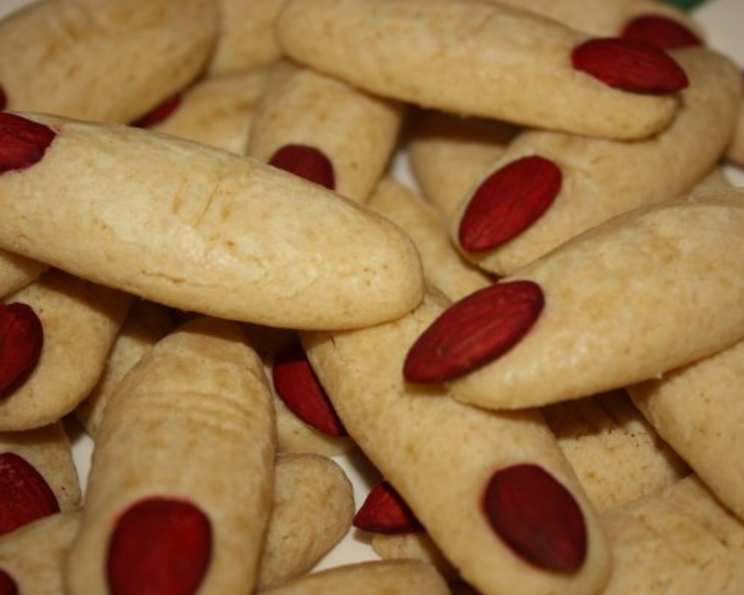
Freaky Ladies’ Fingers: A Halloween Treat to Die For
I remember one Halloween, my little sister, bless her heart, decided she was too old for trick-or-treating. Instead, she wanted to host a “sophisticated” Halloween party. The centerpiece, according to her, was going to be a cheese and charcuterie board. Little did she know, I had other plans. I snuck into the kitchen and assembled a platter of these “Freaky Ladies’ Fingers,” strategically placing them amongst the brie and prosciutto. The reactions ranged from horrified gasps to delighted giggles, and suddenly, my sister’s sophisticated soiree had a deliciously macabre edge. That’s the power of a little edible fright!
Recipe Overview
- Prep Time: 45 minutes
- Cook Time: 12-15 minutes
- Total Time: 1 hour 12 minutes
- Servings: 48
- Yield: 4 dozen
- Dietary Type: Vegetarian
Ingredients
- 24 blanched almonds (halved lengthwise)
- Red food coloring
- 2 cups warm water
- 1 tablespoon sugar
- 1 tablespoon yeast (scant)
- 5 -6 cups flour
- 1 tablespoon salt
- 2 tablespoons baking soda
- 1 large egg
- Sea salt (to garnish)
- Dried rosemary (to garnish, optional)
Equipment Needed
- Mixing bowl
- New paintbrush
- Plastic wrap
- Large bowl
- Cooking spray
- Two baking sheets
- 3-quart pot
- Slotted spoon
- Sharp knife
- Wire rack
Instructions
-
First, create the “nails.” Place a small amount of red food coloring in a bowl. Using a new paintbrush, carefully “paint” the rounded side of each almond half. This creates a realistic and slightly gruesome nail effect. Set the painted almonds aside to dry completely.
-
In a mixing bowl, combine the warm water, sugar, and yeast. Let the mixture stand for about five minutes. This allows the yeast to activate and start working its magic, ensuring a light and airy final product. You should see the yeast start to foam.
-
Beat in 1 cup of flour until thoroughly combined. Then, add the salt and 3 1/2 cups of flour. Continue beating until the dough begins to pull away from the sides of the bowl. The dough will start to look shaggy.
-
Reduce the mixer speed and gradually add the remaining 1/2 cup of flour. If the dough remains sticky, add up to 1 additional cup of flour, a little at a time, until it forms a smooth, manageable ball. The amount of flour needed can vary depending on humidity and the type of flour used.
-
Turn the dough out onto a lightly floured surface and knead it for several minutes until it is smooth and elastic. This develops the gluten, giving the “fingers” their chewy texture.
-
Coat a large bowl with cooking spray. Place the dough in the bowl, turning to coat. Cover the bowl with plastic wrap and place it in a warm place to rise until it doubles in size, approximately one hour. This proofing step is crucial for the dough’s texture.
-
While the dough is rising, preheat your oven to 450°F (232°C). This high temperature helps the “fingers” brown quickly and achieve a crisp exterior.
-
Also, bring 3 quarts of water to a rolling boil in a large pot.
-
Once the water is boiling, carefully add the baking soda. Be prepared for the water to foam up – this is normal!
-
Lightly coat two baking sheets with pan spray to prevent the “fingers” from sticking.
-
Divide the dough into quarters. Work with one quarter at a time, keeping the remaining dough covered to prevent it from drying out.
-
Divide each quarter into 12 equal pieces.
-
On a lightly floured surface, roll each piece of dough back and forth with your hands to create a finger shape, approximately 3-4 inches long. Remember to create a slight lump to represent the knuckle.
-
As you form each “finger,” transfer it to the pot of boiling soda water.
-
Poach the “fingers” in the boiling water for one minute. Using a slotted spoon, carefully remove them from the water and place them onto the prepared baking sheets. The baking soda bath gives these “fingers” their characteristic chewy pretzel-like texture.
-
Repeat the poaching process until all of the dough pieces have been shaped and poached.
-
In a small bowl, beat the egg with 1 tablespoon of water to create an egg wash. Brush the egg wash evenly over the surface of each “finger.” This gives them a beautiful golden-brown sheen.
-
Using a sharp knife, score each “knuckle” about three times to create realistic creases.
-
Sprinkle the “fingers” with sea salt. If desired, you can also sprinkle them with dried rosemary for a slightly earthy and creepy touch.
-
Position the painted almond “nails” into place at the end of each “finger,” pressing down gently to secure them.
-
Bake in the preheated oven for 12-15 minutes, or until the “fingers” are golden brown. Keep a close eye on them, as baking times can vary depending on your oven.
-
Let the “Freaky Ladies’ Fingers” cool completely on a wire rack before serving.
Expert Tips & Tricks
- For a truly gruesome effect, use a small amount of raspberry jam or strawberry preserves near the base of the almond “nail” to simulate blood.
- If you want to make these ahead of time, you can prepare the dough and store it in the refrigerator for up to 24 hours. Let it come to room temperature before shaping and baking.
- If your almond halves aren’t staying in place, try dabbing a tiny bit of egg wash underneath each one before pressing it into the dough.
- For a vegan version, substitute the egg wash with a mixture of maple syrup and plant-based milk.
Serving & Storage Suggestions
Serve these “Freaky Ladies’ Fingers” on a platter alongside other Halloween treats, or as a spooky surprise on a dessert table. They are best enjoyed fresh on the first day, when they are at their chewiest. However, they can be stored in an airtight container at room temperature for up to two days. Reheating is not recommended, as they can become tough.
Nutritional Information
| Nutrient | Amount per Serving | % Daily Value |
|---|---|---|
| Calories | 54.2 kcal | N/A |
| Calories from Fat | 5 g | 9% |
| Total Fat | 0.6 g | 0% |
| Saturated Fat | 0.1 g | 0% |
| Cholesterol | 3.9 mg | 1% |
| Sodium | 304.2 mg | 12% |
| Total Carbohydrate | 10.4 g | 3% |
| Dietary Fiber | 0.5 g | 1% |
| Sugars | 0.3 g | 1% |
| Protein | 1.7 g | 3% |
Variations & Substitutions
- Goblin Toes: Make shorter versions (2-3 inches long) and use plain, unpainted almond halves for the toenails. Sprinkle with dried rosemary “toe hair” for a fun twist.
- Gluten-Free Fingers: Substitute the all-purpose flour with a gluten-free blend, but be aware that the texture may be slightly different. You may need to adjust the amount of flour to achieve the right consistency.
- Spiced Fingers: Add a pinch of ground cinnamon, nutmeg, or ginger to the dough for a warm, autumnal flavor.
FAQs (Frequently Asked Questions)
Q: Can I use active dry yeast instead of instant yeast?
A: Yes, but you’ll need to proof the active dry yeast in warm water for a longer period, about 10-15 minutes, before adding it to the other ingredients.
Q: Why do I need to boil the dough in baking soda water?
A: The baking soda water gives the “fingers” their characteristic chewy texture and slightly alkaline flavor, similar to pretzels.
Q: Can I freeze the dough for later use?
A: Yes, you can freeze the dough after it has risen. Thaw it in the refrigerator overnight before shaping and baking.
Q: My almonds keep falling off during baking. What can I do?
A: Make sure the almond halves are dry and secure them firmly into the dough before baking. You can also try dabbing a tiny bit of egg wash under each one.
Q: Can I use a different type of nut for the nails?
A: Yes, you can experiment with other nuts like slivered almonds, pumpkin seeds, or even sunflower seeds for a nut-free option.
Final Thoughts
So, there you have it! “Freaky Ladies’ Fingers” are a fun, spooky, and surprisingly delicious treat that’s sure to be a hit at any Halloween gathering. Don’t be afraid to get creative with your decorations and add your own personal touch. I encourage you to give this recipe a try and share your creepy creations with friends and family. Happy haunting and happy baking!