
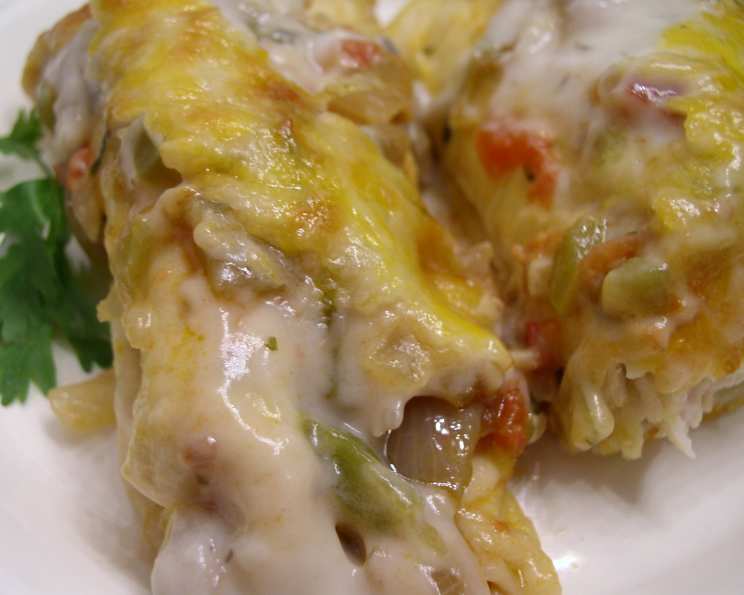
Fred’s Green Chile & Chicken Enchiladas
The memory still makes me laugh. It was a chaotic Sunday brunch service, the kind where tickets fly and the kitchen feels like a pressure cooker about to explode. Chef Fred, normally a picture of culinary zen, was wrestling with a rogue stack of tortillas. He looked up, flour dusting his eyebrows, and yelled, “Enchiladas! I need enchiladas! Stat!” Even in the heat of the moment, the comforting aroma of green chiles and melting cheese cut through the stress, a promise of satisfying deliciousness amidst the mayhem. These enchiladas, born from a necessity, are a true testament to his culinary spirit.
Recipe Overview
- Prep Time: 30 minutes
- Cook Time: 30 minutes
- Total Time: 1 hour
- Servings: 12
- Yield: 1 large baking dish
- Dietary Type: Not specified
Ingredients
- 3-4 cups shredded cooked chicken
- 2 tablespoons butter or 2 tablespoons margarine
- 1 medium white onion, chopped
- 1-2 garlic cloves, pressed
- 1 (8 ounce) can chopped green chilies
- 1 (8 ounce) can whole green chilies, sliced in thin strips
- 1 green bell pepper, finely chopped
- 5 tomatoes, skinned and chopped (skin removal optional)
- 2 tablespoons fresh cilantro
- 1 cup chicken broth
- 1/8 teaspoon cumin
- 12 large flour tortillas
- 3/4 lb Monterey Jack cheese, cut into 1/4 inch strips lengthwise
- 2 (10 3/4 ounce) cans cream of mushroom soup (can use lower fat version)
- 1/2 cup heavy cream or 1/2 cup half-and-half cream
- 1-2 cups Longhorn cheese or Cheddar cheese, shredded
Equipment Needed
- Large heavy fry pan or skillet
- Large baking dish or pan
- Cheese grater (if using block cheese)
Instructions
-
Begin by preparing the base sauce. In a large heavy fry pan or skillet, melt the butter (or margarine) over medium heat.
-
Add the chopped onion and pressed garlic to the melted butter. Sauté for about 4 minutes, or until the onion is softened and translucent, being careful not to brown the garlic.
-
Introduce the flavor boosters. Add the can of chopped green chilies, the can of sliced whole green chilies, finely chopped green bell pepper, skinned and chopped tomatoes, fresh cilantro, chicken broth, and cumin to the skillet.
-
Simmer this vibrant mixture over medium-low heat for about an hour, stirring occasionally. Leave the pan uncovered to allow the sauce to thicken slightly. If the mixture becomes too thick and dry during simmering, add more chicken broth as needed to maintain a saucy consistency.
-
While the sauce simmers, prepare the fillings. Ensure your chicken is shredded and the Monterey Jack cheese is cut into strips. If using block cheese for the topping, shred it at this time.
-
Once the sauce has simmered, remove it from the heat. This is when you’ll assemble the enchiladas.
-
One at a time, dip each tortilla in the warm sauce to soften it. This step is crucial for pliable enchiladas. Lay the softened tortilla flat on a clean surface.
-
Place strips of shredded chicken, 1-2 pieces of Monterey Jack cheese, and 1-2 strips of whole green chilies at one end of the dipped tortilla.
-
Carefully roll the filled tortilla tightly and place it in a lightly greased large baking dish or pan, seam-side down. This prevents the enchiladas from unraveling during baking.
-
Repeat steps 7-9 until all the tortillas are filled and rolled, packing them snugly in the baking dish.
-
In a separate bowl, combine the two cans of cream of mushroom soup with the heavy cream (or half-and-half cream). Mix until well combined.
-
Pour the soup and cream mixture evenly over all the rolled enchiladas in the baking dish, ensuring they are well coated.
-
Sprinkle the shredded Longhorn cheese or Cheddar cheese generously over the entire surface of the enchiladas.
-
Bake in a preheated 350°F (175°C) oven for 30 minutes, or until the cheese is melted, bubbly, and lightly golden brown. The enchiladas should be heated through and the sauce should be bubbling around the edges.
Expert Tips & Tricks
- Tortilla Softening is Key: Don’t skip dipping the tortillas in the sauce. This prevents them from cracking during rolling and baking. If your tortillas are particularly dry, you can also lightly steam them before dipping.
- Don’t Overfill: Resist the urge to overfill the tortillas, or they’ll be difficult to roll and may burst during baking. A moderate amount of filling ensures neat and tidy enchiladas.
- Sauce Consistency: If the sauce becomes too thick during simmering, add a bit more chicken broth to achieve the desired consistency. It should be thick enough to coat the tortillas but not so thick that it becomes paste-like.
- Cheese Placement: For extra gooey enchiladas, sprinkle a little of the shredded cheese inside the enchiladas along with the chicken and Monterey Jack before rolling.
- Browning Boost: For a deeper golden-brown cheese topping, broil the enchiladas for the last 1-2 minutes of baking, keeping a close eye to prevent burning.
Serving & Storage Suggestions
These enchiladas are best served hot, straight from the oven, with a side of sour cream or Mexican crema, guacamole, and a sprinkle of fresh cilantro for garnish. For a complete meal, serve with a side of Mexican rice and refried beans.
Leftover enchiladas can be stored in an airtight container in the refrigerator for up to 3-4 days. To reheat, bake in a preheated 350°F (175°C) oven until heated through, or microwave individual portions. They can also be frozen for up to 2-3 months. Thaw completely in the refrigerator before reheating.
Nutritional Information
| Nutrient | Amount per Serving | % Daily Value |
|---|---|---|
| Calories | 433 kcal | 22% |
| Total Fat | 24 g | 37% |
| Saturated Fat | 12 g | 60% |
| Cholesterol | 68 mg | 23% |
| Sodium | 707 mg | 29% |
| Total Carbohydrate | 34 g | 11% |
| Dietary Fiber | 2 g | 8% |
| Sugars | 3 g | – |
| Protein | 23 g | 46% |
Note: Nutritional information is an estimate and may vary based on specific ingredients and portion sizes.
Variations & Substitutions
- Spicier Kick: Add a pinch of cayenne pepper or a finely chopped jalapeño to the sauce for a spicier kick.
- Vegetarian Option: Substitute the chicken with black beans, pinto beans, or a mixture of vegetables such as corn, zucchini, and bell peppers for a vegetarian version.
- Gluten-Free: Use corn tortillas instead of flour tortillas for a gluten-free option. Be sure to warm the corn tortillas slightly before dipping to prevent them from cracking.
- Creamy Sauce Variation: Replace the cream of mushroom soup with cream of chicken or cream of celery soup for a different flavor profile. You could also use a homemade white sauce (béchamel) as a base.
- Cheese Alternatives: Experiment with different types of cheese. Pepper Jack cheese adds a spicy flavor, while Oaxaca cheese provides a mild and stringy texture.
FAQs (Frequently Asked Questions)
Q: Can I make these enchiladas ahead of time?
A: Yes, you can assemble the enchiladas ahead of time, cover them tightly with plastic wrap, and refrigerate for up to 24 hours before baking. Add the cheese topping just before baking for the best results.
Q: Can I use rotisserie chicken for this recipe?
A: Absolutely! Rotisserie chicken is a convenient and flavorful option. Just shred the chicken and use it as directed in the recipe.
Q: What can I do if my tortillas are tearing when I roll them?
A: This usually means the tortillas are too dry. Make sure to dip them thoroughly in the warm sauce to soften them before rolling. You can also lightly steam them before dipping.
Q: Can I freeze these enchiladas?
A: Yes, you can freeze them after baking. Let them cool completely, then wrap them tightly in plastic wrap and foil before freezing. Thaw completely in the refrigerator before reheating.
Q: What is the best way to prevent the cheese from burning?
A: If the cheese starts to brown too quickly, cover the baking dish loosely with foil for the remaining baking time.
Final Thoughts
These Green Chile & Chicken Enchiladas are more than just a meal; they’re a warm hug on a plate. The rich, savory sauce, tender chicken, and melty cheese create a symphony of flavors that’s simply irresistible. So gather your ingredients, put on some music, and get ready to create a dish that will bring joy to your table. Don’t be afraid to experiment with variations to make it your own. And most importantly, enjoy the process of cooking and sharing this delicious meal with the people you love. I’d love to hear your feedback and what variations you have tried! Pair with a crisp Mexican lager or a refreshing margarita for the ultimate dining experience.