
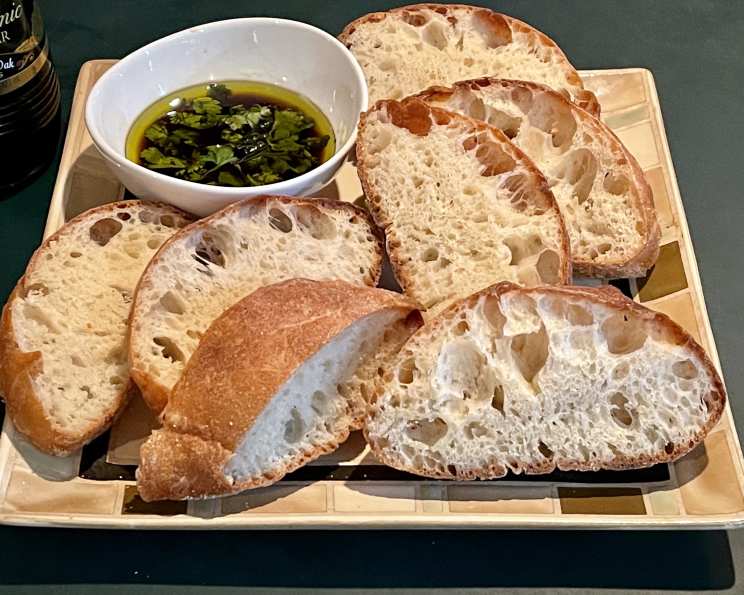
The Soul of Simplicity: Baking French Hearth Bread
I remember the first time I tasted true French pain de campagne. It wasn’t in Paris, but in a tiny, family-run bakery nestled in the hills of Provence. The air was thick with the scent of warm flour and yeast, and the baker, a woman with flour dusting her apron and a twinkle in her eye, handed me a still-warm loaf. The crust crackled as I tore into it, releasing an aroma that transported me to sun-drenched fields of wheat. The taste? A symphony of simple flavors, a testament to the magic that happens when you combine a few humble ingredients with time and care. I’ve been chasing that flavor ever since, and this French Hearth Bread recipe comes incredibly close to capturing that rustic essence.
Recipe Overview
- Prep Time: 30 minutes (plus starter fermentation time)
- Cook Time: 30-40 minutes
- Total Time: 5 hours 30 minutes (including fermentation)
- Servings: 6
- Yield: 1 loaf
- Dietary Type: Vegetarian
Ingredients
Dough Starter (Sponge)
- 1 cup bread flour
- 1/4 cup wheat flour
- 1/2 teaspoon instant yeast
- 1 1/4 teaspoons honey
- 1 1/3 cups water, room temperature (70-90 degrees)
Flour Mixture
- 1 3/4 cups bread flour
- 1 teaspoon instant yeast
- 1 1/2 teaspoons salt
Equipment Needed
- Mixer bowl
- Whisk
- Plastic wrap
- Dough hook attachment (for stand mixer)
- Oiled bowl for rising
- 8 x 4 inch greased bread pan (optional) or cookie sheet
- Cookie sheet or baking stone
- Sharp knife or razor blade
- Instant read thermometer
Instructions
-
Prepare the Dough Starter (Sponge): In a mixer bowl, combine the 1 cup bread flour, 1/4 cup wheat flour, 1/2 tsp yeast, honey, and water.
-
Whisk: Whisk the ingredients until smooth, about 2 minutes. Ensure there are no lumps and the mixture is well combined.
-
Ferment the Starter: Scrape down the sides of the bowl. Cover the bowl tightly with plastic wrap. Let the starter ferment at room temperature for 1 hour up to 4 hours. The starter is ready when it has bubbled up and risen noticeably in the bowl. The longer fermentation time (up to 4 hours) will result in a more complex flavor.
-
Combine Flour Mixture: In a separate bowl, combine the 1 3/4 cups bread flour and the 1 teaspoon instant yeast.
-
Mix the Dough: Add the flour mixture to the risen sponge in the mixing bowl. Do not add the salt at this time.
-
Initial Mix: With the dough hook installed on your stand mixer, mix on low speed (setting #2 on a Kitchenaid) for about one minute until you have a rough dough.
-
Rest: Cover the bowl with plastic wrap and let the dough rest for 20 minutes. This process, called autolyse, allows the flour to fully hydrate and develops gluten, resulting in a better texture.
-
Add Salt and Knead: Sprinkle the salt onto the dough. Knead with the dough hook on medium speed (setting #4 on a Kitchenaid) for about 7 minutes. The friction from kneading will warm the dough. An instant-read thermometer plunged into the center of the dough should read 78 to 80 degrees Fahrenheit.
-
Check Dough Consistency: The dough should be very elastic, smooth, and slightly sticky. If the dough is too sticky and unmanageable, add a little flour, up to 1/4 cup, a tablespoon at a time. You can knead in any extra flour by hand after you remove the dough from the bowl.
-
First Rise: Let the dough rise in an oiled, covered bowl at room temperature until it has doubled in size. This typically takes 1.5 to 2 hours, depending on the ambient temperature.
-
Second Rise: Gently press the dough down to release the air. Fold it over onto itself and let it rise again for another hour. This second rise further develops the flavor and texture.
-
Shape the Dough: Turn the dough out onto a lightly floured surface. At this stage, you have options:
- Ball: Form the dough into a round ball.
- Loaf Pan: Place the dough in an 8 x 4 inch greased bread pan.
- Oblong Loaf: Roll the dough out to an oblong shape.
-
Prepare for Baking: If making a freeform loaf (ball or oblong), place it on a cookie sheet that has been sprinkled generously with flour or cornmeal to prevent sticking.
-
Final Proof: Cover the shaped dough and allow it to double in size. The freeform oblong loaf should be about 8 inches long and 3 inches high. In the loaf pan, the center of the dough should be about 1 inch higher than the sides of the pan.
-
Preheat Oven: Preheat the oven to 475 degrees Fahrenheit one hour before baking. Adjust the oven shelf to the lowest level and place a baking stone or baking sheet on it before preheating the oven. This helps to create a hot surface for the bread, resulting in a crispier crust.
-
Optional Toppings: At this stage, you can mist the loaf with water and roll it in sesame seeds, poppy seeds, or other whole grains for added flavor and visual appeal.
-
Score the Bread: Slash freeform bread diagonally with a sharp knife or razor blade, making 1/2-inch deep slices. This allows the bread to expand properly in the oven and creates an attractive crust. If using a loaf pan, make one slash down the center or leave it unslashed.
-
Bake: Bake for 10 minutes at 475 degrees Fahrenheit. Then, turn the oven temperature down to 425 degrees Fahrenheit and continue to bake for 20 to 30 minutes more, or until an instant-read thermometer inserted into the center of the bread reads about 200 degrees Fahrenheit.
-
Check for Doneness: If the loaf becomes too brown during baking, cover it loosely with aluminum foil halfway through.
-
Cool: Let the bread cool thoroughly on a wire rack before slicing. This is crucial for allowing the internal structure to set and preventing a gummy texture.
Expert Tips & Tricks
- Starter Consistency: The dough starter should be bubbly and slightly tangy smelling. If it smells overly sour or vinegary, it may be over-fermented.
- Humidity: If your kitchen is very humid, you may need to add a bit more flour to the dough. Start with a tablespoon at a time.
- Oven Spring: The initial burst of heat in the oven is crucial for creating oven spring (the rapid rise of the bread). Make sure your oven is fully preheated.
- Steam: For an even crispier crust, create steam in the oven during the first 10 minutes of baking. You can do this by placing a pan of hot water on the bottom rack of the oven. Be careful when opening the oven door to avoid burns.
- Overnight Proof: For a deeper flavor, you can let the shaped dough proof in the refrigerator overnight. This will slow down the fermentation process and develop more complex flavors. Bring the dough back to room temperature for about an hour before baking.
Serving & Storage Suggestions
This French Hearth Bread is perfect served warm with butter, olive oil, or your favorite jam. It also makes excellent toast, sandwiches, or croutons.
- Room Temperature: Store the bread at room temperature in a breadbox or tightly wrapped in plastic wrap for up to 3 days.
- Refrigerator: For longer storage, store the bread in the refrigerator for up to a week. However, refrigeration can dry out the bread, so it’s best to wrap it tightly.
- Freezer: For the longest storage, freeze the bread for up to 2 months. Wrap it tightly in plastic wrap and then in aluminum foil. Thaw at room temperature before serving.
- Reheating: To reheat, wrap the bread in foil and bake in a preheated oven at 350 degrees Fahrenheit for about 10-15 minutes, or until warmed through.
Nutritional Information
Please note that these values are estimates and may vary based on specific ingredients and portion sizes.
| Nutrient | Amount per Serving | % Daily Value |
|---|---|---|
| Calories | 250 kcal | 13% |
| Total Fat | 1.5g | 2% |
| Saturated Fat | 0.3g | 1% |
| Cholesterol | 0mg | 0% |
| Sodium | 600mg | 26% |
| Total Carbohydrate | 50g | 18% |
| Dietary Fiber | 3g | 11% |
| Sugars | 2g | 4% |
| Protein | 8g | 16% |
Variations & Substitutions
- Whole Wheat: Substitute up to half of the bread flour with whole wheat flour for a nuttier flavor.
- Rye Flour: Add a couple of tablespoons of rye flour to the flour mixture for a more complex flavor profile.
- Herbs: Incorporate dried herbs like rosemary, thyme, or oregano into the dough for a savory twist.
- Cheese: Add grated cheese like Gruyere or Parmesan to the dough for a cheesy bread.
- Seeds: Mix in sunflower seeds, pumpkin seeds, or flax seeds for added texture and nutrition.
- Gluten-Free: This recipe contains gluten and it is not advised to attempt substitutions without appropriate gluten-free bread-making expertise.
FAQs (Frequently Asked Questions)
Q: Why is the starter important for this recipe?
A: The starter provides flavor and leavening to the bread. The long fermentation time develops complex flavors that are characteristic of French Hearth Bread.
Q: Can I use active dry yeast instead of instant yeast?
A: Yes, but you will need to proof the active dry yeast in warm water before adding it to the dough. Use about 1/2 cup of the water called for in the recipe to proof the yeast, then add the yeast mixture and the remaining water to the other ingredients.
Q: My dough is too sticky. What should I do?
A: Add flour one tablespoon at a time until the dough becomes manageable. Be careful not to add too much flour, as this can result in a dry bread.
Q: Why do I need to slash the bread before baking?
A: Slashing the bread allows it to expand properly in the oven and prevents it from cracking unevenly. It also creates an attractive crust.
Q: How can I tell if the bread is done baking?
A: The bread is done when an instant-read thermometer inserted into the center reads about 200 degrees Fahrenheit. The crust should also be golden brown and sound hollow when tapped.
Final Thoughts
Baking bread is an act of love, a way to connect with tradition and nourish those around you. This French Hearth Bread, with its simple ingredients and rustic charm, is a perfect way to experience the magic of baking. Don’t be intimidated by the multiple steps – each one is a small contribution to the final masterpiece. I encourage you to try this recipe, experiment with variations, and share your creations with friends and family. Pair it with a hearty soup, a simple cheese plate, or a glass of red wine for a truly memorable meal. Bon appétit!