
French Onion Bread: A Flavorful Twist on a Classic
The aroma of baking bread has always transported me back to my grandmother’s kitchen. I can almost feel the warmth of the oven on my face as she’d pull out a golden-brown loaf. While her repertoire was mostly traditional, I often wonder what she would have thought of this French Onion Bread. The savory aroma of onion soup mingled with the comforting scent of baking bread creates a truly irresistible experience, a delightful departure from the ordinary that I know she would have eventually embraced with open arms and a generous pat of butter.
Recipe Overview
- Prep Time: 20 minutes
- Rise Time: 2 hours 15 minutes
- Cook Time: 30 minutes
- Total Time: 3 hours 5 minutes
- Yields: 1 loaf
- Dietary Type: Vegetarian
Ingredients
- 3 1/2 cups whole wheat flour
- 2 cups warm water
- 1 (1/4 ounce) packet dry active yeast
- 1 tablespoon sugar
- 2 tablespoons olive oil
- 1 (1 1/4 ounce) package French onion soup mix
- 1 teaspoon salt
Egg Wash:
- 1 egg
- 1 tablespoon water
Equipment Needed
- Large mixing bowl
- Measuring cups and spoons
- Floured surface
- Baking sheet
- Parchment paper
- Wire cooling rack
Instructions
-
Begin by activating the yeast. In a measuring cup, add the sugar and dry active yeast to one cup of the warm water. Stir gently to combine, and then set aside for five minutes. The mixture should become foamy and bubbly, indicating the yeast is active. If it doesn’t foam, your yeast might be old, and you’ll need to start with a fresh packet.
-
In a large mixing bowl, whisk together the whole wheat flour, French onion soup mix, and salt. Ensure these dry ingredients are evenly distributed; this will help to incorporate the onion flavor throughout the bread.
-
Create a well in the center of the dry ingredients. Pour in the yeast mixture, the remaining one cup of warm water, and the olive oil.
-
Using your hands or a wooden spoon, begin to bring the ingredients together. Mix until a dough starts to form. Don’t be afraid to get your hands dirty! The dough will initially be shaggy, but it will come together as you knead it.
-
Turn the dough out onto a lightly floured surface. Knead for 10 minutes. Kneading develops the gluten in the flour, which gives the bread its structure. The dough should become smooth and elastic. If the dough is too sticky, add a little more flour, one tablespoon at a time.
-
Place the kneaded dough in a lightly oiled bowl, turning to coat. Cover the bowl with plastic wrap or a clean kitchen towel. Set aside in a warm place to rise for an hour and a half, or until the dough has doubled in size. Patience is key here; allowing the dough to fully rise will result in a lighter, more flavorful bread.
-
Once the dough has rested and doubled, preheat your oven to 400 degrees Fahrenheit (200 degrees Celsius). Line a baking sheet with parchment paper. This will prevent the bread from sticking and make cleanup easier.
-
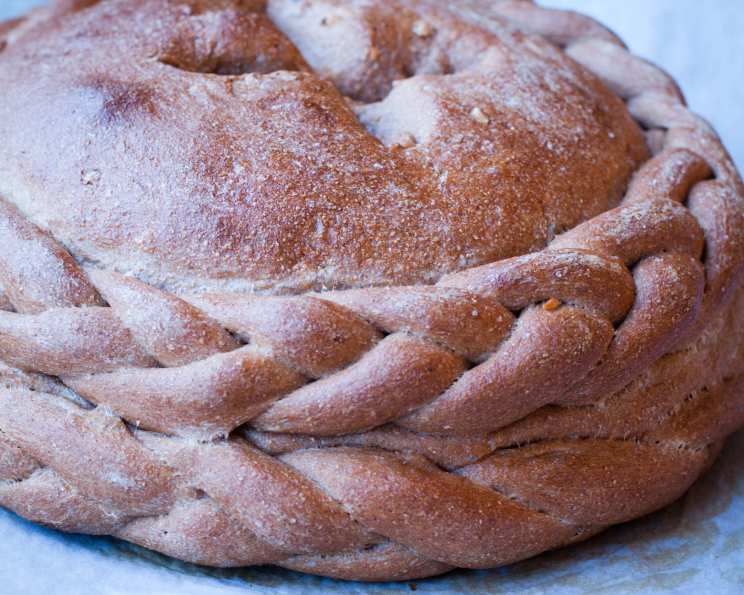
Remove the dough from the bowl and gently deflate it. Now comes the fun part – shaping the dough! You can shape it into a round boule, a classic loaf, or get creative with braids or other designs. For the loaf pictured, you could divide the dough into two pieces, using one to form a ball and the other to create braided ropes around the base. Place the shaped dough on the prepared baking sheet.
-
Cover the shaped dough with a clean kitchen towel and let it rest for another 45 minutes to an hour. This second rise allows the dough to relax and further develop its flavor.
-
Uncover the dough and prepare the egg wash. In a small bowl, whisk together the egg and water. Brush the top of the loaf evenly with the egg wash. The egg wash will give the bread a beautiful golden-brown color and a slight sheen. At this stage, you can also score the top of the bread with a sharp knife or lame.
-
Place the baking sheet in the preheated oven. Let the loaf bake at 400 degrees Fahrenheit (200 degrees Celsius) for the first 15 minutes. This initial high heat helps to create a good crust.
-
After 15 minutes, reduce the oven temperature to 350 degrees Fahrenheit (175 degrees Celsius) and continue baking for another 15 minutes. The lower temperature will allow the bread to cook through without burning the crust.
-
Remove the bread from the oven and let it cool on a wire rack before slicing and serving. This is important because slicing the bread while it’s still hot can result in a gummy texture. The cooling rack allows air to circulate, preventing the bottom crust from becoming soggy.
Expert Tips & Tricks
- For a deeper onion flavor, consider adding a tablespoon of onion powder to the dry ingredients.
- If you don’t have whole wheat flour, you can use all-purpose flour instead. The texture will be slightly different, but the flavor will still be delicious.
- To check for doneness, insert a toothpick into the center of the bread. If it comes out clean, the bread is done. You can also check the internal temperature with a thermometer; it should be around 200-210°F (93-99°C).
- If the crust is browning too quickly, tent the bread with aluminum foil during the last 10 minutes of baking.
- If you’re short on time, you can use rapid-rise yeast instead of active dry yeast. Follow the instructions on the yeast package.
- For a crispier crust, place a pan of hot water on the bottom rack of the oven during the first 15 minutes of baking. The steam will create a more humid environment, resulting in a crispier crust.
Serving & Storage Suggestions
This French Onion Bread is delicious served warm with butter or olive oil. It’s also a wonderful accompaniment to soups, stews, and salads. Try it with a creamy tomato soup or a hearty beef stew. It also pairs well with cheeses and charcuterie.
To store leftover bread, wrap it tightly in plastic wrap or place it in an airtight container. It will keep at room temperature for 2-3 days. For longer storage, you can freeze the bread. Slice it before freezing for easier thawing. To reheat, wrap the bread in aluminum foil and bake at 350 degrees Fahrenheit (175 degrees Celsius) for 10-15 minutes.
Nutritional Information
| Nutrient | Amount per Serving | % Daily Value |
|---|---|---|
| Calories | 238 kcal | 12% |
| Total Fat | 4.8g | 7% |
| Saturated Fat | 0.8g | 4% |
| Cholesterol | 0mg | 0% |
| Sodium | 2006mg | 83% |
| Total Carbohydrate | 49.4g | 16% |
| Dietary Fiber | 6.6g | 26% |
| Sugars | 2.6g | 10% |
| Protein | 8.8g | 18% |
Note: Nutritional information is an estimate and may vary based on specific ingredients and portion sizes.
Variations & Substitutions
- Vegan: Replace the egg wash with a mixture of maple syrup and plant-based milk for a similar sheen.
- Garlic Lover’s Bread: Add 2-3 cloves of minced garlic to the dough for a garlicky kick.
- Cheesy Onion Bread: Sprinkle shredded Parmesan or Gruyere cheese on top of the bread before baking.
- Seeded Bread: Sprinkle sesame seeds, poppy seeds, or everything bagel seasoning on top of the bread before baking for added texture and flavor.
FAQs (Frequently Asked Questions)
Q: Can I use bread flour instead of whole wheat flour?
A: Yes, you can substitute bread flour for whole wheat flour. The texture will be slightly different, resulting in a lighter, less dense loaf.
Q: Can I make this bread in a bread machine?
A: Yes, you can adapt this recipe for a bread machine. Follow your bread machine’s instructions for adding ingredients and selecting the appropriate settings.
Q: Why is my bread so dense?
A: This could be due to several factors, including using old yeast, not kneading the dough enough, or not allowing it to rise sufficiently. Make sure your yeast is fresh, knead the dough for the full 10 minutes, and allow it to rise in a warm place until doubled in size.
Q: Can I freeze this bread?
A: Yes, this bread freezes well. Wrap it tightly in plastic wrap or place it in an airtight container before freezing. For best results, slice the bread before freezing so you can easily thaw only what you need.
Q: What can I serve with this bread?
A: This bread is delicious on its own or served with soups, stews, salads, cheeses, and charcuterie. It’s also great for making sandwiches or toast.
Final Thoughts
This French Onion Bread is more than just a loaf; it’s an experience. The delightful combination of savory onion flavor and comforting bread texture will elevate any meal. Don’t be afraid to experiment with variations and make it your own. Share your creations and feedback, and perhaps pair it with a glass of robust red wine for the ultimate culinary indulgence. Happy baking!