
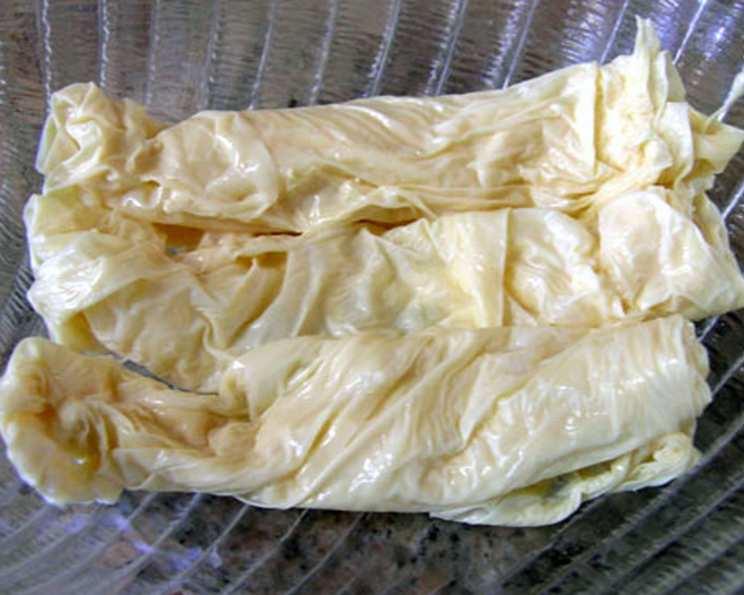
Fresh Homemade Yuba (Tofu Skin): A Culinary Adventure
I remember the first time I tasted truly fresh yuba. It was a tiny, unassuming restaurant tucked away in a Kyoto alley. The chef, a wizened woman with decades of experience, presented a single, glistening sheet draped over a bed of freshly grated wasabi. The delicate, subtly sweet flavor, the almost ethereal texture – it was a revelation. That experience ignited a passion in me to recreate that magic in my own kitchen, and I’m excited to share the secrets with you.
Recipe Overview
- Prep Time: 8 hours (soaking) + 30 minutes (preparation)
- Cook Time: 45 minutes
- Total Time: 9 hours 15 minutes
- Servings: 8 (approximate, varies depending on use)
- Yield: Variable, depending on batch size
- Dietary Type: Vegan, Gluten-Free, Dairy-Free
Ingredients
- 1 1⁄2 cups whole dried soybeans
- 7 1⁄2 cups water
- 2 cups hot water
- 2 cups hot water
Equipment Needed
- Large non-stick pot
- Blender
- Colander
- Cheesecloth or cotton straining bag (preferably cotton)
- Large bowl (or two)
- Canning jar (optional, for pressing)
- Small knife
- Long chopstick
- Spatula
Instructions
-
Begin by thoroughly washing the soybeans. Place them in a large bowl and cover with plenty of water. Soak the soybeans for at least 8 hours, or preferably overnight. This crucial step allows the beans to fully hydrate, resulting in a smoother and more flavorful soy milk.
-
In a large, non-stick pot, bring 7 1/2 cups of water to a boil. Once boiling, reduce the heat to a gentle simmer. Using a non-stick pot is essential to prevent the soy milk from scorching and sticking, which can ruin the delicate flavor of the yuba.
-
Drain the soaked soybeans well. Divide the drained beans into two equal portions.
-
Working in batches, use a blender to create a smooth puree. Combine one portion of beans with 2 cups of hot water in the blender. Blend until the mixture is very smooth and creamy. Pour the blended mixture into the non-stick pot containing the simmering water. Repeat this process with the remaining beans and the other 2 cups of hot water.
-
Prepare to strain the mixture. Place a colander over a large bowl (it’s a good idea to have a second bowl ready in case the first one becomes too full). Line the colander with several layers of cheesecloth (double-lined if the cheesecloth is thin) or, preferably, a cotton straining bag. The cotton bag is more durable and provides a finer filtration, resulting in a smoother soy milk.
-
Carefully ladle the hot soybean mixture into the cheesecloth-lined colander. This step requires caution as the mixture is very hot. Wearing rubber gloves is highly recommended to protect your hands.
-
Once all the mixture has been ladled into the cheesecloth, gather the edges and twist the cheesecloth closed, forming a pouch. Use a canning jar or your hands to gently press down on the cheesecloth, extracting the soy milk. Ensure the cheesecloth remains tightly closed to prevent any bits of grated soybeans, also known as okara, from falling into the soy milk.
-
Continue to knead and squeeze the twisted cheesecloth to extract as much milk as possible. You should now have soy milk in the bowl and okara remaining in the cheesecloth. Reserve the okara for other uses, such as adding it to baked goods or stir-fries. It’s a highly nutritious and versatile ingredient.
-
Pour the extracted soy milk into a wide, non-stick pot. Gently heat the soy milk to 175°F (79.5°C) slowly. Use a thermometer to ensure accurate temperature control. Heating the soy milk too quickly can cause it to scorch and affect the yuba’s texture.
-
Once the soy milk reaches the target temperature, maintain it and allow it to steam undisturbed for about 7 minutes. This is the crucial step where the yuba begins to form on the surface of the soy milk. Be patient and avoid rushing the process. The exact time may vary slightly depending on your stovetop and pot.
-
As the yuba forms, use a small knife to gently trim the edges of the film away from the sides of the pot. With your fingertips, carefully lift up one edge of the yuba. Insert a long chopstick underneath the lifted edge to gently lift the entire sheet of yuba.
-
Hold the yuba over the pot for a few seconds to allow excess soy milk to drain back into the pot. This helps to prevent the yuba from becoming too soggy.
-
Repeat the process of trimming, lifting, and draining until all the soy milk has been used up. What remains in the pot is a reddish film known as amayuba. Scrape this off with a spatula; it is also edible, but has a different texture and flavor.
-
Gently roll each sheet of yuba into rolls. These can then be used in various dishes.
-
Variation: For half-formed yuba, steam the soy milk for only 4 to 5 minutes, before the yuba has a chance to fully attach to the sides of the pot. Using your fingertips or chopstick, gently lift the delicate yuba and serve immediately. This variation offers a different texture and a more subtle flavor.
Expert Tips & Tricks
- Temperature is Key: Maintaining the correct temperature of 175°F (79.5°C) is crucial for successful yuba formation. Use a reliable thermometer.
- Non-Stick is Non-Negotiable: A high-quality non-stick pot is essential. Even slight sticking can ruin the delicate yuba.
- Patience is a Virtue: Don’t rush the process. Allow the yuba to form properly before attempting to lift it.
- Gentle Handling: Yuba is delicate. Handle it with care to avoid tearing.
- Experiment with Thickness: Vary the steaming time to create yuba sheets of different thicknesses.
Serving & Storage Suggestions
Fresh yuba is best enjoyed immediately. It can be served warm or cold. It’s delicious simply dipped in soy sauce and wasabi, or used in stir-fries, soups, and salads.
To store leftover yuba, gently wrap it in plastic wrap and refrigerate it. It will keep in the refrigerator for up to 3 days. You can also freeze yuba for longer storage. Thaw it in the refrigerator overnight before using. Reheat gently in a steamer or pan with a little water.
Nutritional Information
| Nutrient | Amount per Serving | % Daily Value |
|---|---|---|
| Calories | 56 kcal | 3% |
| Total Fat | 2.9 g | 4% |
| Saturated Fat | 0.4 g | 2% |
| Cholesterol | 0 mg | 0% |
| Sodium | 7.1 mg | 0% |
| Total Carbohydrate | 3.2 g | 1% |
| Dietary Fiber | 1.9 g | 7% |
| Sugars | 1 g | 3% |
| Protein | 5.4 g | 10% |
Variations & Substitutions
- Flavored Yuba: Infuse the soy milk with herbs, spices, or aromatics before heating to create flavored yuba. Consider adding ginger, garlic, or chili flakes.
- Smoked Yuba: Lightly smoke the yuba after it’s formed for a smoky flavor.
- Fried Yuba: Deep-fry the yuba for a crispy texture.
- Different Legumes: While traditionally made with soybeans, you could experiment with other legumes, though the results will vary.
FAQs (Frequently Asked Questions)
Q: Can I use store-bought soy milk instead of making my own?
A: Yes, you can use store-bought soy milk, but make sure it is unsweetened and unflavored. Homemade soy milk will generally produce a fresher and more flavorful yuba. Skip steps 1-4 in the directions if using store-bought soy milk.
Q: Why is my yuba not forming properly?
A: Ensure your soy milk is at the correct temperature (175°F or 79.5°C) and that you are using a non-stick pot. Also, be patient – it takes time for the yuba to form.
Q: What can I do with the leftover okara?
A: Okara is a highly versatile ingredient! You can add it to baked goods like muffins and breads, use it as a filling for dumplings, or incorporate it into stir-fries.
Q: How can I prevent the yuba from tearing when I lift it?
A: Handle the yuba very gently. Use a long chopstick to lift it carefully, supporting the entire sheet as you lift it from the pot.
Q: Can I freeze yuba?
A: Yes, you can freeze yuba. Wrap it tightly in plastic wrap and store it in the freezer for up to 2 months. Thaw it in the refrigerator overnight before using.
Final Thoughts
Making fresh yuba at home might seem a little intimidating at first, but with a little patience and practice, you’ll be rewarded with a truly exquisite and unique culinary experience. Don’t be afraid to experiment with different flavors and serving suggestions. The possibilities are endless! I encourage you to embark on this culinary adventure, and I’m eager to hear about your own yuba creations. Perhaps you’ll serve it alongside a delicate sake or incorporate it into a vibrant summer roll. Enjoy the journey!