
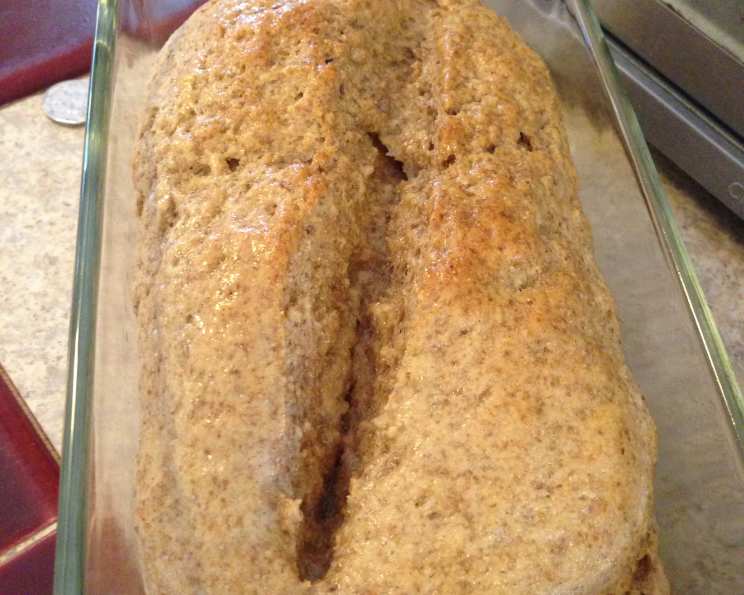
Fresh Milled Wheat and Rye Bread: A Rustic Delight
I remember the first time I truly appreciated the aroma of freshly baked bread. It was during a family trip to a small village in Germany. The local baker, a stout woman with flour dusting her apron, pulled a dark, crusty loaf from a wood-fired oven. The air filled with a scent so earthy and warm, it felt like a hug. The slightly sour, complex flavor of the rye lingered on my tongue, a reminder of simpler times and the magic of turning humble grains into something extraordinary. Ever since, I’ve been on a quest to recreate that experience in my own kitchen, and this recipe brings me remarkably close.
Recipe Overview
- Prep Time: 45 minutes (includes yeast activation and resting)
- Cook Time: 35-45 minutes
- Total Time: 3 hours 5 minutes (includes rising times)
- Yield: 3 loaves
- Servings: 40
- Dietary Type: Vegetarian
Ingredients
- 5 cups fresh milled hard winter white flour
- 2 cups fresh milled rye flour
- 1 tablespoon whole caraway seed (optional, see instructions)
- 3 tablespoons vital wheat gluten
- 1 tablespoon yeast
- 2 teaspoons salt
- 1 1/4 cups buttermilk, warmed to 110 degrees Fahrenheit
- 3 tablespoons raw honey
- 3 tablespoons olive oil
- 1 1/2 cups water, warmed to 110 degrees Fahrenheit
- Melted butter, for brushing (optional)
Equipment Needed
- Large mixing bowl
- Glass measuring cup
- KitchenAid mixer (optional, but recommended)
- Dough hook attachment (for KitchenAid)
- Large oiled bowl
- Clean kitchen towel
- Bread pans (optional, for loaf shape)
- Baking sheet
Instructions
-
In a large mixing bowl, mix together the fresh milled hard winter white flour, fresh milled rye flour, vital wheat gluten, and caraway seeds (if adding to the entire batch). The rye flour adds a wonderful depth of flavor, but requires a little help from the gluten to achieve a good rise.
-
In a glass measuring cup, combine the warmed buttermilk and raw honey. The warmth helps to activate the yeast, and the honey provides crucial food for it. Sprinkle the yeast on top of the buttermilk mixture and let it sit for about 15 minutes. You should see it become nice and bubbly and frothy, indicating that the yeast is active and ready to work its magic. This step is crucial for a good rise.
-
Pour the buttermilk and yeast mixture into the mixing bowl with the flour. With your mixer on low speed, slowly add the warmed water while mixing. Finally, add the olive oil and salt. The oil adds richness and helps to create a softer crumb, while the salt controls the yeast activity and enhances the flavor.
-
The dough should start to come together at this point. If the dough is too wet, add a little more flour, one tablespoon at a time. If it is too dry, add a little more water, one tablespoon at a time. Go slowly and test the consistency. This dough will be a little stickier than dough made with only wheat flour, so don’t be alarmed if it doesn’t form a perfectly smooth ball right away.
-
Cover the bowl with a clean kitchen towel and let the dough rest for 30 minutes. This resting period, called autolyse, allows the flour to fully hydrate, resulting in a more extensible dough and a better texture in the final bread.
-
If you are kneading by hand: Turn the dough out onto a lightly oiled surface. Knead for 8-10 minutes until it is nice and smooth. The dough should take on a sheen when it is properly kneaded. Remember that rye dough does not stretch as much as wheat-only dough, so don’t worry too much about achieving a super-elastic texture.
-
If you’re using a KitchenAid mixer: Attach the dough hook. Knead the dough on medium speed for 5 minutes, being sure to push the dough back down into the bowl as it tries to crawl out. When the dough is smooth and shiny, transfer it to a large oiled bowl.
-
Cover the bowl with a clean kitchen towel and let the dough rise in a warm place for 1 hour. The dough will rise significantly, so ensure your bowl is large enough to accommodate the increased volume.
-
After an hour, punch the dough down to release the air. This also helps to redistribute the yeast and gluten, promoting a more even texture. Divide the dough into two or three equal portions, depending on the size you want the loaves to be. Keep the portions you are not working with covered to prevent them from drying out.
-
Form each portion into a round or a loaf (if using a bread pan). If you wish to have some loaves without caraway seeds, this is the time to gently fold them into a portion of the dough. Shape the loaves gently but firmly, creating a smooth surface.
-
Cut a slash or two into the top of each loaf with a sharp knife or lame. This will allow the bread to expand properly during baking and prevent it from tearing unevenly.
-
Cover the shaped loaves with a clean kitchen towel and let them rise until doubled in size, about half an hour or so. A warm, draft-free environment will help the dough rise more quickly.
-
Preheat your oven to 350 degrees Fahrenheit (175 degrees Celsius).
-
Bake the loaves for 35-45 minutes, or until they are golden brown and sound hollow when tapped on the bottom. Keep in mind that rye bread does not brown as much as wheat bread, and it won’t have a significant oven spring. This is perfectly normal.
-
Remove the loaves from the oven and brush the tops with melted butter for a softer crust (optional).
-
Remove the bread from the bread pan (if used) after a few minutes to prevent the bottom from becoming soggy. Let the loaves cool completely on a clean towel before slicing and serving.
Expert Tips & Tricks
- Using a stand mixer is highly recommended for this recipe, as rye dough can be quite sticky and challenging to knead by hand. However, with some patience and a good technique, hand kneading is certainly achievable.
- For a deeper rye flavor, consider using a slightly higher percentage of rye flour. However, be mindful that too much rye flour can result in a dense, gummy bread.
- If you prefer a softer crust, bake the bread with a pan of water in the bottom of the oven. The steam will help to create a softer, more pliable crust.
- To test for doneness, insert a toothpick into the center of the loaf. If it comes out clean, the bread is done. You can also use an instant-read thermometer; the internal temperature should be around 200-210°F (93-99°C).
Serving & Storage Suggestions
This fresh milled wheat and rye bread is delicious served warm with butter, cheese, or a hearty stew. It’s also excellent for sandwiches or toast.
To store, wrap the cooled bread tightly in plastic wrap or place it in an airtight container. It will keep at room temperature for 2-3 days or in the refrigerator for up to a week. For longer storage, you can freeze the bread for up to 3 months. Thaw completely before serving. To refresh frozen bread, wrap it in foil and warm it in a 350°F (175°C) oven for 10-15 minutes.
Nutritional Information
(Estimated, per slice, based on 20 slices per recipe)
| Nutrient | Amount per Serving | % Daily Value |
|---|---|---|
| Calories | 120 kcal | 6% |
| Total Fat | 2.5g | 3% |
| Saturated Fat | 0.5g | 3% |
| Cholesterol | 0mg | 0% |
| Sodium | 150mg | 7% |
| Total Carbohydrate | 22g | 8% |
| Dietary Fiber | 2g | 7% |
| Sugars | 2g | 4% |
| Protein | 4g | 8% |
Variations & Substitutions
- Spelt Flour: Substitute some of the hard winter white flour with spelt flour for a slightly nutty flavor.
- Different Seeds: Experiment with other seeds, such as sunflower seeds, pumpkin seeds, or flax seeds, for added texture and flavor.
- Sweetener: Maple syrup can be used as a substitute for honey.
- Dairy-Free: Use a plant-based milk alternative, like almond or soy milk, in place of buttermilk. Add a tablespoon of lemon juice or apple cider vinegar to mimic the acidity of buttermilk.
FAQs (Frequently Asked Questions)
Q: Can I use pre-milled flour instead of fresh milled flour?
A: Yes, you can, but the flavor and texture will be slightly different. Fresh milled flour has a richer, more complex flavor and creates a more tender crumb.
Q: Why is vital wheat gluten necessary in this recipe?
A: Rye flour is low in gluten, so the vital wheat gluten helps to provide the necessary structure for the bread to rise properly.
Q: My dough is very sticky. Is that normal?
A: Yes, rye dough tends to be stickier than wheat dough. Just try to resist the urge to add too much flour, as that can make the bread dry and dense.
Q: Can I bake this bread in a Dutch oven?
A: Absolutely! Baking in a Dutch oven will create a crustier loaf with a more open crumb. Preheat the Dutch oven in the oven before placing the dough inside.
Q: How can I tell if my bread is done baking?
A: The best way to check for doneness is to insert a toothpick into the center of the loaf. If it comes out clean, the bread is done. You can also tap on the bottom of the loaf; it should sound hollow.
Final Thoughts
There’s nothing quite like the satisfaction of baking your own bread, especially when it’s made with fresh milled grains. The aroma that fills your kitchen, the taste of the slightly tangy rye, and the hearty texture of the crust—it’s a truly rewarding experience. So go ahead, dust off your grinder, embrace the rustic charm of this fresh milled wheat and rye bread, and savor the simple pleasures of homemade goodness. Don’t hesitate to experiment with different flours and seeds to create your own unique version. And please, share your baking adventures with friends and family – the warmth of freshly baked bread is always best when shared!