
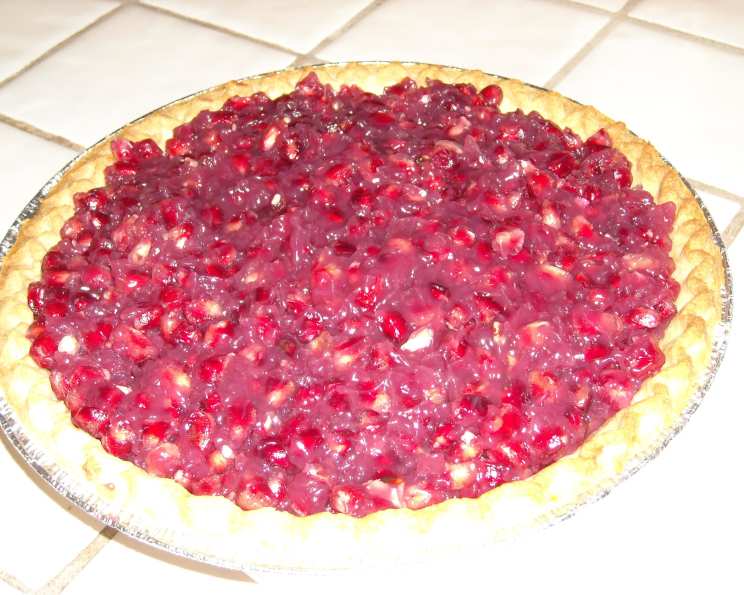
Jewel-Toned Delight: A Recipe for Fresh Pomegranate Pie
The first time I bit into a slice of pomegranate pie, I was transported back to my grandmother’s orchard. The sweet-tart burst of flavor, the delicate pop of each seed, it was like sunshine captured in a pastry shell. I remember the vibrant red stains on my fingers and the satisfied smiles around the table. This pie isn’t just a dessert; it’s a memory, a tradition, a taste of autumn’s bounty.
Recipe Overview
- Prep Time: 1 hour
- Cook Time: 0 minutes (excluding pre-baking crust)
- Total Time: 1 hour (plus chilling time)
- Servings: 8
- Yield: 1 pie
- Dietary Type: Vegetarian
Ingredients
- 4-5 cups yellow-skinned pomegranate seeds (from approximately 4-6 pomegranates)
- 2 cups pomegranate juice (from approximately 4-6 red pomegranates)
- 1/4 cup cornstarch (can use up to 1/3 cup if a thicker consistency is desired)
- 1 cup granulated sugar
- 1 pre-baked 9-inch pie shell (tart pastry recommended)
Equipment Needed
- Large bowl
- Citrus juicer
- Medium saucepan
- Whisk
- Measuring cups and spoons
- 9-inch pie dish (if not using the pre-baked shell)
Instructions
-
Prepare the Yellow Pomegranate Seeds: Carefully deseed the yellow-skinned pomegranates. This is perhaps the most time-consuming step, but the result is well worth the effort. Gently separate the seeds from the fruit’s membrane.
-
Remove the Membrane: Ensure that you remove all of the white membrane, as it is quite bitter and will negatively impact the pie’s flavor. Take your time and be meticulous during this step.
-
Juice the Red Pomegranates: Cut the red pomegranates in half. Using a citrus juicer, extract the juice. This can be a messy process, so it’s best to do it in a location that’s easy to clean. Wearing an apron or old clothes is also recommended.
-
Measure the Juice: Aim to end up with exactly 2 cups of fresh pomegranate juice. If you have slightly more or less, adjust the other ingredients accordingly.
-
Combine Dry Ingredients: In a medium saucepan, thoroughly mix the cornstarch and granulated sugar. This ensures the cornstarch is evenly distributed, preventing lumps in the glaze.
-
Create the Pomegranate Glaze: Add the pomegranate juice to the cornstarch-sugar mixture. Cook over medium heat, whisking constantly to prevent scorching.
-
Thicken the Glaze: Continue to cook and whisk the mixture until it thickens into a glaze, similar to the consistency used for strawberry or blueberry pie filling. This usually takes about 5-7 minutes. Remove from heat and allow to cool slightly.
-
Gently Fold in the Seeds: Once the glaze has cooled slightly (but is still pliable), gently fold it into the bowl of yellow pomegranate seeds. Be very careful not to break or bruise the seeds, as this will release excess juice and make the glaze runny. A light hand is key here!
-
Pour into the Pie Shell: Carefully pour the glazed pomegranate seed mixture into the pre-baked pie or tart shell. Ensure an even distribution of the filling for a beautiful presentation.
-
Chill (Optional): You can serve the pie immediately if you prefer, or refrigerate it for several hours to allow the filling to set further. Chilling enhances the flavors and makes for a cleaner slice.
-
Serve and Enjoy: Before serving, consider topping with freshly whipped cream or a dollop of vanilla ice cream. Enjoy the bright, refreshing taste of your homemade pomegranate pie!
Expert Tips & Tricks
- Seed Extraction Simplified: To make deseeding pomegranates easier, try this trick: score the pomegranate into quarters, then submerge it in a bowl of water. Gently separate the seeds underwater. The water prevents the juice from splattering and makes it easier to separate the seeds from the membrane.
- Adjusting Sweetness: Pomegranate sweetness can vary. Taste the juice before making the glaze. If it’s particularly tart, you may want to add an extra tablespoon or two of sugar.
- Glaze Consistency: If you prefer a thicker filling, use the full 1/3 cup of cornstarch. If you want a looser, more flowing filling, stick with the 1/4 cup.
- Preventing a Soggy Crust: To prevent a soggy crust, brush the pre-baked pie shell with a thin layer of melted chocolate or egg white before adding the filling. This creates a moisture barrier.
- Make-Ahead Magic: You can prepare the filling a day in advance and store it in the refrigerator. Wait to assemble the pie until just before serving to prevent the crust from becoming soggy.
Serving & Storage Suggestions
Serve the pomegranate pie chilled or at room temperature. A dollop of freshly whipped cream or a scoop of vanilla ice cream complements the tartness of the pomegranate beautifully. Garnish with a few extra pomegranate seeds for a visually appealing presentation.
Store leftover pie in the refrigerator, covered, for up to 3 days. The crust may soften slightly over time. Pomegranate pie is best enjoyed fresh. Freezing is not recommended as it can alter the texture of the filling.
Nutritional Information
(Estimated per serving, based on 8 servings)
| Nutrient | Amount per Serving | % Daily Value |
|---|---|---|
| Calories | 315 kcal | 16% |
| Total Fat | 12g | 18% |
| Saturated Fat | 5g | 25% |
| Cholesterol | 0mg | 0% |
| Sodium | 100mg | 4% |
| Total Carbohydrate | 50g | 17% |
| Dietary Fiber | 3g | 12% |
| Sugars | 35g | N/A |
| Protein | 3g | 6% |
Variations & Substitutions
- Gluten-Free: Use a gluten-free pie crust recipe or a store-bought gluten-free crust.
- Vegan: Ensure the pie crust is vegan-friendly (many store-bought crusts contain lard).
- Different Juices: While fresh pomegranate juice is best, you can substitute with a high-quality pomegranate juice from the store if necessary. Just ensure it is 100% juice and has no added sugar.
- Berry Medley: Add a cup of fresh raspberries or blackberries to the filling for an even more complex flavor profile.
- Citrus Zest: Grate the zest of one orange or lemon into the pomegranate glaze for a bright, citrusy note.
FAQs (Frequently Asked Questions)
Q: Can I use only red pomegranates for this pie?
A: While you can, the yellow pomegranates contribute a unique sweetness and slightly softer texture that complements the tartness of the red juice. If using only red, consider adding a bit more sugar to the glaze.
Q: How can I tell if the pie is done?
A: Since the crust is pre-baked, you’re primarily looking for the filling to be set. The glaze should be thick and slightly jiggly, but not runny.
Q: Can I make this pie ahead of time?
A: Yes, you can prepare the filling up to a day in advance and store it in the refrigerator. Assemble the pie just before serving to prevent the crust from becoming soggy.
Q: What can I do if the glaze is too thin?
A: If the glaze is too thin, you can gently simmer it in a saucepan for a few minutes longer to allow it to thicken. Be sure to stir constantly to prevent scorching.
Q: Why is it important to remove the white membrane from the pomegranates?
A: The white membrane is very bitter and will negatively impact the overall flavor of the pie. Removing it is essential for a sweet and enjoyable dessert.
Final Thoughts
This Fresh Pomegranate Pie is more than just a dessert; it’s an experience. The bright, jewel-toned filling, the delicate pop of each seed, the sweet-tart flavor, it’s a truly unforgettable treat. I encourage you to try this recipe and share it with your loved ones. Whether it’s for Thanksgiving, Christmas, or just a special occasion, this pie is sure to impress. Don’t be afraid to experiment with variations and make it your own. And please, let me know what you think! I’d love to hear about your pomegranate pie adventures. Now, go forth and bake some happiness!