
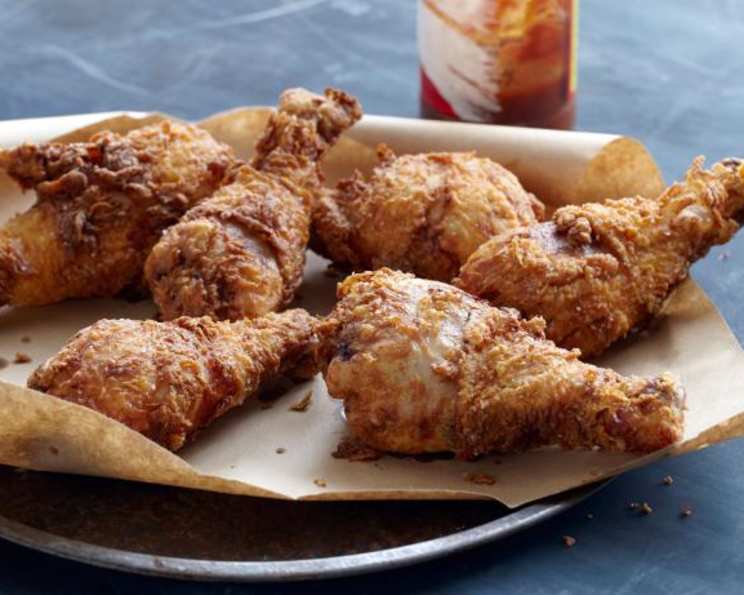
The Ultimate Fried Chicken Recipe: Crispy, Juicy Perfection
I’ll never forget the first time I tasted truly exceptional fried chicken. It wasn’t from a famous chef or a high-end restaurant, but from my grandmother’s kitchen, a humble space filled with the comforting aromas of her love. The golden, crispy skin gave way to incredibly juicy meat, seasoned to perfection. Each bite was a symphony of textures and flavors, a memory I cherish and strive to recreate in my own kitchen. This recipe is an homage to her, a little bit of my heart and soul fried to crispy perfection.
Recipe Overview
- Prep Time: 20 minutes
- Cook Time: 15 minutes
- Total Time: 1 hour 35 minutes (includes marinating time)
- Servings: 8
- Dietary Type: Not specified
Ingredients
- 4 tablespoons kosher salt
- 3 tablespoons fresh ground black pepper
- 2 tablespoons ground cayenne pepper
- 2 teaspoons garlic powder
- 2 teaspoons onion powder
- 1 teaspoon mustard powder
- 2 cups all-purpose flour
- 8 chicken drumsticks
- 4 cups buttermilk
- Canola oil, for frying
Equipment Needed
- Large mixing bowls
- Fork
- Plastic wrap
- Large re-sealable plastic bag
- Large heavy-bottomed saucepan
- Deep-frying thermometer
- Tongs
- Paper towel-lined baking sheet
Instructions
-
In a large mixing bowl, combine the kosher salt, fresh ground black pepper, ground cayenne pepper, garlic powder, onion powder, and mustard powder. Mix thoroughly to ensure the spices are evenly distributed.
-
Divide the spice mixture evenly between two mixing bowls. This ensures that you’ll have enough seasoning for both the initial rub and the flour coating.
-
Add the all-purpose flour to one of the bowls containing the spice mixture. Mix well, ensuring the flour is thoroughly combined with the spices. Set this aside; this is your dredging mixture.
-
Take the chicken drumsticks and rub them generously with the reserved spice mix from the second bowl. Make sure each drumstick is fully coated with the spices, pressing the mixture into the chicken.
-
Using a fork, poke each chicken drumstick a few times. This will help the flavors of the spice rub penetrate deep into the meat, resulting in a more flavorful and tender final product.
-
Pour the buttermilk over the seasoned chicken drumsticks in a large bowl. Ensure all the chicken pieces are submerged in the buttermilk.
-
Cover the bowl with plastic wrap to prevent any contamination and to keep the chicken moist during marination.
-
Refrigerate the chicken in the buttermilk marinade for at least 1 hour, or preferably longer. Marinating the chicken overnight will result in even more tender and flavorful meat. The buttermilk acts as a tenderizer and helps the spices infuse throughout the chicken.
-
Pour the flour mixture into a large re-sealable plastic bag. This will make coating the chicken easier and less messy.
-
Remove the chicken pieces from the buttermilk marinade, letting any excess buttermilk drip off.
-
Working in batches, place the chicken pieces into the bag with the flour mixture. Seal the bag tightly and shake vigorously to ensure each piece of chicken is heavily coated with the flour mixture. Make sure every nook and cranny is covered for maximum crispiness.
-
In a large, heavy-bottomed saucepan, pour in enough canola oil to fill the pan about one-third of the way. Using a heavy-bottomed pan helps maintain a consistent oil temperature.
-
Heat the oil over medium heat until it reaches 360 degrees F, using a deep-frying thermometer to monitor the temperature. Maintaining the correct oil temperature is crucial for achieving perfectly cooked fried chicken. If you don’t have a thermometer, you can test the oil by dropping in a small cube of bread; it should brown in about 3 minutes.
-
Carefully drop the coated chicken drumsticks into the hot oil, working in batches to avoid overcrowding the pan. Overcrowding will lower the oil temperature and result in soggy chicken.
-
As the chicken browns, turn the pieces occasionally with tongs to ensure even cooking on all sides. Do not let the pieces touch each other while frying.
-
Continue to cook the chicken until it is crispy and deep golden brown, approximately 15 minutes, turning occasionally.
-
To test for doneness, cut into the thickest part of a drumstick. The juices should run clear, and the meat should be opaque throughout.
-
If the chicken is not fully cooked through but is already browning too quickly, you can transfer it to a preheated 325 degrees F oven to finish cooking.
-
Transfer the fried chicken to a paper towel-lined baking sheet to drain off any excess oil. This helps to keep the chicken crispy and prevents it from becoming greasy.
-
Transfer the drumsticks onto a serving platter or place them in a bucket for a classic presentation.
-
Serve the chicken hot, at room temperature, or even cold. Fried chicken is delicious at any temperature.
Expert Tips & Tricks
- For extra crispy skin, double-dredge the chicken. After the initial buttermilk soak and flour coating, dip the chicken back into the buttermilk, then back into the flour before frying.
- Don’t overcrowd the pan! Fry in batches to maintain oil temperature and ensure even cooking.
- If your chicken is browning too quickly, lower the heat slightly.
- Add a tablespoon of cornstarch to the flour mixture for added crispness.
- Use a combination of vegetable shortening and oil for a classic flavor.
- Let the fried chicken rest for a few minutes before serving. This allows the juices to redistribute, resulting in a more tender and flavorful product.
Serving & Storage Suggestions
Fried chicken is incredibly versatile and pairs well with a variety of sides. Classic choices include coleslaw, mashed potatoes, macaroni and cheese, cornbread, and green beans. For a lighter meal, serve it with a fresh salad.
Leftover fried chicken can be stored in an airtight container in the refrigerator for up to 3-4 days. To reheat, bake in a preheated oven at 350 degrees F until heated through and crispy, about 15-20 minutes. You can also reheat it in an air fryer for a crispier result. While you can microwave it, the skin will likely lose its crispiness. Fried chicken can also be frozen for longer storage. Wrap the chicken pieces individually in plastic wrap and then place them in a freezer-safe bag or container. Frozen fried chicken can last for up to 2-3 months. Thaw it in the refrigerator overnight before reheating.
Nutritional Information
| Nutrient | Amount per Serving | % Daily Value |
|---|---|---|
| Calories | 593.7 kcal | N/A |
| Calories from Fat | 146 g | 25% |
| Total Fat | 16.3 g | 25% |
| Saturated Fat | 5.1 g | 25% |
| Cholesterol | 128.1 mg | 42% |
| Sodium | 7359.8 mg | 306% |
| Total Carbohydrate | 66.5 g | 22% |
| Dietary Fiber | 4.1 g | 16% |
| Sugars | 12.4 g | 49% |
| Protein | 44.1 g | 88% |
Variations & Substitutions
- Spicy Fried Chicken: Increase the amount of cayenne pepper in the spice mixture for a spicier kick. You can also add a pinch of chipotle powder.
- Herb-Infused Fried Chicken: Add dried herbs such as thyme, rosemary, or oregano to the flour mixture for a more complex flavor profile.
- Gluten-Free Fried Chicken: Substitute the all-purpose flour with a gluten-free flour blend. Ensure the blend contains xanthan gum for proper binding.
- Buttermilk Substitute: If you don’t have buttermilk, you can make a quick substitute by adding 1 tablespoon of lemon juice or white vinegar to regular milk and letting it sit for 5-10 minutes until it thickens.
- Chicken Pieces: While this recipe calls for drumsticks, you can use other cuts of chicken, such as thighs, wings, or breasts. Adjust the cooking time accordingly, as different cuts may require different cooking times.
FAQs (Frequently Asked Questions)
Q: Why is my fried chicken soggy?
A: Soggy fried chicken is often caused by overcrowding the pan, which lowers the oil temperature. Make sure to fry the chicken in batches and maintain a consistent oil temperature.
Q: How do I keep my fried chicken crispy after cooking?
A: Place the fried chicken on a wire rack lined with paper towels to drain excess oil and allow air to circulate around the pieces. Avoid stacking the chicken, as this can trap steam and make it soggy.
Q: Can I use a different type of oil for frying?
A: Yes, you can use other high-smoke-point oils such as peanut oil, vegetable oil, or grapeseed oil. Avoid using olive oil, as it has a lower smoke point and can impart an undesirable flavor.
Q: How do I know when the chicken is fully cooked?
A: The best way to check for doneness is to insert a meat thermometer into the thickest part of the chicken. It should register 165 degrees F. Alternatively, you can cut into the thickest part of the chicken; the juices should run clear, and the meat should be opaque throughout.
Q: Can I marinate the chicken for longer than 1 hour?
A: Yes, you can marinate the chicken for several hours or even overnight. The longer the chicken marinates, the more flavorful and tender it will be.
Final Thoughts
This fried chicken recipe is more than just a set of instructions; it’s an invitation to create something truly special. Embrace the process, experiment with different seasonings, and don’t be afraid to make it your own. Whether you’re serving it at a backyard barbecue, a family dinner, or a simple weeknight meal, I hope this recipe brings as much joy to your table as it has to mine. So, gather your ingredients, preheat your oil, and get ready to experience the crispy, juicy perfection of homemade fried chicken. Enjoy!