
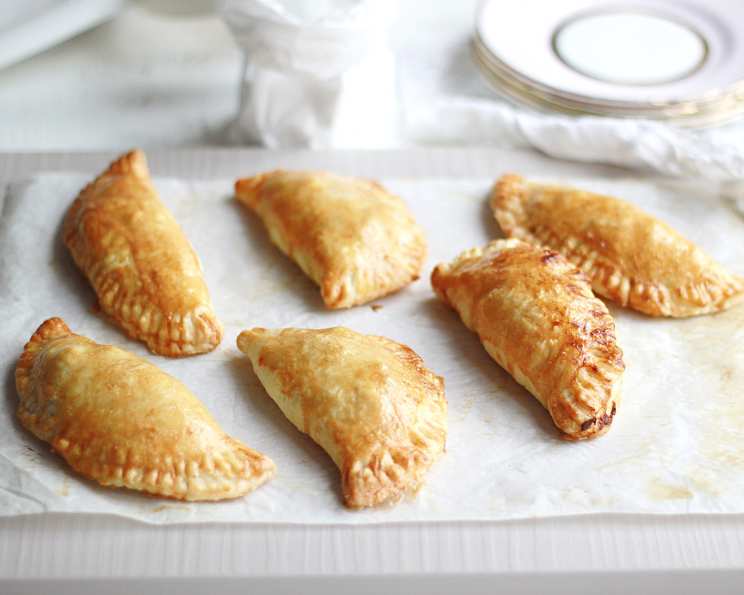
Fried Fruit Pies: A Taste of Nostalgia
I can still picture my grandmother, apron dusted with flour, standing over a cast-iron skillet bubbling with hot oil. The air would be thick with the sweet scent of cooked fruit and golden-brown pastry as she carefully lowered these little gems into the shimmering depths. Fried fruit pies were her specialty, a treat reserved for special occasions or when we just needed a little comfort. Each bite was an explosion of warm, fruity filling encased in a perfectly crisp, flaky crust – a taste of pure, unadulterated love.
Recipe Overview
- Prep Time: 45 minutes
- Cook Time: 35 minutes
- Total Time: 1 hour 20 minutes
- Yields: 12 pies
- Serves: 12
- Dietary Type: Vegetarian
Ingredients
For The Pastry:
- 3 cups all-purpose flour
- 1 teaspoon salt
- ¾ cup Crisco or other good vegetable shortening
- 1 egg, lightly beaten
- ¼ cup cold water
- 1 teaspoon vinegar (preferably white vinegar)
For The Filling:
- 3 cups dried fruit (such as apricots, peaches, or apples)
- 1 ½ cups water
- 1 cup sugar
- ¼ teaspoon cinnamon
- ¼ teaspoon ground allspice
Equipment Needed
- Large Mixing Bowl
- Pastry Blender (or fork)
- Plastic Wrap
- Nonreactive Pan
- Rolling Pin
- Deep Fryer
- Paper Towels
Instructions
- In a large mixing bowl, thoroughly combine the flour and salt.
- Cut in the shortening using a pastry blender, a fork, your hands, or your preferred method. Continue until the mixture resembles coarse crumbs with no large chunks of shortening remaining. This ensures a flaky crust.
- In a separate small bowl, stir together the lightly beaten egg with the water. Sprinkle this mixture evenly over the flour mixture.
- Sprinkle the vinegar over the flour mixture as well. Mix lightly until all ingredients are well combined and a dough starts to form. Be careful not to overmix; a shaggy dough is perfectly fine.
- Form the dough into a ball. Wrap it tightly in plastic wrap. Refrigerate for at least one hour, or preferably longer. This allows the gluten to relax, resulting in a more tender crust.
- While the dough chills, prepare the fruit filling. In a nonreactive pan (stainless steel or enamel-coated), combine the dried fruit and water.
- Simmer the fruit mixture on very low heat for 30 to 45 minutes, or until the dried fruit is very tender and plump. Stir occasionally to prevent scorching. Add more water if necessary to keep the fruit from sticking to the pan.
- Once the fruit is tender, remove the pan from the heat and allow the mixture to cool slightly. Then, using a fork or potato masher, mash the fruit slightly, leaving some texture. You don’t want a completely smooth puree.
- Stir in the sugar, cinnamon, and ground allspice. Mix well to combine.
- The filling can be prepared in advance and refrigerated. However, before filling the pies, warm the fruit mixture slightly (a few seconds in the microwave is fine) to take the chill off and make it easier to work with.
- Remove the pastry from the refrigerator. On a lightly floured surface, divide the dough into four equal pieces. Then, cut each of those four pieces into three equal pieces, resulting in 12 golf-ball-sized dough balls.
- On a lightly floured surface, roll each ball into a 5- to 6-inch circle. Don’t worry about perfect circles; ragged edges are perfectly acceptable and will add to the rustic charm of the pies.
- Place about 2 generous tablespoons of filling onto one side of each dough circle. Be careful not to overfill, or the pies will be difficult to seal.
- To seal the pie, lightly wet the inside edge of the dough circle with water using your finger. This acts as a glue to ensure a good seal.
- Fold the dough over the filling, creating a familiar half-moon shape. Make sure the edges of the dough are even.
- Press and crimp the edges to seal the pie. You can use a fork to create a decorative edge while further securing the seal. Pay close attention to any holes in the dough and crimp them shut to prevent filling from leaking out during frying.
- Heat a deep fryer to 350°F (175°C). If you don’t have a deep fryer, you can use a large, heavy-bottomed pot filled with enough oil to submerge the pies. Ensure you have a reliable thermometer to monitor the oil temperature.
- Carefully lower the pies into the hot oil, one at a time. Avoid overcrowding the fryer, as this will lower the oil temperature and result in soggy pies.
- Fry the pies until they turn a nice, even golden brown, approximately 3 to 4 minutes per side. The filling is already cooked, so the frying process is primarily to cook the dough.
- Remove the fried pies from the oil using a slotted spoon or tongs and place them on a paper towel-lined plate or wire rack to drain excess oil.
Expert Tips & Tricks
- For the flakiest crust, ensure the shortening is very cold before cutting it into the flour. You can even chill the flour and shortening in the freezer for 15-20 minutes before starting.
- Don’t overwork the dough. Overmixing develops the gluten, leading to a tough crust. Mix only until the ingredients are just combined.
- If the dough becomes too sticky while rolling, lightly dust the surface with more flour.
- If you don’t have a deep fryer, you can shallow fry the pies in a skillet with about an inch of oil. Turn them frequently to ensure even browning.
- For a richer flavor, try using brown sugar instead of white sugar in the filling.
- Experiment with different dried fruits and spices to create your own unique flavor combinations.
Serving & Storage Suggestions
Serve the fried fruit pies warm or at room temperature. They are delicious on their own, but you can also serve them with a scoop of vanilla ice cream or a dollop of whipped cream.
Store leftover pies in an airtight container at room temperature for up to 2 days. For longer storage, refrigerate them for up to 5 days. To reheat, bake them in a preheated oven at 350°F (175°C) for 10-15 minutes, or until warmed through. You can also reheat them in a microwave, but they may lose some of their crispness. The pies can also be frozen for up to 2 months. Thaw overnight in the refrigerator before reheating.
Nutritional Information
| Nutrient | Amount per Serving | % Daily Value |
|---|---|---|
| Calories | 427.7 kcal | N/A |
| Calories from Fat | N/A | 29% |
| Total Fat | 13.8 g | 21% |
| Saturated Fat | 4.1 g | 20% |
| Cholesterol | 15.5 mg | 5% |
| Sodium | 211.2 mg | 8% |
| Total Carbohydrate | 74.9 g | 24% |
| Dietary Fiber | 5 g | 20% |
| Sugars | 16.7 g | 66% |
| Protein | 5.1 g | 10% |
Variations & Substitutions
- Gluten-Free: Use a gluten-free all-purpose flour blend for the crust. You may need to add a binder like xanthan gum to help hold the dough together.
- Vegan: Replace the egg in the crust with 2 tablespoons of applesauce or flaxseed meal mixed with 6 tablespoons of water. Ensure your shortening is also vegan-friendly.
- Filling Variations: Use different combinations of dried fruits, such as cranberries and raisins, or add chopped nuts like pecans or walnuts. You can also add a splash of lemon juice or vanilla extract to the filling for extra flavor. For a savory twist, try filling the pies with cooked apples and cheddar cheese.
FAQs (Frequently Asked Questions)
Q: Can I use fresh fruit instead of dried fruit?
A: While dried fruit is traditional, you can use fresh fruit. Be sure to cook it down with sugar and spices until it thickens into a jam-like consistency before filling the pies to avoid a soggy filling.
Q: My crust is tough. What did I do wrong?
A: Overmixing the dough is the most common cause of a tough crust. Be sure to mix only until the ingredients are just combined and avoid overworking the dough when rolling it out.
Q: Can I bake these pies instead of frying them?
A: While these are traditionally fried, you can bake them. Bake at 375°F (190°C) for 20-25 minutes, or until golden brown. Brush the tops with melted butter or an egg wash before baking for a golden sheen.
Q: How do I prevent the filling from leaking out during frying?
A: Ensure you seal the edges of the pies tightly by wetting them with water and crimping them well. Avoid overfilling the pies, and be sure to patch up any holes in the dough before frying.
Q: Can I make the dough ahead of time?
A: Absolutely! The dough can be made up to 2 days in advance and stored in the refrigerator, wrapped tightly in plastic wrap. You can also freeze the dough for up to 2 months. Thaw overnight in the refrigerator before using.
Final Thoughts
These fried fruit pies are more than just a dessert; they’re a little piece of history, a taste of home, and a reminder of simpler times. I encourage you to give this recipe a try and create your own memories around this classic treat. Don’t be afraid to experiment with different fillings and spices to find your perfect combination. And if you do, be sure to share your creations with loved ones – and maybe even with me! They pair wonderfully with a strong cup of coffee or a scoop of vanilla ice cream. Enjoy!