
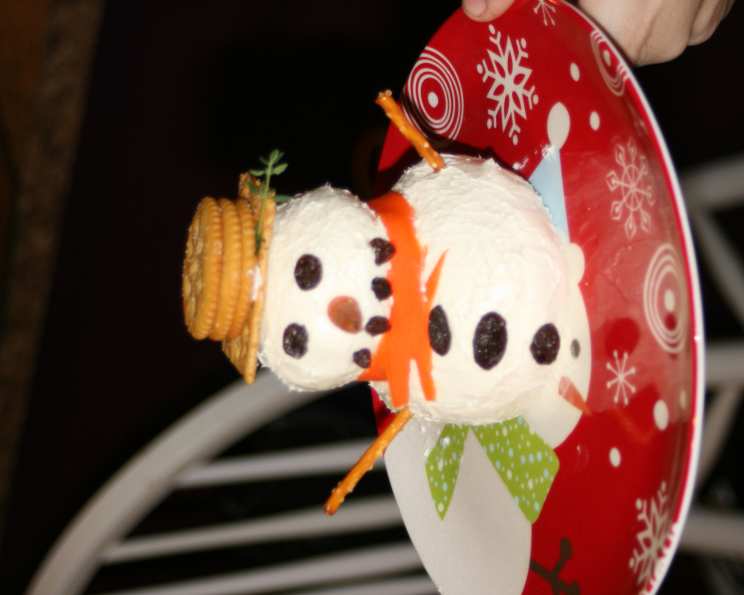
Frosty the Cheese Ball: A Holiday Culinary Delight
Christmas Eve, 1998. The scent of pine filled the air, carols played softly, and nestled amongst the usual cheese and crackers on the coffee table sat…Frosty. Not the snowman from the beloved song, but a jovial cheese ball creation, complete with a carrot nose and pretzel arms. My aunt, always the creative one, had brought him, and instantly, he was the star of the appetizer spread. He wasn’t just cheese; he was a centerpiece, a conversation starter, and a deliciously cheesy start to the holiday festivities. I can still recall the delighted squeals from my cousins as they carefully selected a cracker, eager to adorn it with a bit of Frosty’s cheesy goodness. From that moment on, no Christmas Eve felt complete without a cheese ball snowman gracing the table, a reminder of shared laughter and holiday cheer.
Recipe Overview
- Prep Time: 30 minutes
- Chill Time: 2 hours
- Total Time: 2 hours 30 minutes
- Yields: 1 cheese ball
- Serves: 25
- Dietary Type: Vegetarian
Ingredients
- 16 ounces cream cheese, softened
- 1/2 teaspoon garlic salt
- 1/2 teaspoon onion powder
- 10 raisins, for eyes, mouth, and buttons
- 1 piece carrot, for the nose
- 4 crackers, for the hat
- 1 sprig thyme, for hat decoration
- 1 slice carrot, for the scarf
- 2 broken pretzels, for arms
Equipment Needed
- Large mixing bowl
- Plastic wrap
Instructions
-
In a large bowl, allow the cream cheese to soften at room temperature for approximately 30 minutes. This step is crucial for easy mixing and ensures a smooth, even texture for your Frosty. Don’t rush it! Cold cream cheese will result in a lumpy cheese ball.
-
Once the cream cheese is adequately softened, add the garlic salt and onion powder. Stir until thoroughly combined. Make sure there are no lumps of cream cheese remaining and the spices are evenly distributed throughout the mixture.
-
Cover the bowl tightly with plastic wrap and chill in the refrigerator for at least 2 hours. This chilling period is essential for firming up the cheese mixture, making it easier to shape into the snowman’s form. Don’t skip this step; otherwise, you’ll have a melty, shapeless snowman.
-
After chilling, remove the cream cheese mixture from the refrigerator. Now it’s time to sculpt your Frosty! Divide the cheese mixture into two portions: approximately two-thirds for the body and one-third for the head.
-
Using your hands, roll each portion into a smooth ball. The chilled cheese should be firm enough to hold its shape easily. If the mixture seems too soft, return it to the refrigerator for another 30 minutes.
-
Carefully stack the smaller ball (the head) on top of the larger ball (the body) to create the snowman’s basic form. Gently press them together to secure the head, but avoid applying too much pressure, which can distort the shape.
-
Now comes the fun part: decorating! Use the raisins to create Frosty’s eyes, mouth, and buttons. Press them gently into the cheese to secure them.
-
Attach the carrot piece to Frosty’s face to form his nose. You might need to trim the carrot to the desired size and shape. A small dab of cream cheese can help secure it if needed.
-
Create Frosty’s hat using the crackers. Arrange the crackers to form a simple top hat shape on top of his head. Use a small amount of cream cheese as “glue” to hold them in place, if necessary.
-
Add a sprig of thyme to the hat for a festive touch. It adds a pop of color and a subtle aroma.
-
Drape the carrot slice around Frosty’s “neck” to create his scarf.
-
Finally, insert the broken pretzels into the sides of the body to form Frosty’s arms.
-
Serve immediately with your favorite crackers or mini bagels.
Expert Tips & Tricks
- Softening the Cream Cheese: Ensure the cream cheese is truly softened before mixing. This prevents lumps and ensures a smooth, creamy texture. If you’re short on time, you can microwave it for a few seconds, but watch it closely to avoid melting.
- Flavor Boost: Add a dash of Worcestershire sauce to the cream cheese mixture for a savory umami flavor.
- Spice It Up: For a spicier kick, add a pinch of cayenne pepper or some finely chopped jalapenos to the cream cheese mixture.
- Alternative Decorations: Get creative with your decorations! Use black olives for the eyes and mouth, small pieces of bell pepper for the buttons, and rosemary sprigs for the hat.
- Preventing Cracking: To prevent the cheese ball from cracking while chilling, wrap it tightly in plastic wrap, ensuring all air is removed.
- Serving Temperature: Remove Frosty from the refrigerator about 15-20 minutes before serving to allow the cheese to soften slightly for easier spreading.
- Make-Ahead: You can prepare the cheese ball up to 2 days in advance. Keep it tightly wrapped in plastic wrap in the refrigerator until ready to decorate and serve.
Serving & Storage Suggestions
Serve Frosty the Cheese Ball on a festive platter surrounded by an assortment of crackers, mini bagels, or even vegetable sticks for dipping. A colorful arrangement of grapes, berries, and other crudités will add visual appeal.
Leftovers should be stored in an airtight container in the refrigerator. The cheese ball will last for up to 3-4 days. While freezing is not recommended (as it can alter the texture), properly refrigerated leftovers will maintain their flavor and quality for several days.
It is not recommended to leave the cheese ball at room temperature for more than 2 hours to prevent spoilage.
Nutritional Information
| Nutrient | Amount per Serving | % Daily Value |
|---|---|---|
| Calories | 66.6 kcal | N/A |
| Calories from Fat | 58 g | 87% |
| Total Fat | 6.5 g | 9% |
| Saturated Fat | 4 g | 20% |
| Cholesterol | 20 mg | 6% |
| Sodium | 57.9 mg | 2% |
| Total Carbohydrate | 1 g | 0% |
| Dietary Fiber | 0 g | 0% |
| Sugars | 0.2 g | 0% |
| Protein | 1.4 g | 2% |
Note: Nutritional information is an estimate and can vary based on specific ingredients and portion sizes.
Variations & Substitutions
- Garlic Herb: Replace the garlic salt and onion powder with a blend of dried Italian herbs and a clove of minced garlic.
- Spicy Southwest: Add a can of diced green chilies and a teaspoon of chili powder to the cream cheese mixture. Decorate with black olives and a sprinkle of cilantro.
- Cranberry Walnut: Mix in dried cranberries and chopped walnuts for a sweet and savory combination.
- Vegan Frosty: Use a plant-based cream cheese alternative and vegan crackers for the hat to create a dairy-free version.
- Gluten-Free: Use gluten-free crackers for the hat and serve with gluten-free crackers or vegetables for dipping.
- Cheese Variety: Mix in a shredded cheese of your choice such as cheddar or Monterey jack to the cream cheese to add another layer of flavor.
FAQs (Frequently Asked Questions)
Q: Can I use low-fat cream cheese?
A: While you can use low-fat cream cheese, the texture may be slightly less creamy. Full-fat cream cheese will yield the best flavor and consistency.
Q: Can I make this ahead of time?
A: Absolutely! The cheese ball can be made up to 2 days in advance. Just keep it tightly wrapped in plastic wrap in the refrigerator until ready to decorate and serve.
Q: What if my cheese ball is too soft?
A: If the cheese ball is too soft to handle, return it to the refrigerator for another 30 minutes to an hour to allow it to firm up.
Q: Can I freeze the cheese ball?
A: Freezing is not recommended as it can change the texture of the cream cheese.
Q: What can I serve with the cheese ball besides crackers?
A: Consider serving it with mini bagels, vegetable sticks (carrots, celery, cucumbers), or even apple slices.
Final Thoughts
Frosty the Cheese Ball isn’t just a recipe; it’s an invitation to create a moment of joy and connection during the holidays. Gather your family, unleash your creativity with the decorations, and savor the deliciousness of this festive treat. Don’t hesitate to experiment with different flavor combinations and decorations to make it your own. Share your creations and feedback – and perhaps start a new holiday tradition that will be cherished for years to come! Merry cheesemas!