
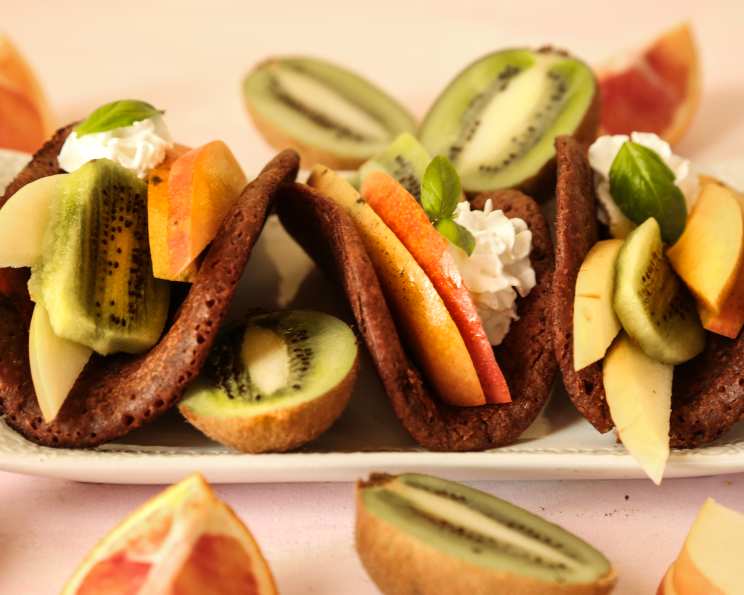
Fruit Filled Chocolate Tacos: A Sweet Fiesta
I’ll never forget the first time I tried a dessert taco. It was at a small family gathering, the air thick with the scent of grilling meats and the buzz of laughter. Then, someone brought out a platter of these chocolatey shells overflowing with vibrant fruit. The combination of the crisp, slightly bitter chocolate and the juicy, sweet filling was an absolute revelation – a playful, unexpected delight that instantly transported me back to childhood summers filled with carefree joy. It wasn’t just a dessert; it was a memory in the making.
Recipe Overview
- Prep Time: 20 minutes
- Cook Time: 10 minutes
- Total Time: 30 minutes
- Servings: 6
- Yield: 6 tacos
- Dietary Type: Vegetarian
Ingredients
- 1/4 cup all-purpose flour
- 1/4 cup sugar
- 1 tablespoon cocoa
- 2 tablespoons skim milk or 2% low-fat milk
- 2 tablespoons vegetable oil
- 1 teaspoon vanilla extract
- 1 egg white
- 1/8 teaspoon salt
- 1/2 cup sliced strawberry
- 1/2 cup sliced mango
- 1 kiwi fruit, peeled and sliced
- 1 carambola, sliced (starfruit) (optional)
Equipment Needed
- Medium mixing bowl
- Electric mixer
- 8-inch nonstick skillet
- Wire rack
- Large bowl
Instructions
-
In a medium mixing bowl, combine the flour, sugar, cocoa, skim milk (or 2% milk), vegetable oil, vanilla extract, egg white, and salt.
-
Using an electric mixer at medium speed, beat the ingredients until the batter is smooth. It should be pourable but not too thin.
-
Cover the bowl with plastic wrap and chill the batter in the refrigerator for at least 2 hours. This step is crucial as it allows the gluten to relax and prevents the tacos from becoming too tough. You can even chill it overnight for best results.
-
Place an 8-inch nonstick skillet over medium heat. Allow the pan to heat up completely. To test, flick a few drops of water into the pan; they should sizzle and evaporate quickly.
-
Pour 3 tablespoons of batter into the heated skillet.
-
Immediately and quickly tilt the pan in all directions, ensuring the batter evenly coats the bottom of the pan in a thin film. The thinner the layer, the crispier the taco shell will be. Work quickly to avoid any thick spots.
-
Cook for approximately 2 minutes, or until the edges of the tortilla begin to lift slightly and the surface appears set.
-
Carefully flip the tortilla using a thin spatula.
-
Cook for about 1 minute on the other side, until it is lightly browned and cooked through.
-
Remove the chocolate tortilla from the pan.
-
Immediately drape the warm tortilla over one of the tines (or rungs) of a wire rack that is suspended over a large bowl. This will create the taco shell shape as it cools. The bowl underneath will catch any drips.
-
Cool the taco shell for about 15 minutes, or until it has completely set and hardened into its taco shape. Handle with care during cooling as they are fragile.
-
Repeat the procedure (steps 5-12) with the remaining batter until you have made all 6 taco shells.
-
Once the taco shells are cooled and hardened, it’s time to assemble! Arrange the sliced strawberries, sliced mango, and sliced kiwi fruit attractively inside each chocolate taco shell.
-
If desired, garnish with sliced carambola (starfruit) for an extra touch of elegance and a burst of tartness.
Expert Tips & Tricks
- Batter Consistency: The batter should be smooth and easily spreadable. If it seems too thick after chilling, add a teaspoon of milk at a time until you reach the desired consistency.
- Non-Stick Pan: A good quality non-stick pan is essential for this recipe. If your pan is not perfectly non-stick, lightly grease it with cooking spray before each taco.
- Even Cooking: To ensure even cooking, maintain a consistent medium heat. If the tacos are browning too quickly, reduce the heat slightly.
- Crispy Tacos: For extra crispy tacos, you can bake the shells in a preheated oven at 350°F (175°C) for a few minutes after they have cooled on the wire rack. Watch them closely to prevent burning.
- Fruit Prep: Prepare your fruit just before assembling the tacos to prevent it from becoming soggy. You can also lightly toss the fruit with a tablespoon of lemon or lime juice to prevent browning.
Serving & Storage Suggestions
These Fruit Filled Chocolate Tacos are best served immediately after assembling to maintain the crispness of the shells and the freshness of the fruit.
If you need to store them, keep the taco shells separate from the fruit filling. The chocolate shells can be stored in an airtight container at room temperature for up to 2 days. The sliced fruit should be stored in an airtight container in the refrigerator and consumed within 1-2 days.
Assembled tacos are not ideal for storing, as the moisture from the fruit will soften the shells.
Nutritional Information
| Nutrient | Amount per Serving | % Daily Value |
|---|---|---|
| Calories | 120.6 kcal | – |
| Total Fat | 4.8 g | 7% |
| Saturated Fat | 0.6 g | 3% |
| Cholesterol | 0.1 mg | 0% |
| Sodium | 61.3 mg | 2% |
| Total Carbohydrate | 17.9 g | 5% |
| Dietary Fiber | 1.1 g | 4% |
| Sugars | 12 g | – |
| Protein | 1.8 g | 3% |
Note: Percent Daily Values are based on a 2,000 calorie diet. Dietary values may vary depending on specific ingredients and portion sizes.
Variations & Substitutions
- Gluten-Free: Substitute the all-purpose flour with a gluten-free all-purpose blend.
- Dairy-Free: Use almond milk or soy milk in place of skim milk.
- Vegan: In addition to the dairy-free substitution, use a flax egg (1 tablespoon flaxseed meal mixed with 3 tablespoons water, let sit for 5 minutes) instead of the egg white.
- Spices: Add a pinch of cinnamon or chili powder to the batter for a warming spice note.
- Fruit Combinations: Get creative with your fruit fillings! Consider using berries, peaches, pineapple, or any other seasonal fruit.
- Toppings: Drizzle with melted chocolate, sprinkle with chopped nuts, or add a dollop of whipped cream or non-dairy whipped topping for extra indulgence.
FAQs (Frequently Asked Questions)
Q: Can I make the taco shells ahead of time?
A: Yes, you can make the taco shells up to 2 days in advance. Store them in an airtight container at room temperature to maintain their crispness.
Q: My taco shells are sticking to the pan. What am I doing wrong?
A: Make sure your non-stick pan is properly heated and that you are using enough oil. If the pan is still sticking, try lightly greasing it with cooking spray between each taco.
Q: Can I use a different type of milk?
A: Yes, you can use any type of milk you prefer, such as whole milk, almond milk, or soy milk. The choice of milk will slightly affect the flavor and texture of the tacos.
Q: How do I prevent the fruit from making the taco shells soggy?
A: Assemble the tacos just before serving to prevent the fruit from making the shells soggy. You can also lightly toss the fruit with lemon or lime juice to help preserve its freshness.
Q: Can I freeze the taco shells?
A: Freezing the taco shells is not recommended, as they may become brittle and lose their crispness. It’s best to make them fresh or store them at room temperature for a few days.
Final Thoughts
These Fruit Filled Chocolate Tacos are a fun and delicious way to satisfy your sweet tooth! They’re incredibly easy to make, endlessly customizable, and guaranteed to bring a smile to everyone’s face. So, gather your ingredients, fire up the skillet, and get ready for a sweet fiesta. Don’t hesitate to experiment with different fruit combinations and toppings to create your own signature version. I encourage you to try this recipe and share your feedback. And if you’re looking for the perfect pairing, try serving these tacos with a scoop of vanilla ice cream or a refreshing glass of iced coffee!