
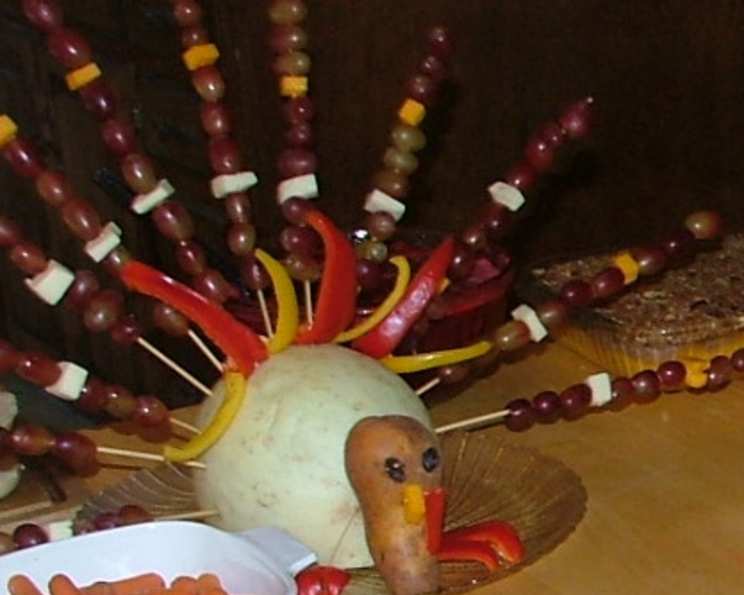
Fruit Gobbler (Turkey) Centerpiece
I remember the first time I saw this magnificent Fruit Gobbler at a Thanksgiving potluck. It wasn’t just a dish; it was a conversation starter, a whimsical centerpiece that brought smiles to everyone’s faces. The vibrant colors of the fruits and cheese, cleverly arranged to resemble a turkey, made it an instant hit with both kids and adults. It was so delightful that I made sure to get the recipe that very day, and it’s been a staple at my Thanksgiving table ever since.
Recipe Overview
- Prep Time: 30 minutes
- Servings: 12-16
- Dietary Type: Gluten-Free
Ingredients
- 1 Bosc pear (head)
- 1 cantaloupe (body) or 1 honeydew melon (body)
- 2 lbs cubed cheddar cheese (beak and tail feathers)
- 1-2 red bell peppers (snood, feet, and side feathers) or 1-2 yellow bell peppers (snood, feet, and side feathers)
- 2 raisins (eyes)
- 1 lb seedless grapes (tail feathers)
- Bamboo skewer
- Toothpicks
Equipment Needed
- Serving platter or dish
- Knife
- Cutting board
- Bamboo skewer
- Toothpicks
Instructions
- Begin by preparing the melon body. Cut a very shallow slice off the bottom of the cantaloupe or honeydew melon rind to create a flat, stable base. This will prevent the turkey from rolling around on the serving platter. Carefully place the melon on your serving dish or platter.
- Next, take the Bosc pear (which will serve as the turkey’s head) and attach it upside-down to the upper front of the melon body. Secure it using a section of bamboo skewer. Insert the skewer through the pear and into the melon to keep the head firmly in place.
- Now, focus on creating the facial features. Cut a triangle of cheddar cheese to form the beak and a strip of red pepper to create the snood. Use sections of toothpick to attach both the cheese beak and the red pepper snood to the pear head.
- Attach the raisin eyes. Use small pieces of toothpick to affix each raisin to the pear head, giving the turkey its character.
- Craft the turkey’s feet. Cut the red pepper into the shape of feet and carefully set them in place at the base of the melon.
- Assemble the tail feathers. Skewer cheddar cheese cubes and red grapes alternately onto the remaining bamboo skewers. Insert these skewers around the back of the melon, creating the turkey’s impressive tail feather display.
- Finally, cut additional pieces of red pepper or yellow pepper into feather shapes. Use toothpicks to pin these pepper side feathers in place along the sides of the melon. These will add extra flair and detail to your edible turkey.
Expert Tips & Tricks
- For a more stable base, use a slightly larger melon and ensure the bottom is cut evenly.
- To prevent the fruit from browning, you can lightly brush the cut surfaces of the pear and melon with lemon juice.
- When assembling the tail feathers, alternate colors and textures for a visually appealing design. Try using different types of grapes (green, red, black) and cheeses (cheddar, Monterey Jack, Colby).
- If you find that the bamboo skewers are too long, you can easily trim them with kitchen shears.
- For extra stability, consider using melted chocolate as “glue” to adhere the raisins and smaller details. Allow the chocolate to set before serving.
- To prevent the cheese from drying out, keep the Fruit Gobbler refrigerated until just before serving.
Serving & Storage Suggestions
Serve the Fruit Gobbler as a show-stopping centerpiece at your Thanksgiving or holiday buffet. It is best served immediately after assembly, as the fruit and cheese are freshest then.
If you need to prepare it in advance, you can assemble the different components separately. Cut the cheese cubes, shape the pepper feathers, and wash the grapes, storing each in airtight containers in the refrigerator. Cut the melon and pear close to serving time to minimize browning. Assemble the entire Gobbler just before your guests arrive.
Leftovers can be stored in the refrigerator, but the fruit and cheese may lose some of their freshness after a day or two. It’s best to disassemble the Gobbler, wrap the individual components separately, and consume them within 2-3 days. Keep in mind that the texture of the cut fruit may change slightly. Freezing is not recommended, as it will significantly alter the texture of the fruit and cheese.
Nutritional Information
| Nutrient | Amount per Serving | % Daily Value |
|---|---|---|
| Calories | 357.3 kcal | N/A |
| Calories from Fat | N/A | 64% |
| Total Fat | 25.2 g | 38% |
| Saturated Fat | 16 g | 80% |
| Cholesterol | 79.4 mg | 26% |
| Sodium | 477.9 mg | 19% |
| Total Carbohydrate | 14.4 g | 4% |
| Dietary Fiber | 1.4 g | 5% |
| Sugars | 11.7 g | N/A |
| Protein | 19.6 g | 39% |
Note: Nutritional information is an estimate and may vary based on specific ingredients and portion sizes.
Variations & Substitutions
- Fruit Variations: Feel free to use other types of fruit for the tail feathers, such as blueberries, kiwi slices, or orange segments. You could even add some pineapple chunks for a tropical twist.
- Cheese Options: Experiment with different types of cheese, such as pepper jack, provolone, or even vegan cheese alternatives, to cater to dietary preferences.
- Vegetable Additions: For a savory-sweet combination, add some cucumber slices or carrot sticks to the tail feathers.
- Nut-Free Version: Ensure all ingredients are processed in a nut-free facility if serving to individuals with nut allergies.
- Seasonal Adaptations: In the fall, you might incorporate apple slices or cranberries into the design.
FAQs (Frequently Asked Questions)
Q: Can I make the Fruit Gobbler a day in advance?
A: It’s best to assemble the Fruit Gobbler as close to serving time as possible to prevent the fruit from drying out or browning. You can, however, prepare the individual components (cut cheese, washed grapes, shaped peppers) a day ahead and store them separately in the refrigerator.
Q: What can I use instead of toothpicks to attach the features?
A: If you’re concerned about using toothpicks, you can use small pieces of softened cream cheese or melted chocolate as edible glue to attach the features. Be sure to allow the chocolate to set before serving.
Q: How do I prevent the melon from rolling on the platter?
A: Ensure you cut a wide enough, shallow slice off the bottom of the melon to create a stable, flat base. You can also place a non-slip mat underneath the serving platter for added security.
Q: Can I use a smaller melon for a smaller crowd?
A: Absolutely! Adjust the size of the melon and the quantity of other ingredients accordingly to create a smaller, more manageable Fruit Gobbler.
Q: What is the best way to transport the Fruit Gobbler to a potluck?
A: If possible, transport the assembled Fruit Gobbler on a sturdy platter in a large, covered container. If that’s not feasible, transport the components separately and assemble it at the potluck location.
Final Thoughts
The Fruit Gobbler is more than just a recipe; it’s a fun, creative project that brings joy and healthy snacking to any gathering. I encourage you to try your hand at creating this whimsical centerpiece. Don’t be afraid to get creative with the ingredients and decorations. Whether you stick to the original recipe or put your own spin on it, I’m sure your Fruit Gobbler will be a crowd-pleaser. Share your creations and feedback – I’d love to see how you make it your own! Consider pairing it with a festive fruit dip for an extra touch of sweetness. Happy feasting!