
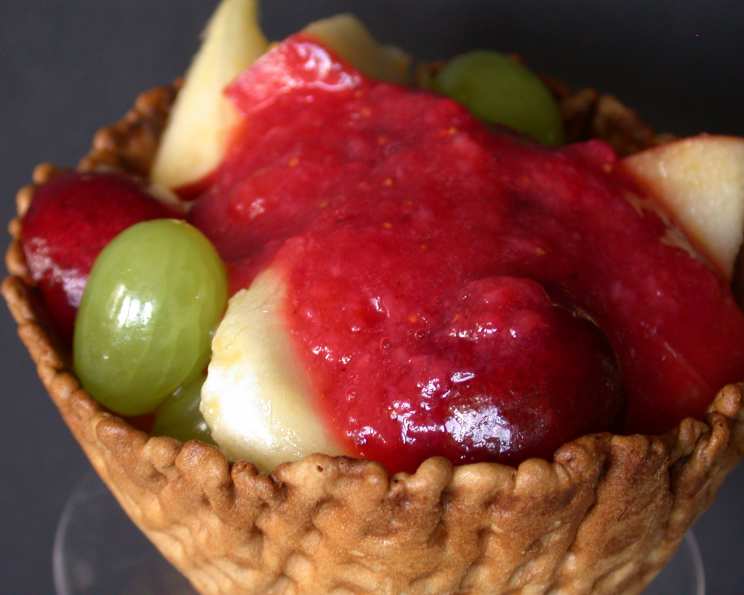
Fruit Sundae Cones: A Summer Treat Reimagined
There’s something magical about the first bite of a juicy summer fruit. I remember being a kid, perched on my grandmother’s porch swing, sticky fingers stained crimson from the endless stream of cherries and plums she’d let me pluck from her garden. We’d always end up with way too much fruit, and she’d come up with the most wonderfully whimsical ways to use it all. While pies and jams were staples, her “fruit cone creations” were the real showstoppers. This recipe is a nod to those carefree summer days, a way to capture that simple joy in every single bite.
Recipe Overview
- Prep Time: 20 minutes
- Cook Time: 0 minutes
- Total Time: 20 minutes
- Servings: 6
- Yield: 6 cones
- Dietary Type: Vegetarian
Ingredients
- ¾ cup cut-up strawberries, hulled
- 3 cups fresh fruit, cut into chunks (Apples, bananas, cherries, plums, seedless red grapes, peaches, etc.)
- 6 giant waffle ice cream cones
- ½ teaspoon ascorbic acid (optional)
- ¼ cup coconut, toasted
Equipment Needed
- Blender
- Mixing Bowl
Instructions
-
Begin by preparing the strawberry puree. Place the cut-up strawberries in a blender container. Cover and blend until smooth. This will be your delicious, natural “sauce.”
-
Next, prepare the fruit mixture. In a mixing bowl, combine the 3 cups of assorted fresh fruit that has been cut into chunks. The best part about this recipe is that you can use any combination of fruits you love! Apples, bananas, cherries, plums, seedless red grapes, and peaches all work wonderfully.
-
This step is optional but recommended to prevent browning: Toss the fruit with ½ teaspoon of ascorbic acid. Ascorbic acid, also known as Vitamin C, will help to keep the fruit looking vibrant and appealing, especially if you are preparing the cones ahead of time.
-
Now, for the fun part! Carefully spoon the fruit mixture into each of the 6 giant waffle ice cream cones. Be generous, but not so much that the cones become unstable.
-
Drizzle the strawberry puree over the fruit-filled cones. Be sure to get some of that delicious sauce into every nook and cranny.
-
Finally, sprinkle the tops of the cones with ¼ cup of toasted coconut. This adds a lovely textural contrast and a hint of tropical flavor.
-
Serve immediately and enjoy!
Expert Tips & Tricks
- Toast your coconut: To enhance the flavor and texture of the coconut, spread it in a thin layer on a baking sheet and toast it in a 350°F (175°C) oven for 5-7 minutes, or until lightly golden. Watch it carefully to prevent burning.
- Prevent browning: If you don’t have ascorbic acid, you can also use lemon juice to prevent the fruit from browning. A squeeze of lemon juice over the cut fruit will help keep it looking fresh.
- Adjust sweetness: Depending on the sweetness of your fruit, you may want to add a touch of honey or maple syrup to the strawberry puree. Taste and adjust to your preference.
- Cone stability: To prevent the cones from toppling over, you can place them in cups or cone holders while you’re assembling them.
- Make it ahead: If you’re preparing these cones for a party, you can prep the fruit and strawberry puree ahead of time. Just keep them separate and assemble the cones right before serving.
- Get the kids involved: This is a great recipe to make with kids! Let them help chop the fruit (with supervision, of course) and assemble the cones.
Serving & Storage Suggestions
These Fruit Sundae Cones are best served immediately after assembly, as the cones can become soggy over time. If you have any leftover fruit mixture or strawberry puree, store them separately in airtight containers in the refrigerator. The fruit mixture will last for about 2-3 days, and the strawberry puree will last for up to 5 days. Unfortunately, assembled cones are not suitable for storing due to the cone getting soggy. It’s best to only assemble what you intend to eat right away.
Nutritional Information
| Nutrient | Amount per Serving | % Daily Value |
|---|---|---|
| Calories | 150 kcal | 8% |
| Total Fat | 3g | 5% |
| Saturated Fat | 2g | 10% |
| Cholesterol | 0mg | 0% |
| Sodium | 12mg | 1% |
| Total Carbohydrate | 30g | 10% |
| Dietary Fiber | 2g | 8% |
| Sugars | 15g | – |
| Protein | 1g | 2% |
Note: Nutritional information is an estimate and may vary based on specific ingredients and portion sizes.
Variations & Substitutions
- Tropical twist: Use tropical fruits like mango, pineapple, and papaya for a taste of the islands.
- Berry bonanza: Load up on different types of berries like blueberries, raspberries, and blackberries.
- Citrus burst: Add segments of oranges, grapefruits, and mandarins for a refreshing citrus flavor.
- Chocolate drizzle: Drizzle the cones with melted dark chocolate for an extra indulgent treat.
- Nutty delight: Sprinkle with chopped nuts like almonds, pecans, or walnuts instead of coconut.
- Dairy-free: Use a coconut whipped cream in addition to the fruit for a non-dairy treat.
- Different “sauce”: Try using a different fruit puree, such as raspberry or mango, in place of the strawberry.
FAQs (Frequently Asked Questions)
Q: Can I use frozen fruit?
A: Yes, you can use frozen fruit, but make sure to thaw it completely and drain any excess liquid before using it in the recipe. Frozen fruit may be softer in texture than fresh fruit.
Q: How can I prevent the cones from getting soggy?
A: Assemble the cones right before serving to prevent the cones from absorbing moisture from the fruit. You can also line the inside of the cones with a thin layer of melted chocolate to create a barrier.
Q: Can I make the strawberry puree ahead of time?
A: Yes, the strawberry puree can be made up to 2-3 days in advance and stored in an airtight container in the refrigerator.
Q: What if I don’t have giant waffle cones?
A: You can use regular-sized waffle cones or even sugar cones. Just adjust the amount of fruit and puree accordingly.
Q: Is ascorbic acid necessary?
A: No, ascorbic acid is not necessary, but it helps to prevent the fruit from browning. If you don’t have it, you can use lemon juice instead.
Final Thoughts
These Fruit Sundae Cones are more than just a dessert; they’re a celebration of summer’s bounty and a reminder of simpler times. I hope this recipe inspires you to get creative with your fruit and share the joy with friends and family. Don’t be afraid to experiment with different fruit combinations and toppings to create your own unique variations. And most importantly, have fun! I’d love to hear about your creations – please share your feedback and photos.